Posted on Leave a comment

I’M RUNNING LATE TODAY!

I decided to make a Mini Christmas Album for my Facebook Live today. So I thought that I would wait until it was finished and share it with you.

You can see how I made it here – just click!

Facebook Icon Symbol - Free vector graphic on Pixabay

The album will be given as a gift for Christmas, filled with messages and gift cards.

I cut 18 pieces of card using the largest of the Scalloped Contour Dies. Using three 1-1/2″x 1/2″ pieces of Basic Black card, I joined each pair of die cut ‘pages’. These pieces of black card were folded in half to create a hinge.

To create the album, each of these hinged pairs were then glued to the back of a pair. The next photo shows you how the album looks.

Each of the eight pages is made up of two of the die cut pieces of card. The Facebook video also shows you the technique I used. By joining two pices of card for each page gives the album greater stability.

Each page then had either a panel of Painted Christmas Designer Series Paper or a panel of Basic White card adhered. These pieces also worked to cover the black hinges.

The white panels provide a place to write your Christmas messages and the pockets are a place to pop a gift card or a tag with more messages.

The pages can be used to attach photos of the person you’re giving it to or can be left so that they can use the album to add photos of their Christmas celebration. The photos would need to be 3″x 2″.

To secure the album I wrapped a length of Real Red Double-stitched Satin Ribbon around the album, securing it at first with some Stampin’ Seal+. Then Iattached a panel of DSP to the front and back pages.

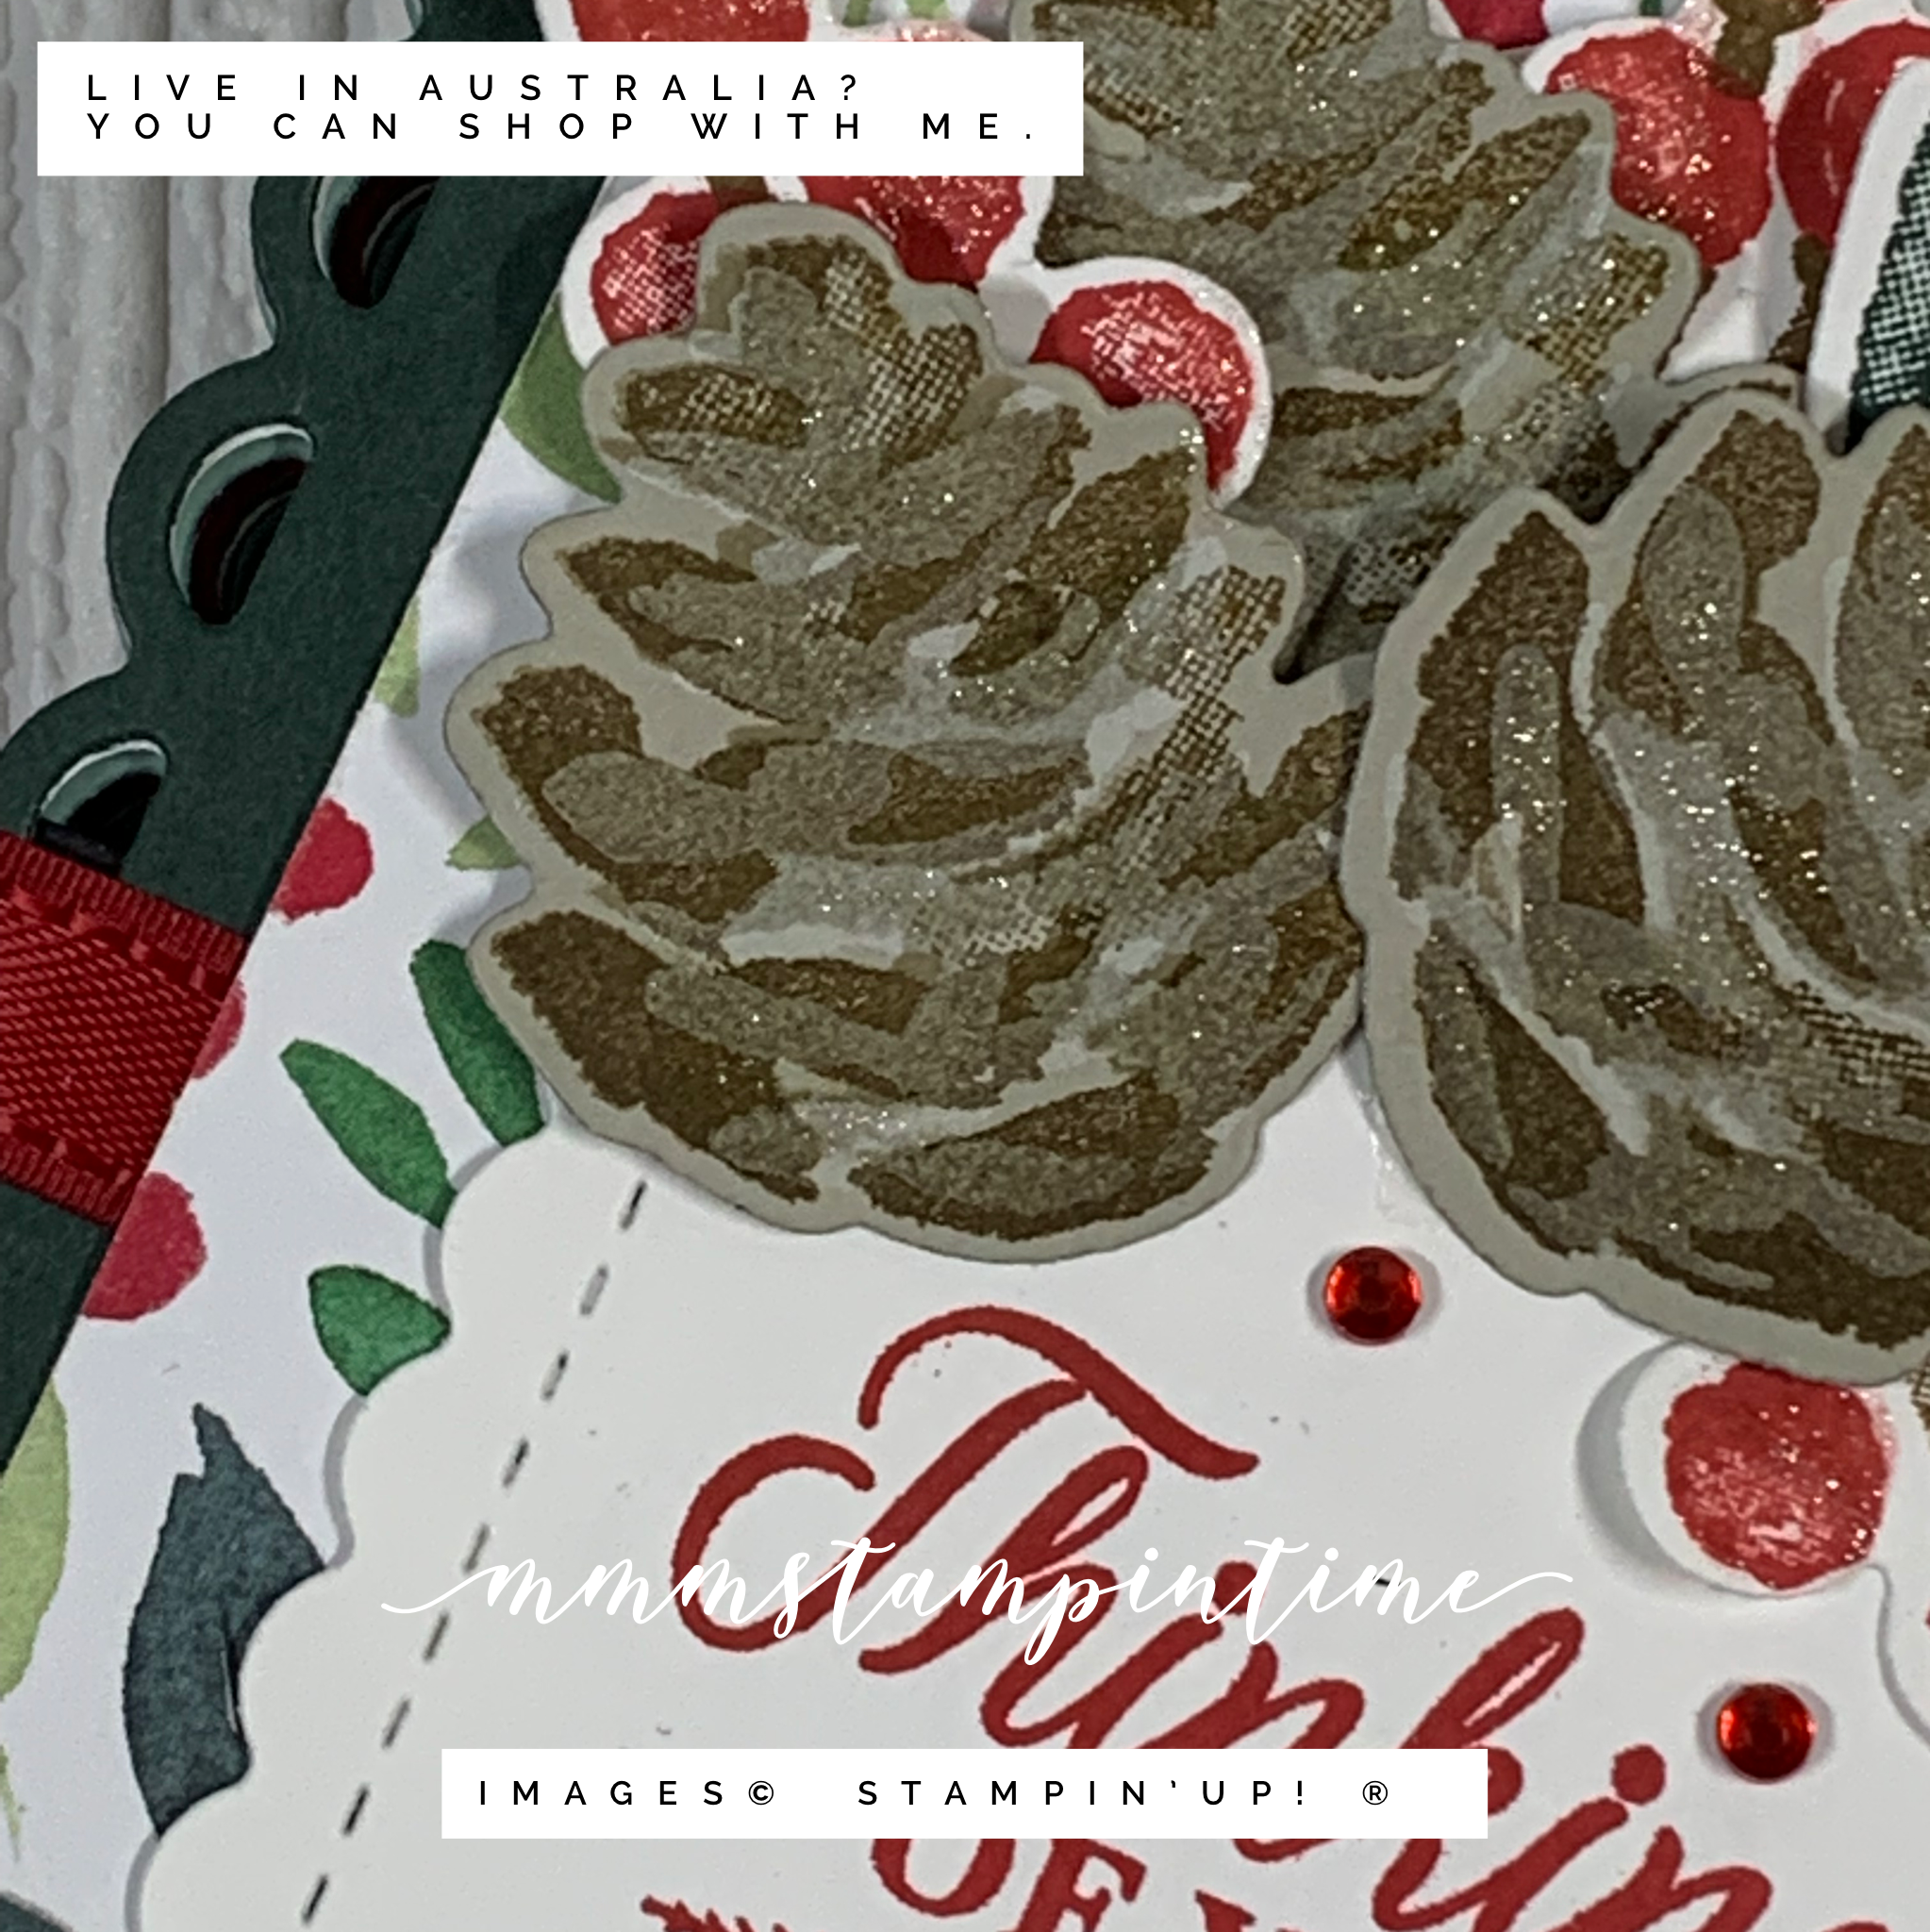
The Christmas greeting, from the Merriest Moments Stamp Set , was stamped and then cut using another of the Scalloped Contour Dies. This was attached to the front of the album.

The front was decorated with stamped and cut elements from the Christmas Season Stamp Set and Seasonal Labels Dies. I popped them on the alum frint using Multipurpose Glue and Stampin’ Dimensionals.

I finsihed the front off with a few Red Rhinestone Basic Jewels.

I am so pleased with the way this Mini Christmas Album has turned out.

Until next time, happy stamping.

If you live in Australia, you can order any of the products I used to make this card by going to my online store. Just click on any of the images below.

Product List
Whisper White Craft Stampin' Pad
Whisper White Craft Stampin’ Pad
[101731]
$14.00
Paper Snips
[103579]
$17.00
Posted on Leave a comment

JOY

Hello and happy Sunday. I’m so pleased that you have popped by.

It’s Father’s Day in Australia today – so happy Father’s Day to the men in your family.

Today I have a Christmas card to share with you.

For this project I have teamed the Merriest Moments Bundle with the Tidings of Christmas 6″x 6″ Designer Series Paper. The colours are Basic White, Cherry Cobbler, Evening Evergreen, Sahara Sand and Soft Succulent.

I also used the Seasonal Labels Dies, from the Christmas Season Bundle, to create the layers on the centre front of the card. A length of Evening Evergreen Chevron Weave Ribbon was folded under the Cherry Cobbler panel. I folded a narrow strip of DSP to create a paper ribbon and adhered it over the top die cut panel. The greeting, from the Merriest Moments Stamp Set, was stamped and trimmed.

The poinsettia shaped flowers and leaf were cut with the Merriest Frames Dies. I used the Snowy White and Red Velvet Sheets to cut these elements. The texture of these velvet sheets is lovely and soft.

I added die cut velvet flowers to the card insert and envelope before placing Cherry Cobbler Holiday Rhinestone Basic Jewels on the card.

The next time I make this card I will dry emboss the Cherry Cobbler and Soft Succulent panels.

Until next time, happy stamping.

If you live in Australia, you can order any of the products I used to make this card by going to my online store. Just click on any of the images below.

Product List
Paper Snips
[103579]
$17.00
Posted on Leave a comment

GLOBAL DESIGN CHALLENGE #GDP305

Hello! Thank you for popping by to see my latest project share.

This time last week I didn’t think that I would up to making a card for this challenge. I went into hospital on Monday for a knee replacement and came home on Thursday. Fortunately, I felt well enough this morning to make a card.

This week’s challenge is a colour challenge. The combination is Pale Papaya, Balmy Blue and Pear Pizzazz. How fun is this color combination?! There are so many ways to be creative with Stampin’ Up! challenge.

If you pop over to Global Design Project website you will be able to see the gorgeous projects the design team made to insire us – just click on the colour combination image above to be taken to the right place!

For this card I was inspired by Patty Bennetts, from Patty Stamps, to use my Blending Brushes to colour a strip of card stock.

To achieve the coloured strip, I laid down Post-It Cover-up Tape using the Grid Paper to ensure I had a parallel space to colour. I used three Blending Brushes and started with Pale Papaya at the top and moving down the card front blended in Pear Pizzazz and then Balmy Blue. The ink was given some time to dry before the Post-It strips were removed.

Then I added colour, from the coordinating Stampin’ Write Markers™, directly onto the selected floral Shaded Summer Stamps. These were then cut using the FREE Sale-a-bration Summer Shadows Dies. To ensure I had strong colour coverage I used my Stamparatus so that I could apply more colour as needed.

I added a swoosh of Pale Papaya Open Weave Ribbon to the card front before placing the die cut flower stems over the colour blended strip. Stampin’ Dimensionals were used to layer up these stems. I stamped and fussy cut additional flowers to pop up over some of the flowers to ensure the card front had height and dimension. I also gave each of the flowers a swipe of Clear Wink of Stella.

The birthday greeting is from the Shaded Summer Stamp Set and was cut using one of the new Seasonal Labels Dies. The stem of leaves was stamped inside the card and onto the envelope.

And, of course, the final step was to add some 2021 – 2023 In Colour Jewels.

I enjoy including a photograph of many of the products I have used to make the card. There are many items that I do not include, yet – cardstock, Designer Series Paper, adhesives. envelopes and paper cutting and some other equipment.

Who would you send this birthday card to?

Until next time, happy stamping.

If you live in Australia, you can order any of the products I used to make this card by going to my online store. Just click on any of the images below.

Product List
Paper Snips
[103579]
$17.00