This card is my interpretation of a creative challenge from one of the groups that I am part of. This is the source ofinspiration for the challenge: https://bit.ly/4lUJJtg
For my card, I have continued to use the Harvest Home Garland Kit.
I needed to create a ‘door’ that, when opened, would pull out and reveal other elements.
For this, I chose the Everyday Arches Dies to create a top opening door in a landscape card.

Using a Cajun Craze base with a panel of paper from the Woven Textures 12″x 12″ Desiger Series Paper, I used one of the Everyday Arches Dies to cut out the opening.
I cut this shape out a few more times to create a hinged ‘door’.
A length of Linen Thread was wrapped several times across the top of the card before being tid in a bow.
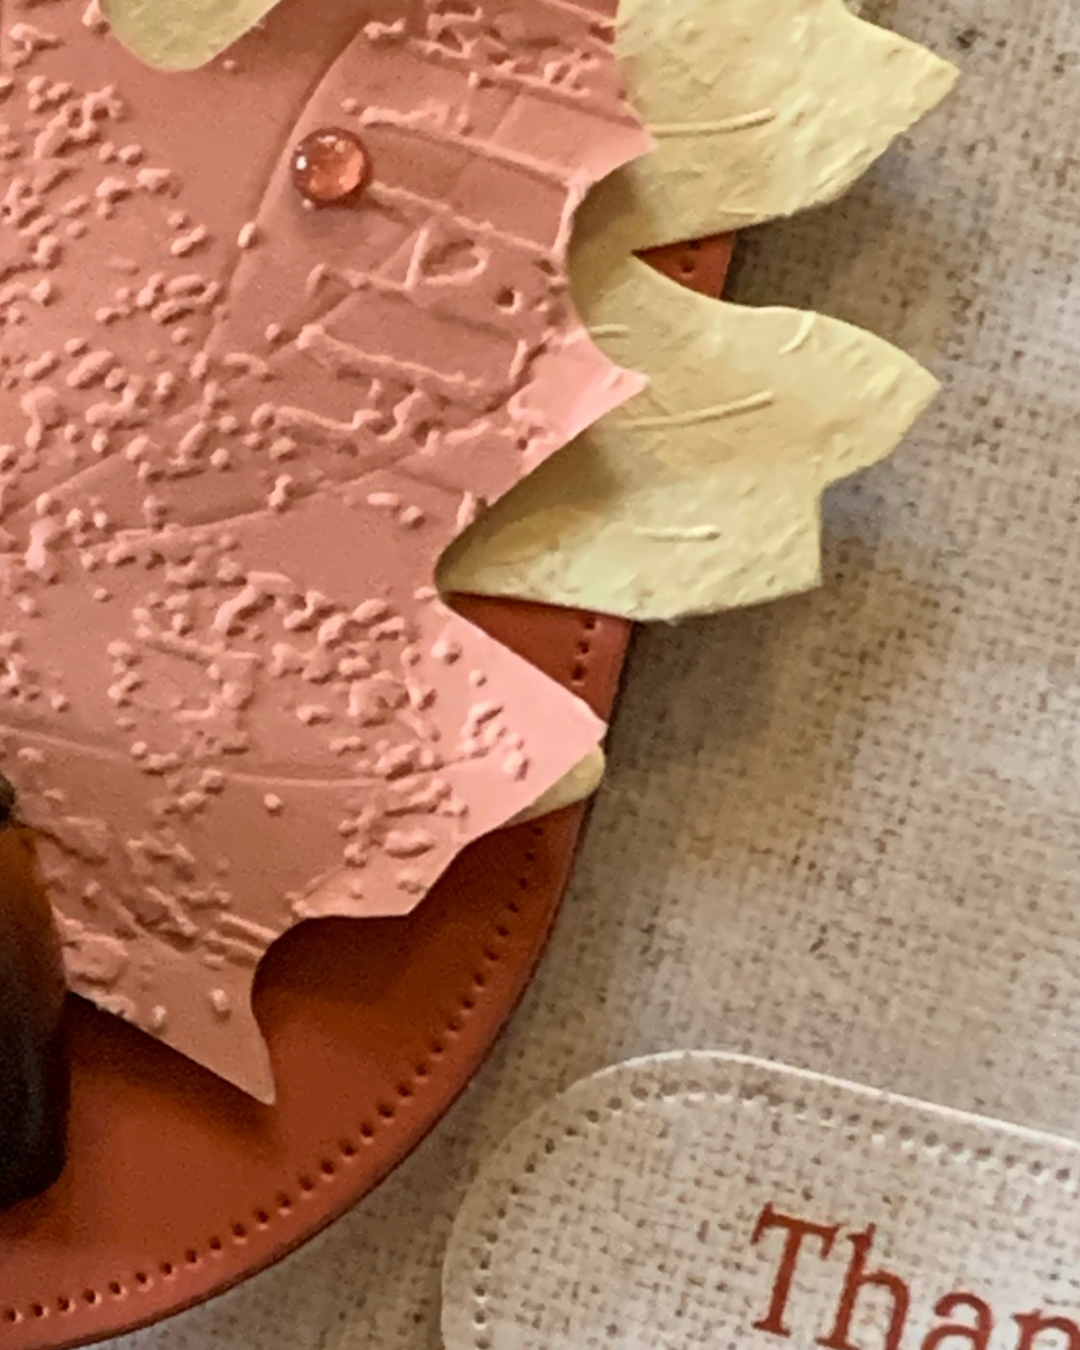
To decorate the front of the ‘door’, I added a Very Vanillla leaf from the kit and embossed a lighter Cajun Craze leaf with the Exposed Brick 3D Embossing Folder. After these were added to the ‘door’ front, I added half an acorn.
I took a 1/2′ strip of card, folded it back 1/2″ and adhered it to the back of the ‘door’. Then I adhered two more leaves to it.
When the card is closed and the ‘door’ opened, the two extra leaves are pulled up.

The card has a panel of Very Vanilla card adhered inside.
The greeting, from the Beautiful Motifs Stamp Set, was stamped using Cajun craze ink and hen cut using the smallest of the Everyday Arches Dies. I attached it to the card front with Stampin’ Dimensionals.
Then I added some of the new Cajun Craze & Gold Dots to the card, both on the front and inside.

I love the way the leaves look after they are embossed.
Woohoo – I am so happy with the projects I have made this week using the Harvest Home Garland Kit.
WHICH ONE DO YOU LIKE THE BEST? WHICH ONE WOUD YOU MAKE?
Please reach out and let me know.
Next week I will another collection of projects to share with you.
Until then, happy stamping and scrapbooking.

If you live in Australia, you can order any of the products I used to make this card by going to my online store. Just click on any of the images below.

![Harvest Home Garland Kit [ 166228 ]](https://i0.wp.com/assets1.tamsnetwork.com/images/EC042017NF/166228s.jpg?w=140&ssl=1 "Harvest Home Garland Kit [ 166228 ]") | ![Exposed Brick 3 D Embossing Folder [ 161600 ]](https://i0.wp.com/assets1.tamsnetwork.com/images/EC042017NF/161600s.jpg?w=140&ssl=1 "Exposed Brick 3 D Embossing Folder [ 161600 ]") | ![Everyday Arches Dies [ 164629 ]](https://i0.wp.com/assets1.tamsnetwork.com/images/EC042017NF/164629s.jpg?w=140&ssl=1 "Everyday Arches Dies [ 164629 ]") | ![Linen Thread [ 104199 ]](https://i0.wp.com/assets1.tamsnetwork.com/images/EC042017NF/104199s.jpg?w=140&ssl=1 "Linen Thread [ 104199 ]") | |
![Cajun Craze A4 Card Stock [ 121683 ]](https://i0.wp.com/assets1.tamsnetwork.com/images/EC042017NF/121683s.jpg?w=140&ssl=1 "Cajun Craze A4 Card Stock [ 121683 ]") | ![Very Vanilla A4 Cardstock [ 166785 ]](https://i0.wp.com/assets1.tamsnetwork.com/images/EC042017NF/166785s.jpg?w=140&ssl=1 "Very Vanilla A4 Cardstock [ 166785 ]") | ![Multipurpose Liquid Glue [ 110755 ]](https://i0.wp.com/assets1.tamsnetwork.com/images/EC042017NF/110755s.jpg?w=140&ssl=1 "Multipurpose Liquid Glue [ 110755 ]") | ![Mini Glue Dots [ 103683 ]](https://i0.wp.com/assets1.tamsnetwork.com/images/EC042017NF/103683s.jpg?w=140&ssl=1 "Mini Glue Dots [ 103683 ]") | ![Stampin' Dimensionals [ 104430 ]](https://i0.wp.com/assets1.tamsnetwork.com/images/EC042017NF/104430s.jpg?w=140&ssl=1 "Stampin' Dimensionals [ 104430 ]") |
![Bone Folder [ 102300 ]](https://i0.wp.com/assets1.tamsnetwork.com/images/EC042017NF/102300s.jpg?w=140&ssl=1 "Bone Folder [ 102300 ]") | ![Paper Snips [ 103579 ]](https://i0.wp.com/assets1.tamsnetwork.com/images/EC042017NF/103579s.jpg?w=140&ssl=1 "Paper Snips [ 103579 ]") | ![Paper Trimmer [ 152392 ]](https://i0.wp.com/assets1.tamsnetwork.com/images/EC042017NF/152392s.jpg?w=140&ssl=1 "Paper Trimmer [ 152392 ]") | ![Stampin' Cut & Emboss Machine [ 149653 ]](https://i0.wp.com/assets1.tamsnetwork.com/images/EC042017NF/149653s.jpg?w=140&ssl=1 "Stampin' Cut & Emboss Machine [ 149653 ]") | ![Very Vanilla C6 Envelopes [ 106589 ]](https://i0.wp.com/assets1.tamsnetwork.com/images/EC042017NF/106589s.jpg?w=140&ssl=1 "Very Vanilla C6 Envelopes [ 106589 ]") |
![Woven Textures 12" X 12" (30.5 X 30.5 Cm) Designer Series Paper [ 165560 ]](https://i0.wp.com/assets1.tamsnetwork.com/images/EC042017NF/165560s.jpg?w=140&ssl=1 "Woven Textures 12\" X 12\" (30.5 X 30.5 Cm) Designer Series Paper [ 165560 ]")



![Drusy Adhesive Backed Embellishments [ 164223 ]](https://i0.wp.com/assets1.tamsnetwork.com/images/EC042017NF/164223s.jpg?w=140&ssl=1 "Drusy Adhesive Backed Embellishments [ 164223 ]")
![Purple Fine Shimmer Gems [ 162611 ]](https://i0.wp.com/assets1.tamsnetwork.com/images/EC042017NF/162611s.jpg?w=140&ssl=1 "Purple Fine Shimmer Gems [ 162611 ]")
![Gold & Silver 1/8" (3.2 Mm) Trim Combo Pack [ 161633 ]](https://i0.wp.com/assets1.tamsnetwork.com/images/EC042017NF/161633s.jpg?w=140&ssl=1 "Gold & Silver 1/8\" (3.2 Mm) Trim Combo Pack [ 161633 ]")
![Basic White A4 Cardstock [ 166781 ]](https://i0.wp.com/assets1.tamsnetwork.com/images/EC042017NF/166781s.jpg?w=140&ssl=1 "Basic White A4 Cardstock [ 166781 ]")
![Berry Burst A4 Cardstock [ 144249 ]](https://i0.wp.com/assets1.tamsnetwork.com/images/EC042017NF/144249s.jpg?w=140&ssl=1 "Berry Burst A4 Cardstock [ 144249 ]")
![Night Of Navy A4 Card Stock [ 106577 ]](https://i0.wp.com/assets1.tamsnetwork.com/images/EC042017NF/106577s.jpg?w=140&ssl=1 "Night Of Navy A4 Card Stock [ 106577 ]")
![Pretty Peacock A4 Cardstock [ 150886 ]](https://i0.wp.com/assets1.tamsnetwork.com/images/EC042017NF/150886s.jpg?w=140&ssl=1 "Pretty Peacock A4 Cardstock [ 150886 ]")
![Berry Burst Classic Stampin' Pad [ 147143 ]](https://i0.wp.com/assets1.tamsnetwork.com/images/EC042017NF/147143s.jpg?w=140&ssl=1 "Berry Burst Classic Stampin' Pad [ 147143 ]")
![Night Of Navy Classic Stampin' Pad [ 147110 ]](https://i0.wp.com/assets1.tamsnetwork.com/images/EC042017NF/147110s.jpg?w=140&ssl=1 "Night Of Navy Classic Stampin' Pad [ 147110 ]")
![Berry Burst Stampin’ Blends Combo Pack [ 161681 ]](https://i0.wp.com/assets1.tamsnetwork.com/images/EC042017NF/161681s.jpg?w=140&ssl=1 "Berry Burst Stampin’ Blends Combo Pack [ 161681 ]")
![Tear & Tape Adhesive [ 154031 ]](https://i0.wp.com/assets1.tamsnetwork.com/images/EC042017NF/154031s.jpg?w=140&ssl=1 "Tear & Tape Adhesive [ 154031 ]")
![1-3/4" (4.4 Cm) Circle Punch [ 119850 ]](https://i0.wp.com/assets1.tamsnetwork.com/images/EC042017NF/119850s.jpg?w=140&ssl=1 "1-3/4\" (4.4 Cm) Circle Punch [ 119850 ]")
![1 7/8" (4.8 Cm) Circle Punch [ 165259 ]](https://i0.wp.com/assets1.tamsnetwork.com/images/EC042017NF/165259s.jpg?w=140&ssl=1 "1 7/8\" (4.8 Cm) Circle Punch [ 165259 ]")
![Mini Stampin' Cut & Emboss Machine [ 150673 ]](https://i0.wp.com/assets1.tamsnetwork.com/images/EC042017NF/150673s.jpg?w=140&ssl=1 "Mini Stampin' Cut & Emboss Machine [ 150673 ]")



![Basic White A4 Thick Cardstock [ 159230 ]](https://i0.wp.com/assets1.tamsnetwork.com/images/EC042017NF/159230s.jpg?w=140&ssl=1 "Basic White A4 Thick Cardstock [ 159230 ]")
![Misty Moonlight A4 Cardstock [ 153086 ]](https://i0.wp.com/assets1.tamsnetwork.com/images/EC042017NF/153086s.jpg?w=140&ssl=1 "Misty Moonlight A4 Cardstock [ 153086 ]")
![Misty Moonlight Classic Stampin' Pad [ 153118 ]](https://i0.wp.com/assets1.tamsnetwork.com/images/EC042017NF/153118s.jpg?w=140&ssl=1 "Misty Moonlight Classic Stampin' Pad [ 153118 ]")




