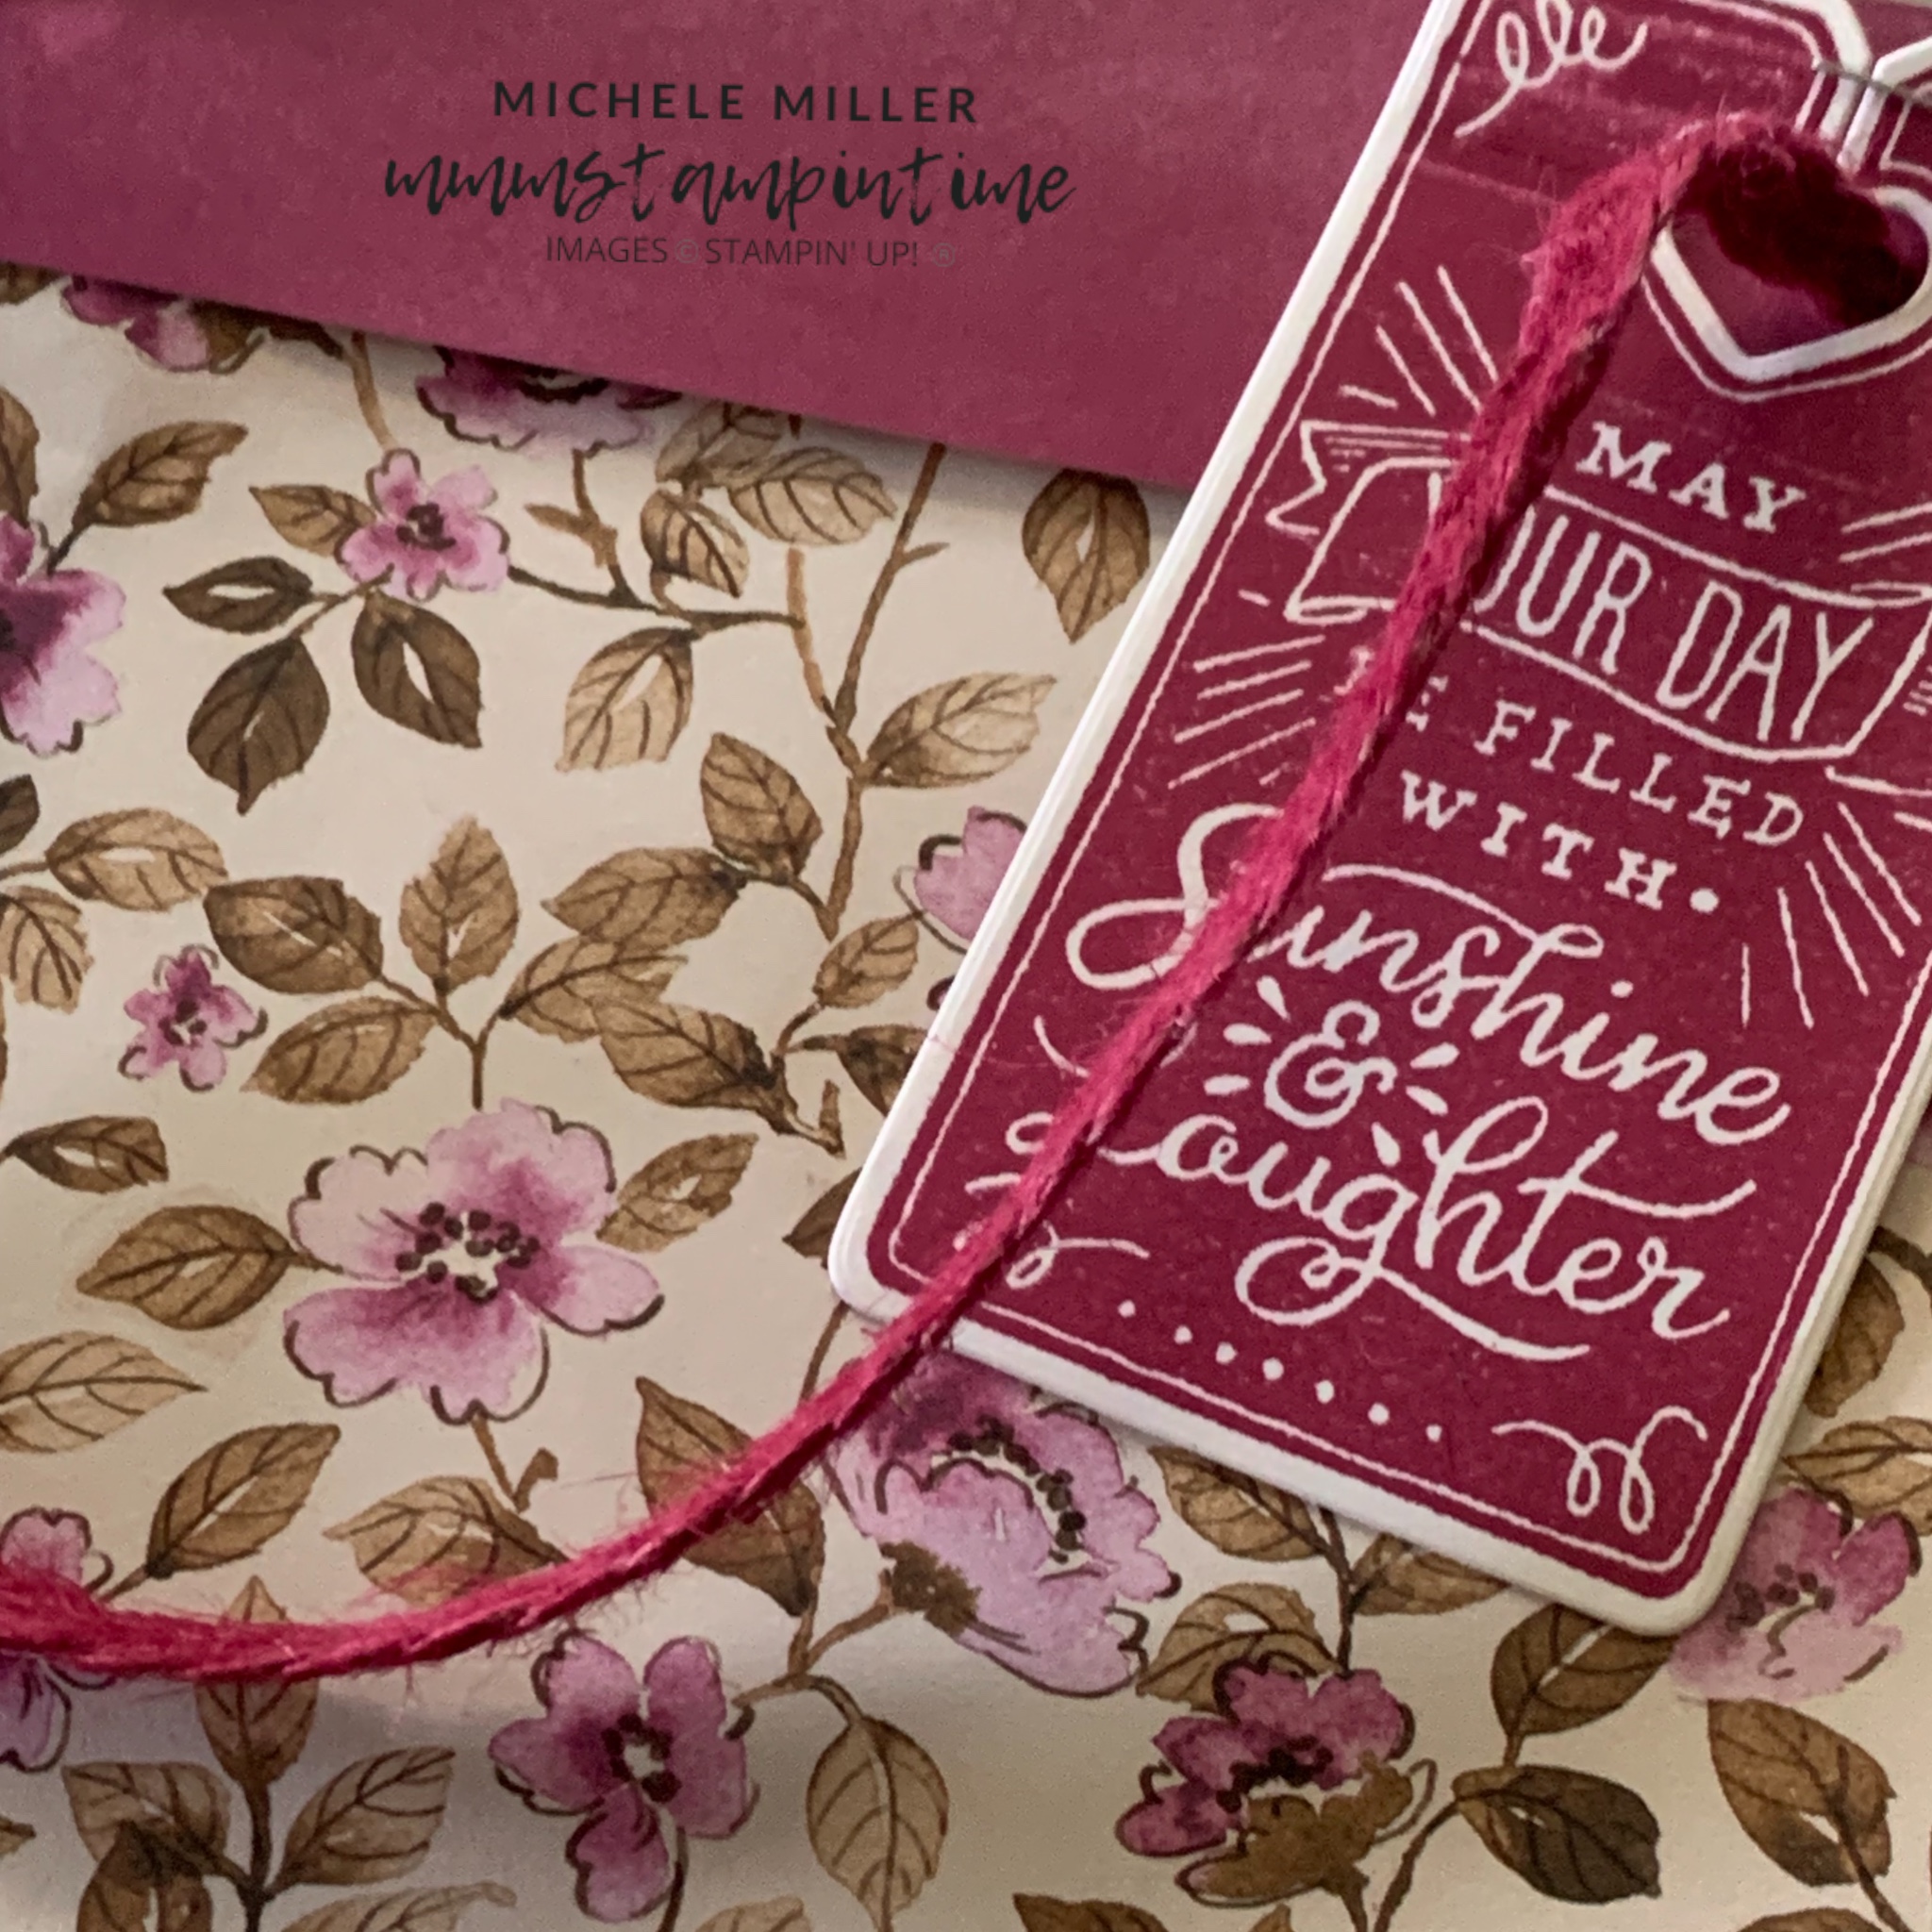
The Designer Series Paper in the Floral Charm Suite Collection is perfect for creating gorgeous gift bags.

I used 2 sheets of the DSP to make the bag.
The top of the bag was scored at 1 1/2″. The other three sides were scored at 3″.
After burnishing all the scored lines the bag was ready for construction. I started by turning the top down to create a contrasting rim.

After trimming the corners and folding in the scored sides I was able to fit the two bag pieces inside each other and adhere the bag together.
Once the adhesive was dry I pinched the sides of the bag together. Then I punched holes in the top edge of the bag.
I took a long length of the Petal Pink Braided Trim and coloured it to coordinate with the Berry Burst colour in the DSP.
The trim was then threaded through the holes and tied off.

I used the Paper Tags Bundle to make the tag for this bag. The greeting was stamped in Berry Burst and die cut. The heart at the top of the tag made it easy to slide over the trim. I stapled the top of the tag closed.
Now I need to find something that is all about “sunshine & laughter” to fill the bag.

Tomorrow I have a fun fold card to share with you.
Until then, happy stamping and scrapbooking.

If you live in Australia, you can order any of the products I used to make this card by going to my online store. Just click on any of the images below.

![Paper Tags Bundle (English) [ 165462 ]](https://i0.wp.com/assets1.tamsnetwork.com/images/EC042017NF/165462s.jpg?w=140&ssl=1 "Paper Tags Bundle (English) [ 165462 ]") | ![Paper Tags Dies [ 165461 ]](https://i0.wp.com/assets1.tamsnetwork.com/images/EC042017NF/165461s.jpg?w=140&ssl=1 "Paper Tags Dies [ 165461 ]") | ![Basic White A4 Cardstock [ 166781 ]](https://i0.wp.com/assets1.tamsnetwork.com/images/EC042017NF/166781s.jpg?w=140&ssl=1 "Basic White A4 Cardstock [ 166781 ]") | |
![Berry Burst Classic Stampin' Pad [ 147143 ]](https://i0.wp.com/assets1.tamsnetwork.com/images/EC042017NF/147143s.jpg?w=140&ssl=1 "Berry Burst Classic Stampin' Pad [ 147143 ]") | ![Multipurpose Liquid Glue [ 110755 ]](https://i0.wp.com/assets1.tamsnetwork.com/images/EC042017NF/110755s.jpg?w=140&ssl=1 "Multipurpose Liquid Glue [ 110755 ]") | ![Paper Trimmer [ 152392 ]](https://i0.wp.com/assets1.tamsnetwork.com/images/EC042017NF/152392s.jpg?w=140&ssl=1 "Paper Trimmer [ 152392 ]") |
![Paper Tags Cling Stamp Set (English) [ 165454 ]](https://i0.wp.com/assets1.tamsnetwork.com/images/EC042017NF/165454s.jpg?w=140&ssl=1 "Paper Tags Cling Stamp Set (English) [ 165454 ]")
![Berry Burst Stampin’ Blends Combo Pack [ 161681 ]](https://i0.wp.com/assets1.tamsnetwork.com/images/EC042017NF/161681s.jpg?w=140&ssl=1 "Berry Burst Stampin’ Blends Combo Pack [ 161681 ]")



![Encircled With Love Photopolymer Stamp Set (English) [ 165338 ]](https://i0.wp.com/assets1.tamsnetwork.com/images/EC042017NF/165338s.jpg?w=140&ssl=1 "Encircled With Love Photopolymer Stamp Set (English) [ 165338 ]")
![Lifetime Of Love Dies [ 162583 ]](https://i0.wp.com/assets1.tamsnetwork.com/images/EC042017NF/162583s.jpg?w=140&ssl=1 "Lifetime Of Love Dies [ 162583 ]")
![2025–2027 In Color™ Flat Pearls [ 165192 ]](https://i0.wp.com/assets1.tamsnetwork.com/images/EC042017NF/165192s.jpg?w=140&ssl=1 "2025–2027 In Color™ Flat Pearls [ 165192 ]")
![1-3/4" (4.4 Cm) Circle Punch [ 119850 ]](https://i0.wp.com/assets1.tamsnetwork.com/images/EC042017NF/119850s.jpg?w=140&ssl=1 "1-3/4\" (4.4 Cm) Circle Punch [ 119850 ]")
![1 7/8" (4.8 Cm) Circle Punch [ 165259 ]](https://i0.wp.com/assets1.tamsnetwork.com/images/EC042017NF/165259s.jpg?w=140&ssl=1 "1 7/8\" (4.8 Cm) Circle Punch [ 165259 ]")
![Old Olive 12" X 12" (30.5 X 30.5 Cm) Two Tone Cardstock [ 166683 ]](https://i0.wp.com/assets1.tamsnetwork.com/images/EC042017NF/166683s.jpg?w=140&ssl=1 "Old Olive 12\" X 12\" (30.5 X 30.5 Cm) Two Tone Cardstock [ 166683 ]")
![Secret Sea Classic Stampin' Pad [ 165285 ]](https://i0.wp.com/assets1.tamsnetwork.com/images/EC042017NF/165285s.jpg?w=140&ssl=1 "Secret Sea Classic Stampin' Pad [ 165285 ]")
![Stampin' Dimensionals [ 104430 ]](https://i0.wp.com/assets1.tamsnetwork.com/images/EC042017NF/104430s.jpg?w=140&ssl=1 "Stampin' Dimensionals [ 104430 ]")
![Adhesive Sheets [ 152334 ]](https://i0.wp.com/assets1.tamsnetwork.com/images/EC042017NF/152334s.jpg?w=140&ssl=1 "Adhesive Sheets [ 152334 ]")
![Tear & Tape Adhesive [ 154031 ]](https://i0.wp.com/assets1.tamsnetwork.com/images/EC042017NF/154031s.jpg?w=140&ssl=1 "Tear & Tape Adhesive [ 154031 ]")
![Basic White C6 Envelopes [ 159235 ]](https://i0.wp.com/assets1.tamsnetwork.com/images/EC042017NF/159235s.jpg?w=140&ssl=1 "Basic White C6 Envelopes [ 159235 ]")



![Beautiful Motifs Dies [ 165205 ]](https://i0.wp.com/assets1.tamsnetwork.com/images/EC042017NF/165205s.jpg?w=140&ssl=1 "Beautiful Motifs Dies [ 165205 ]")
![Damask Designs Embossing Folder [ 165214 ]](https://i0.wp.com/assets1.tamsnetwork.com/images/EC042017NF/165214s.jpg?w=140&ssl=1 "Damask Designs Embossing Folder [ 165214 ]")
![Drusy Adhesive Backed Embellishments [ 164223 ]](https://i0.wp.com/assets1.tamsnetwork.com/images/EC042017NF/164223s.jpg?w=140&ssl=1 "Drusy Adhesive Backed Embellishments [ 164223 ]")
![Blackberry Bliss A4 Cardstock [ 133682 ]](https://i0.wp.com/assets1.tamsnetwork.com/images/EC042017NF/133682s.jpg?w=140&ssl=1 "Blackberry Bliss A4 Cardstock [ 133682 ]")
![Blackberry Bliss Classic Stampin' Pad [ 147092 ]](https://i0.wp.com/assets1.tamsnetwork.com/images/EC042017NF/147092s.jpg?w=140&ssl=1 "Blackberry Bliss Classic Stampin' Pad [ 147092 ]")
![Blackberry Bliss Stampin' Blends Combo Pack [ 154877 ]](https://i0.wp.com/assets1.tamsnetwork.com/images/EC042017NF/154877s.jpg?w=140&ssl=1 "Blackberry Bliss Stampin' Blends Combo Pack [ 154877 ]")
![Mini Stampin' Dimensionals [ 144108 ]](https://i0.wp.com/assets1.tamsnetwork.com/images/EC042017NF/144108s.jpg?w=140&ssl=1 "Mini Stampin' Dimensionals [ 144108 ]")
![Stampin' Cut & Emboss Machine [ 149653 ]](https://i0.wp.com/assets1.tamsnetwork.com/images/EC042017NF/149653s.jpg?w=140&ssl=1 "Stampin' Cut & Emboss Machine [ 149653 ]")




