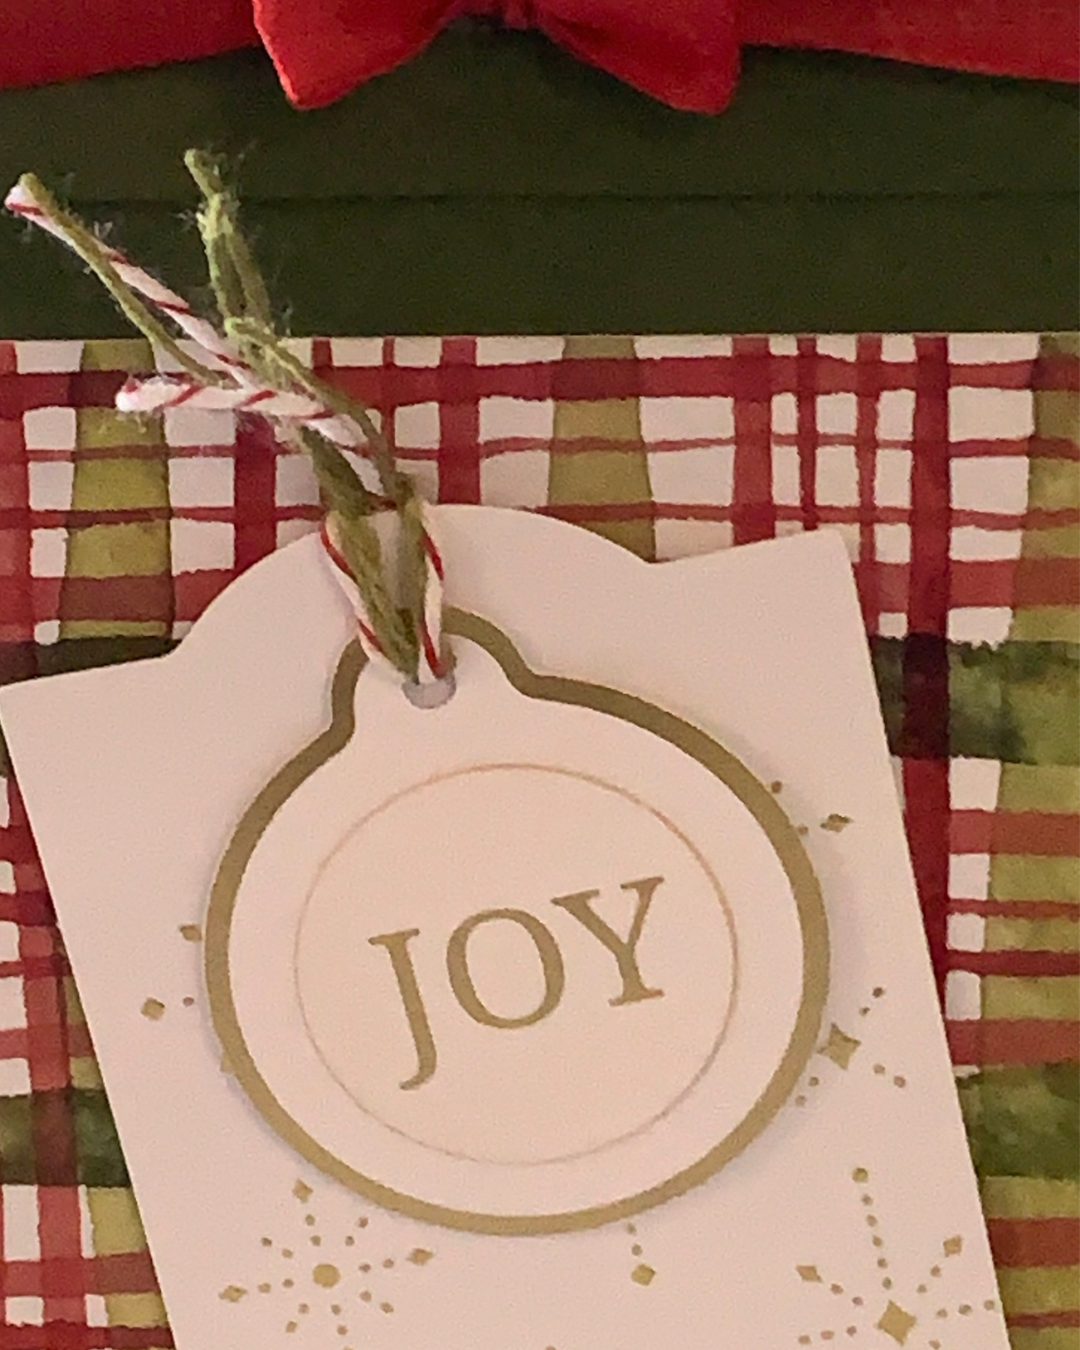
Today I have a gift box to share with you.
The box measures 5 1/2″x 3 1/2″ because I wanted to be able to add half a 6″x 4″ Joyful Days Memories & More Card on each of the sides.

The box was made using Old Olive card.
I decorated the sides and lid with some of Memories & More cards.

I took a length of Real Red Shiny Ribbon and tied a sweet little bow before securing it around the lid.
One of the tags from the A Touch of Gold Mix & Match Specialty Ephemera Pack had the stars design, from the Metallic Texture Rub-Ons (165270 $24AU), transferred onto it.
Then I added the circular ‘joy’ bauble, from the Greetings for You Mix & Match Ephemera Pack, to the tag and threaded Old Olive and Red/White twines through the holes and tied them off. I used Stampin’ Dimensionals to attach them to the front of the box.

I am always pleased when I finish a 3D project.
Tomorrow I have a funfold card to share with you.
Until then, happy stamping and scrapbooking.

If you live in Australia, you can order any of the products I used to make this card by going to my online store. Just click on any of the images below.

![Metallic Textures Rub Ons [ 165270 ]](https://i0.wp.com/assets1.tamsnetwork.com/images/EC042017NF/165270s.jpg?w=140&ssl=1 "Metallic Textures Rub Ons [ 165270 ]") | ||||
![Real Red & White Baker's Twine [ 164051 ]](https://i0.wp.com/assets1.tamsnetwork.com/images/EC042017NF/164051s.jpg?w=140&ssl=1 "Real Red & White Baker's Twine [ 164051 ]") | ![Old Olive A4 Card Stock [ 106576 ]](https://i0.wp.com/assets1.tamsnetwork.com/images/EC042017NF/106576s.jpg?w=140&ssl=1 "Old Olive A4 Card Stock [ 106576 ]") | ![Mini Glue Dots [ 103683 ]](https://i0.wp.com/assets1.tamsnetwork.com/images/EC042017NF/103683s.jpg?w=140&ssl=1 "Mini Glue Dots [ 103683 ]") | ![Stampin' Dimensionals [ 104430 ]](https://i0.wp.com/assets1.tamsnetwork.com/images/EC042017NF/104430s.jpg?w=140&ssl=1 "Stampin' Dimensionals [ 104430 ]") | |
![Multipurpose Liquid Glue [ 110755 ]](https://i0.wp.com/assets1.tamsnetwork.com/images/EC042017NF/110755s.jpg?w=140&ssl=1 "Multipurpose Liquid Glue [ 110755 ]") | ![Stampin' Seal+ [ 149699 ]](https://i0.wp.com/assets1.tamsnetwork.com/images/EC042017NF/149699s.jpg?w=140&ssl=1 "Stampin' Seal+ [ 149699 ]") | ![Paper Snips [ 103579 ]](https://i0.wp.com/assets1.tamsnetwork.com/images/EC042017NF/103579s.jpg?w=140&ssl=1 "Paper Snips [ 103579 ]") | ![Paper Trimmer [ 152392 ]](https://i0.wp.com/assets1.tamsnetwork.com/images/EC042017NF/152392s.jpg?w=140&ssl=1 "Paper Trimmer [ 152392 ]") |
![Greetings For You Mix & Match Ephemera Pack (English) [ 166208 ]](https://i0.wp.com/assets1.tamsnetwork.com/images/EC042017NF/166208s.jpg?w=140&ssl=1 "Greetings For You Mix & Match Ephemera Pack (English) [ 166208 ]")
![A Touch Of Gold Tags Mix & Match Specialty Ephemera Pack [ 165355 ]](https://i0.wp.com/assets1.tamsnetwork.com/images/EC042017NF/165355s.jpg?w=140&ssl=1 "A Touch Of Gold Tags Mix & Match Specialty Ephemera Pack [ 165355 ]")
![Joyful Days Memories & More Card Pack [ 165822 ]](https://i0.wp.com/assets1.tamsnetwork.com/images/EC042017NF/165822s.jpg?w=140&ssl=1 "Joyful Days Memories & More Card Pack [ 165822 ]")
![Real Red 1/2" (1.3 Cm) Shiny Ribbon [ 165876 ]](https://i0.wp.com/assets1.tamsnetwork.com/images/EC042017NF/165876s.jpg?w=140&ssl=1 "Real Red 1/2\" (1.3 Cm) Shiny Ribbon [ 165876 ]")
![Early Espresso & Old Olive Linen Thread Pack [ 165986 ]](https://i0.wp.com/assets1.tamsnetwork.com/images/EC042017NF/165986s.jpg?w=140&ssl=1 "Early Espresso & Old Olive Linen Thread Pack [ 165986 ]")


![Sweet Blooms Dies (English) [ 165186 ]](https://i0.wp.com/assets1.tamsnetwork.com/images/EC042017NF/165186s.jpg?w=140&ssl=1 "Sweet Blooms Dies (English) [ 165186 ]")
![Stylish Shapes Dies [ 159183 ]](https://i0.wp.com/assets1.tamsnetwork.com/images/EC042017NF/159183s.jpg?w=140&ssl=1 "Stylish Shapes Dies [ 159183 ]")
![Basic Black 12" X 12" (30.5 X 30.5 Cm) Two Tone Cardstock [ 166704 ]](https://i0.wp.com/assets1.tamsnetwork.com/images/EC042017NF/166704s.jpg?w=140&ssl=1 "Basic Black 12\" X 12\" (30.5 X 30.5 Cm) Two Tone Cardstock [ 166704 ]")
![Gold Foil Sheets [ 132622 ]](https://i0.wp.com/assets1.tamsnetwork.com/images/EC042017NF/132622s.jpg?w=140&ssl=1 "Gold Foil Sheets [ 132622 ]")
![Black Stampin' Dimensionals Combo Pack [ 150893 ]](https://i0.wp.com/assets1.tamsnetwork.com/images/EC042017NF/150893s.jpg?w=140&ssl=1 "Black Stampin' Dimensionals Combo Pack [ 150893 ]")
![Mini Stampin' Cut & Emboss Machine [ 150673 ]](https://i0.wp.com/assets1.tamsnetwork.com/images/EC042017NF/150673s.jpg?w=140&ssl=1 "Mini Stampin' Cut & Emboss Machine [ 150673 ]")
![Basic White C6 Envelopes [ 159235 ]](https://i0.wp.com/assets1.tamsnetwork.com/images/EC042017NF/159235s.jpg?w=140&ssl=1 "Basic White C6 Envelopes [ 159235 ]")


![Impressions Abloom Dies [ 165610 ]](https://i0.wp.com/assets1.tamsnetwork.com/images/EC042017NF/165610s.jpg?w=140&ssl=1 "Impressions Abloom Dies [ 165610 ]")
![Gold Twisted Thread [ 164603 ]](https://i0.wp.com/assets1.tamsnetwork.com/images/EC042017NF/164603s.jpg?w=140&ssl=1 "Gold Twisted Thread [ 164603 ]")
![Stampin' Cut & Emboss Machine [ 149653 ]](https://i0.wp.com/assets1.tamsnetwork.com/images/EC042017NF/149653s.jpg?w=140&ssl=1 "Stampin' Cut & Emboss Machine [ 149653 ]")




