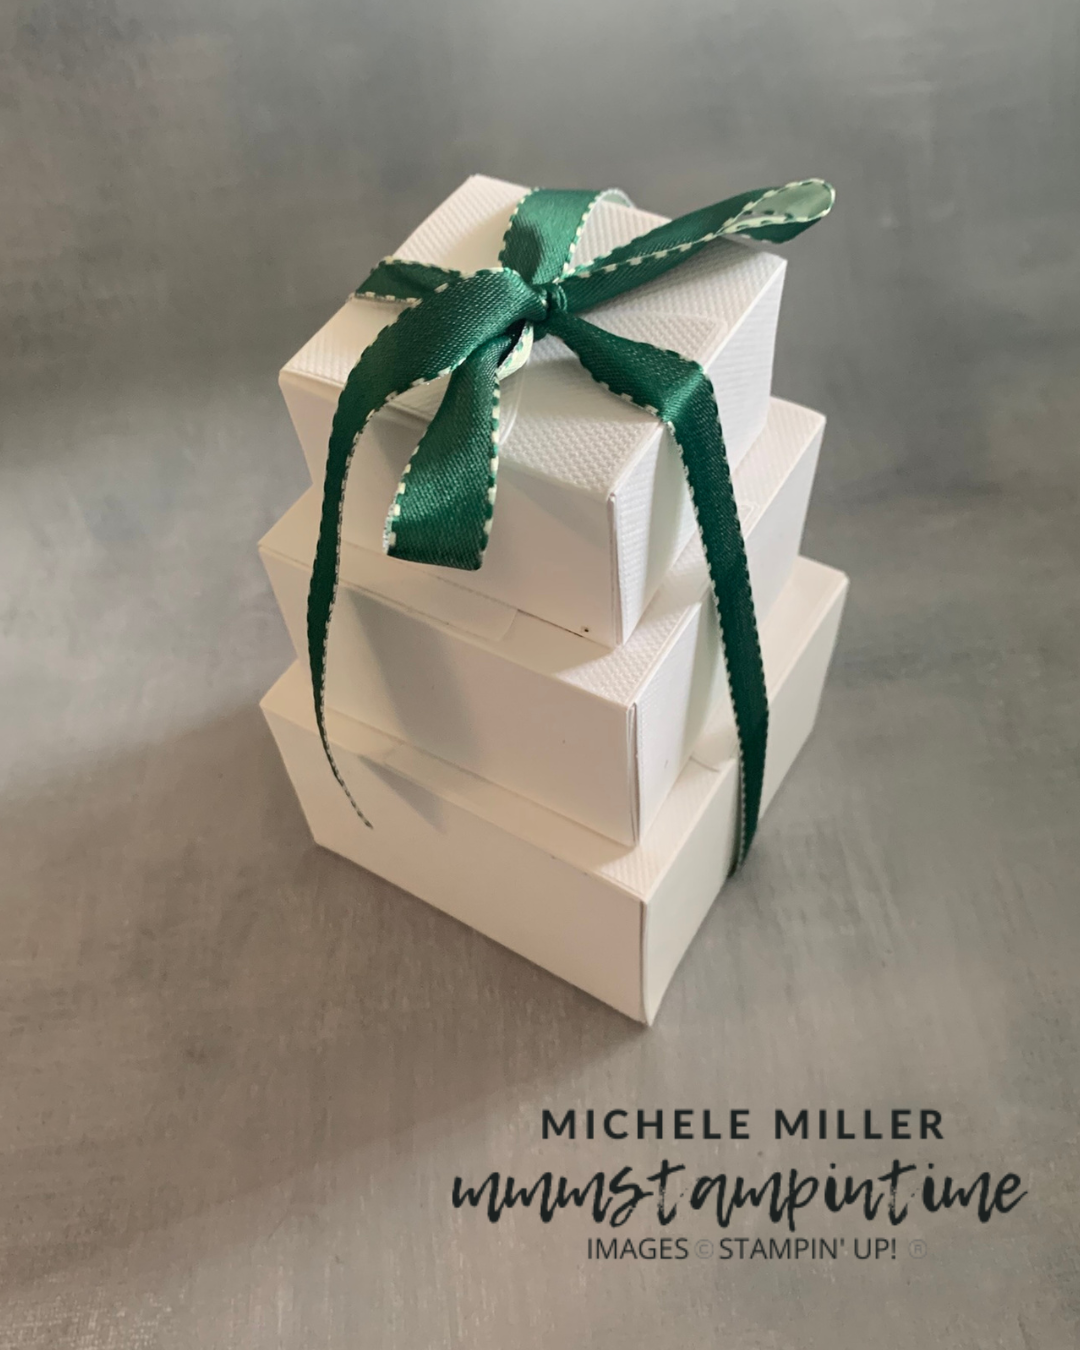
The gift boxes I want to share with you have no connection to the On Display projects I have already shared this week.
Instead, I have used the Party Banners Dies and the soon to be released Whipsers of Texture Specialty Paper.
I used three different sie sizes to create the 3 different box sizes.

Counting the dies from the largest to smallest, I used 6, 9 and 11.
For each box I cut 4 banners and then scored them – from the narrow, straight edge the score measurememnts were:
smallest box is scored at 2 1/4″ and 3 5/8″;
medium box is scored at 2 7/8″ and 4 3/4″; and
large box is scored at 3 1/2″ and 5 3/4″.

After scoring the banners, I used a bone folder to achieve a crisp fold line.
I used Stampin’ Seal+ to securely adhere the base and sides of the box base.
The banner ends were then folded in to create the closure at the top.

I used a length of Shaded Spruce & Soft Sea Foam Bordered Ribbon to present the boxes as a set.
Tomorrow I have one final card to share with you. It is not a fun fold card but a little more intricate than usual.

If you live in Australia, you can order any of the products I used to make this card by going to my online store. Just click on any of the images below.

![Party Banners Dies [ 165264 ]](https://i0.wp.com/assets1.tamsnetwork.com/images/EC042017NF/165264s.jpg?w=140&ssl=1 "Party Banners Dies [ 165264 ]") | ![Stampin' Seal+ [ 149699 ]](https://i0.wp.com/assets1.tamsnetwork.com/images/EC042017NF/149699s.jpg?w=140&ssl=1 "Stampin' Seal+ [ 149699 ]") | |
![Stampin' Cut & Emboss Machine [ 149653 ]](https://i0.wp.com/assets1.tamsnetwork.com/images/EC042017NF/149653s.jpg?w=140&ssl=1 "Stampin' Cut & Emboss Machine [ 149653 ]") | ![Paper Snips [ 103579 ]](https://i0.wp.com/assets1.tamsnetwork.com/images/EC042017NF/103579s.jpg?w=140&ssl=1 "Paper Snips [ 103579 ]") | ![Paper Trimmer [ 152392 ]](https://i0.wp.com/assets1.tamsnetwork.com/images/EC042017NF/152392s.jpg?w=140&ssl=1 "Paper Trimmer [ 152392 ]") |
![Shaded Spruce & Soft Sea Foam 1/2" (1.3 Cm) Ribbon [ 165234 ]](https://i0.wp.com/assets1.tamsnetwork.com/images/EC042017NF/165234s.jpg?w=140&ssl=1 "Shaded Spruce & Soft Sea Foam 1/2\" (1.3 Cm) Ribbon [ 165234 ]")


![Just A Note Bundle (English) [ 166102 ]](https://i0.wp.com/assets1.tamsnetwork.com/images/EC042017NF/166102s.jpg?w=140&ssl=1 "Just A Note Bundle (English) [ 166102 ]")
![Just A Note Cling Stamp Set (English) [ 166098 ]](https://i0.wp.com/assets1.tamsnetwork.com/images/EC042017NF/166098s.jpg?w=140&ssl=1 "Just A Note Cling Stamp Set (English) [ 166098 ]")
![Just A Note Dies [ 166101 ]](https://i0.wp.com/assets1.tamsnetwork.com/images/EC042017NF/166101s.jpg?w=140&ssl=1 "Just A Note Dies [ 166101 ]")
![Mini Alphabet Dies [ 162934 ]](https://i0.wp.com/assets1.tamsnetwork.com/images/EC042017NF/162934s.jpg?w=140&ssl=1 "Mini Alphabet Dies [ 162934 ]")
![Delightful Wishes Dies (English) [ 164707 ]](https://i0.wp.com/assets1.tamsnetwork.com/images/EC042017NF/164707s.jpg?w=140&ssl=1 "Delightful Wishes Dies (English) [ 164707 ]")
![Metallic Textures Rub Ons [ 165270 ]](https://i0.wp.com/assets1.tamsnetwork.com/images/EC042017NF/165270s.jpg?w=140&ssl=1 "Metallic Textures Rub Ons [ 165270 ]")
![Basic Black 12" X 12" (30.5 X 30.5 Cm) Two Tone Cardstock [ 166704 ]](https://i0.wp.com/assets1.tamsnetwork.com/images/EC042017NF/166704s.jpg?w=140&ssl=1 "Basic Black 12\" X 12\" (30.5 X 30.5 Cm) Two Tone Cardstock [ 166704 ]")
![Gold Foil Sheets [ 132622 ]](https://i0.wp.com/assets1.tamsnetwork.com/images/EC042017NF/132622s.jpg?w=140&ssl=1 "Gold Foil Sheets [ 132622 ]")
![Tuxedo Black Memento Ink Pad [ 132708 ]](https://i0.wp.com/assets1.tamsnetwork.com/images/EC042017NF/132708s.jpg?w=140&ssl=1 "Tuxedo Black Memento Ink Pad [ 132708 ]")
![Black Stampin' Dimensionals Combo Pack [ 150893 ]](https://i0.wp.com/assets1.tamsnetwork.com/images/EC042017NF/150893s.jpg?w=140&ssl=1 "Black Stampin' Dimensionals Combo Pack [ 150893 ]")
![Adhesive Sheets [ 152334 ]](https://i0.wp.com/assets1.tamsnetwork.com/images/EC042017NF/152334s.jpg?w=140&ssl=1 "Adhesive Sheets [ 152334 ]")
![Multipurpose Liquid Glue [ 110755 ]](https://i0.wp.com/assets1.tamsnetwork.com/images/EC042017NF/110755s.jpg?w=140&ssl=1 "Multipurpose Liquid Glue [ 110755 ]")
![Mini Stampin' Cut & Emboss Machine [ 150673 ]](https://i0.wp.com/assets1.tamsnetwork.com/images/EC042017NF/150673s.jpg?w=140&ssl=1 "Mini Stampin' Cut & Emboss Machine [ 150673 ]")



![Good Times Mix & Match Ephemera Pack [ 165353 ]](https://i0.wp.com/assets1.tamsnetwork.com/images/EC042017NF/165353s.jpg?w=140&ssl=1 "Good Times Mix & Match Ephemera Pack [ 165353 ]")
![Greetings For All Mix & Match Ephemera Pack (English) [ 164862 ]](https://i0.wp.com/assets1.tamsnetwork.com/images/EC042017NF/164862s.jpg?w=140&ssl=1 "Greetings For All Mix & Match Ephemera Pack (English) [ 164862 ]")
![Time For Celebration Mix & Match Ephemera Pack [ 165354 ]](https://i0.wp.com/assets1.tamsnetwork.com/images/EC042017NF/165354s.jpg?w=140&ssl=1 "Time For Celebration Mix & Match Ephemera Pack [ 165354 ]")
![Embossed Designs Mix & Match Specialty Cards & Envelopes [ 165358 ]](https://i0.wp.com/assets1.tamsnetwork.com/images/EC042017NF/165358s.jpg?w=140&ssl=1 "Embossed Designs Mix & Match Specialty Cards & Envelopes [ 165358 ]")
![Textured Stripes Mix & Match Cards & Envelopes [ 165357 ]](https://i0.wp.com/assets1.tamsnetwork.com/images/EC042017NF/165357s.jpg?w=140&ssl=1 "Textured Stripes Mix & Match Cards & Envelopes [ 165357 ]")
![Baker's Twine Essentials Pack [ 155475 ]](https://i0.wp.com/assets1.tamsnetwork.com/images/EC042017NF/155475s.jpg?w=140&ssl=1 "Baker's Twine Essentials Pack [ 155475 ]")
![1 7/8" (4.8 Cm) Circle Punch [ 165259 ]](https://i0.wp.com/assets1.tamsnetwork.com/images/EC042017NF/165259s.jpg?w=140&ssl=1 "1 7/8\" (4.8 Cm) Circle Punch [ 165259 ]")
![Hole Punch Assortment [ 165409 ]](https://i0.wp.com/assets1.tamsnetwork.com/images/EC042017NF/165409s.jpg?w=140&ssl=1 "Hole Punch Assortment [ 165409 ]")
![Basic White A4 Cardstock [ 166781 ]](https://i0.wp.com/assets1.tamsnetwork.com/images/EC042017NF/166781s.jpg?w=140&ssl=1 "Basic White A4 Cardstock [ 166781 ]")
![Misty Moonlight A4 Cardstock [ 153086 ]](https://i0.wp.com/assets1.tamsnetwork.com/images/EC042017NF/153086s.jpg?w=140&ssl=1 "Misty Moonlight A4 Cardstock [ 153086 ]")
![Real Red A4 Card Stock [ 106578 ]](https://i0.wp.com/assets1.tamsnetwork.com/images/EC042017NF/106578s.jpg?w=140&ssl=1 "Real Red A4 Card Stock [ 106578 ]")
![Mini Stampin' Dimensionals [ 144108 ]](https://i0.wp.com/assets1.tamsnetwork.com/images/EC042017NF/144108s.jpg?w=140&ssl=1 "Mini Stampin' Dimensionals [ 144108 ]")
![Stampin' Dimensionals [ 104430 ]](https://i0.wp.com/assets1.tamsnetwork.com/images/EC042017NF/104430s.jpg?w=140&ssl=1 "Stampin' Dimensionals [ 104430 ]")




