Today I have three cards to share with you. They were projects from the Creativity Now crafting event for demonstrators.

TIP: One of the great benefits of joining Stampin’ Up!, as a demonstrator, is the opportunity for exclusive events and early access to new products. So my tip is to join when you can and enjoy these and many more benefits.
These are the new products that were used for this event – Peaceful Garden Suite Collection.

TIP: Enjoy a 10% discount on Bundles and save yourself the challenge of entering lots of separate products codes by entering the single code for Suite Collections.
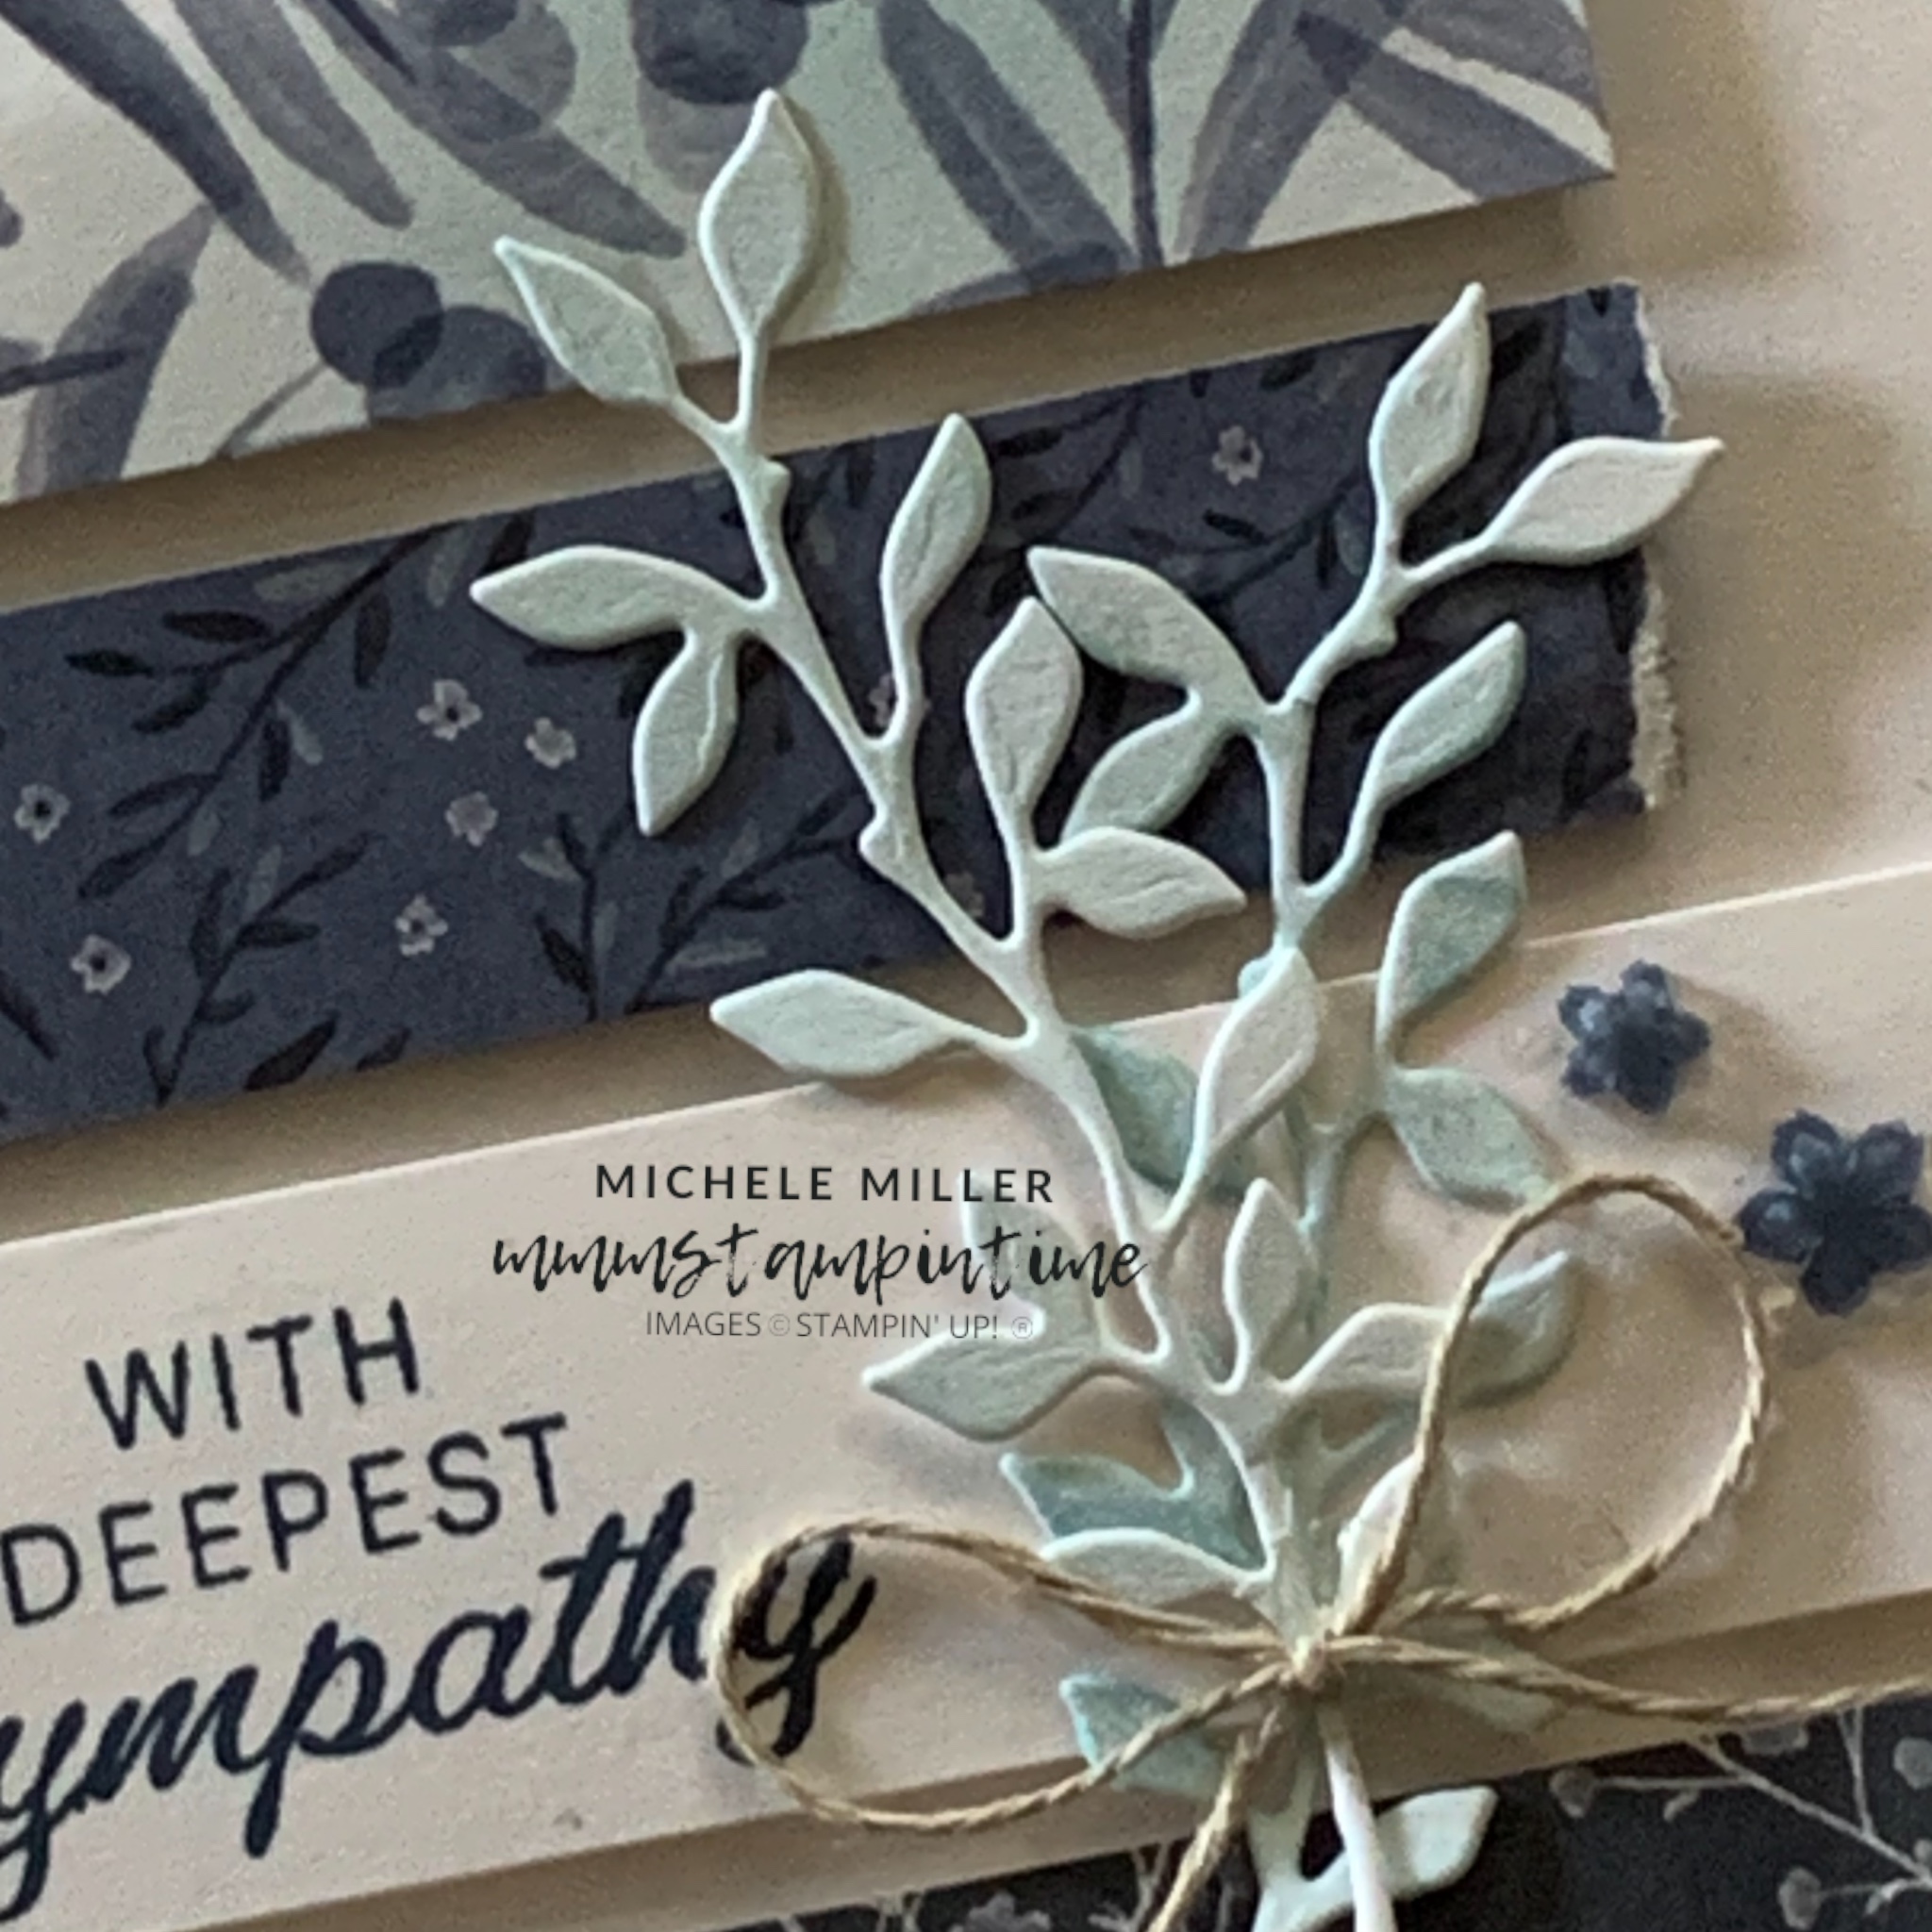
These are the three cards that were designed for the event. Demonstrators received measurements and instructions for each project.

TECHNIQUE: The strips of Designer Series Paper were torn at one end. To reveal the white edge you need to tear the paper towards you.
TECHNIQUE: After die cutting some twigs they then had some colour added using a Blending Brush to lightly transfer some of the Cloud Cover ink.

The second card features some Peaceful Garden Glimmer Paper, embossed Cloud Cover card, A panel of Designer Series Paper and a Basic White panel with a stamped greeting.
TECHNIQUE: By leaving a pocket under the DSP panel, a tag can be inserted. This gives you another place to write a message.

TIP: Add a strip of the DSP to the card insert and more to the back of the envelope.
Finally, I added some of the white Hues of Blue Flowers.
The final card was made from a piece of Designer Series Paper.

This card uses a length of Misty Moonlight Silver Edges Ribbon to wrap around and secure the card’s opening.
TIP: Turn a white tag into a pale blue by using Cloud Cover ink and a Blending Brush. Start adding colour by rotating the brush off the tag and slowly brushing across it.
TECHNIQUE: It is quite easy to create your own coordinating envelope to match the card.

Tomorrow I have my own card design to share with you.
Until then, happy stamping.

If you live in Australia, you can order any of the products I used to make this card by going to my online store. Just click on any of the images below. Some of the products are yet to be released so I’ll provide more details later.

![Linen Thread [ 104199 ]](https://i0.wp.com/assets1.tamsnetwork.com/images/EC042017NF/104199s.jpg?w=140&ssl=1 "Linen Thread [ 104199 ]") | |||
![Multipurpose Liquid Glue [ 110755 ]](https://i0.wp.com/assets1.tamsnetwork.com/images/EC042017NF/110755s.jpg?w=140&ssl=1 "Multipurpose Liquid Glue [ 110755 ]") | ![Mini Glue Dots [ 103683 ]](https://i0.wp.com/assets1.tamsnetwork.com/images/EC042017NF/103683s.jpg?w=140&ssl=1 "Mini Glue Dots [ 103683 ]") | ![Stampin' Dimensionals [ 104430 ]](https://i0.wp.com/assets1.tamsnetwork.com/images/EC042017NF/104430s.jpg?w=140&ssl=1 "Stampin' Dimensionals [ 104430 ]") | |
![Paper Snips [ 103579 ]](https://i0.wp.com/assets1.tamsnetwork.com/images/EC042017NF/103579s.jpg?w=140&ssl=1 "Paper Snips [ 103579 ]") | ![Paper Trimmer [ 152392 ]](https://i0.wp.com/assets1.tamsnetwork.com/images/EC042017NF/152392s.jpg?w=140&ssl=1 "Paper Trimmer [ 152392 ]") | ![Mini Stampin' Cut & Emboss Machine [ 150673 ]](https://i0.wp.com/assets1.tamsnetwork.com/images/EC042017NF/150673s.jpg?w=140&ssl=1 "Mini Stampin' Cut & Emboss Machine [ 150673 ]") |
![Cloud Cover 12" X 12" (30.5 X 30.5 Cm) Two Tone Cardstock [ 166708 ]](https://i0.wp.com/assets1.tamsnetwork.com/images/EC042017NF/166708s.jpg?w=140&ssl=1 "Cloud Cover 12\" X 12\" (30.5 X 30.5 Cm) Two Tone Cardstock [ 166708 ]")
![White Willow 12" X 12" (30.5 X 30.5 Cm) Cardstock [ 166703 ]](https://i0.wp.com/assets1.tamsnetwork.com/images/EC042017NF/166703s.jpg?w=140&ssl=1 "White Willow 12\" X 12\" (30.5 X 30.5 Cm) Cardstock [ 166703 ]")
![Cloud Cover Classic Stampin' Ink Refill [ 165279 ]](https://i0.wp.com/assets1.tamsnetwork.com/images/EC042017NF/165279s.jpg?w=140&ssl=1 "Cloud Cover Classic Stampin' Ink Refill [ 165279 ]")
![Misty Moonlight Classic Stampin' Pad [ 153118 ]](https://i0.wp.com/assets1.tamsnetwork.com/images/EC042017NF/153118s.jpg?w=140&ssl=1 "Misty Moonlight Classic Stampin' Pad [ 153118 ]")


![Party Alphabet Dies [ 165263 ]](https://i0.wp.com/assets1.tamsnetwork.com/images/EC042017NF/165263s.jpg?w=140&ssl=1 "Party Alphabet Dies [ 165263 ]")
![Party Banners Dies [ 165264 ]](https://i0.wp.com/assets1.tamsnetwork.com/images/EC042017NF/165264s.jpg?w=140&ssl=1 "Party Banners Dies [ 165264 ]")
![Misty Moonlight 12" X 12" (30.5 X 30.5 Cm) Two Tone Cardstock [ 166686 ]](https://i0.wp.com/assets1.tamsnetwork.com/images/EC042017NF/166686s.jpg?w=140&ssl=1 "Misty Moonlight 12\" X 12\" (30.5 X 30.5 Cm) Two Tone Cardstock [ 166686 ]")
![Night Of Navy 12" X 12" (30.5 X 30.5 Cm) Two Tone Cardstock [ 166684 ]](https://i0.wp.com/assets1.tamsnetwork.com/images/EC042017NF/166684s.jpg?w=140&ssl=1 "Night Of Navy 12\" X 12\" (30.5 X 30.5 Cm) Two Tone Cardstock [ 166684 ]")
![Pecan Pie 12" X 12" (30.5 X 30.5 Cm) Two Tone Cardstock [ 166688 ]](https://i0.wp.com/assets1.tamsnetwork.com/images/EC042017NF/166688s.jpg?w=140&ssl=1 "Pecan Pie 12\" X 12\" (30.5 X 30.5 Cm) Two Tone Cardstock [ 166688 ]")


![Beautiful Butterflies Bundle (English) [ 164615 ]](https://i0.wp.com/assets1.tamsnetwork.com/images/EC042017NF/164615s.jpg?w=140&ssl=1 "Beautiful Butterflies Bundle (English) [ 164615 ]")
![Beautiful Butterflies Photopolymer Stamp Set (English) [ 164608 ]](https://i0.wp.com/assets1.tamsnetwork.com/images/EC042017NF/164608s.jpg?w=140&ssl=1 "Beautiful Butterflies Photopolymer Stamp Set (English) [ 164608 ]")
![Beautiful Bokeh 6" X 6" (15.2 X 15.2 Cm) Designer Series Paper [ 164607 ]](https://i0.wp.com/assets1.tamsnetwork.com/images/EC042017NF/164607s.jpg?w=140&ssl=1 "Beautiful Bokeh 6\" X 6\" (15.2 X 15.2 Cm) Designer Series Paper [ 164607 ]")
![Iridescent Faceted Gems [ 163368 ]](https://i0.wp.com/assets1.tamsnetwork.com/images/EC042017NF/163368s.jpg?w=140&ssl=1 "Iridescent Faceted Gems [ 163368 ]")
![Balmy Blue A4 Cardstock [ 147007 ]](https://i0.wp.com/assets1.tamsnetwork.com/images/EC042017NF/147007s.jpg?w=140&ssl=1 "Balmy Blue A4 Cardstock [ 147007 ]")
![Basic White 12 X12 (30.5 X 30.5 Cm) Cardstock [ 159231 ]](https://i0.wp.com/assets1.tamsnetwork.com/images/EC042017NF/159231s.jpg?w=140&ssl=1 "Basic White 12 X12 (30.5 X 30.5 Cm) Cardstock [ 159231 ]")
![Balmy Blue Classic Stampin' Pad [ 147105 ]](https://i0.wp.com/assets1.tamsnetwork.com/images/EC042017NF/147105s.jpg?w=140&ssl=1 "Balmy Blue Classic Stampin' Pad [ 147105 ]")
![Balmy Blue Stampin' Blends Combo Pack [ 154830 ]](https://i0.wp.com/assets1.tamsnetwork.com/images/EC042017NF/154830s.jpg?w=140&ssl=1 "Balmy Blue Stampin' Blends Combo Pack [ 154830 ]")
![Bone Folder [ 102300 ]](https://i0.wp.com/assets1.tamsnetwork.com/images/EC042017NF/102300s.jpg?w=140&ssl=1 "Bone Folder [ 102300 ]")
![Stampin' Cut & Emboss Machine [ 149653 ]](https://i0.wp.com/assets1.tamsnetwork.com/images/EC042017NF/149653s.jpg?w=140&ssl=1 "Stampin' Cut & Emboss Machine [ 149653 ]")
![Basic White C6 Envelopes [ 159235 ]](https://i0.wp.com/assets1.tamsnetwork.com/images/EC042017NF/159235s.jpg?w=140&ssl=1 "Basic White C6 Envelopes [ 159235 ]")


