Well, this Wednesday there is alot happening in the Stampin’ Up! world.
We have some updates about cling stamps and Stampin’ Write Markers, as well as some exciting news about new coordinating packaging for stamps and dies. Here’s a quick snapshot:
Cling Stamps (Red Rubber)
Stampin’ Up! has decided to discontinue their cling stamp line due to key raw materials becoming increasingly difficult to source, with some no longer being manufactured at all. They will continue to offer a wide range of photopolymer stamps to support various artistic styles and techniques.
Stampin’ Write Markers
SU has also decided to discontinue Stampin’ Write Markers. With the growing popularity of Stampin’ Blends, they’ve seen a steady decline in sales of Stampin’ Write Markers. One of the primary techniques unique to Stampin’ Write Markers is colouring directly on cling stamps—a technique that will become less relevant as they transition away from cling.

New and Improved Stamp and Die Packaging
As part of the transition away from cling stamps, SU is excited to introduce updated packaging for stamps and dies! Because photopolymer stamps are thinner, they’re able to offer sleeker, slimmer packaging that saves space. Both stamps and dies will now come in the same size and style of packaging, making it easier than ever to store bundles and coordinating products together. The new packaging is similar to current die packaging—durable, clear plastic envelopes—but with an exciting improvement: Die packaging will now feature printed artwork for quick and easy identification! Stamp packaging will continue to display artwork as well.

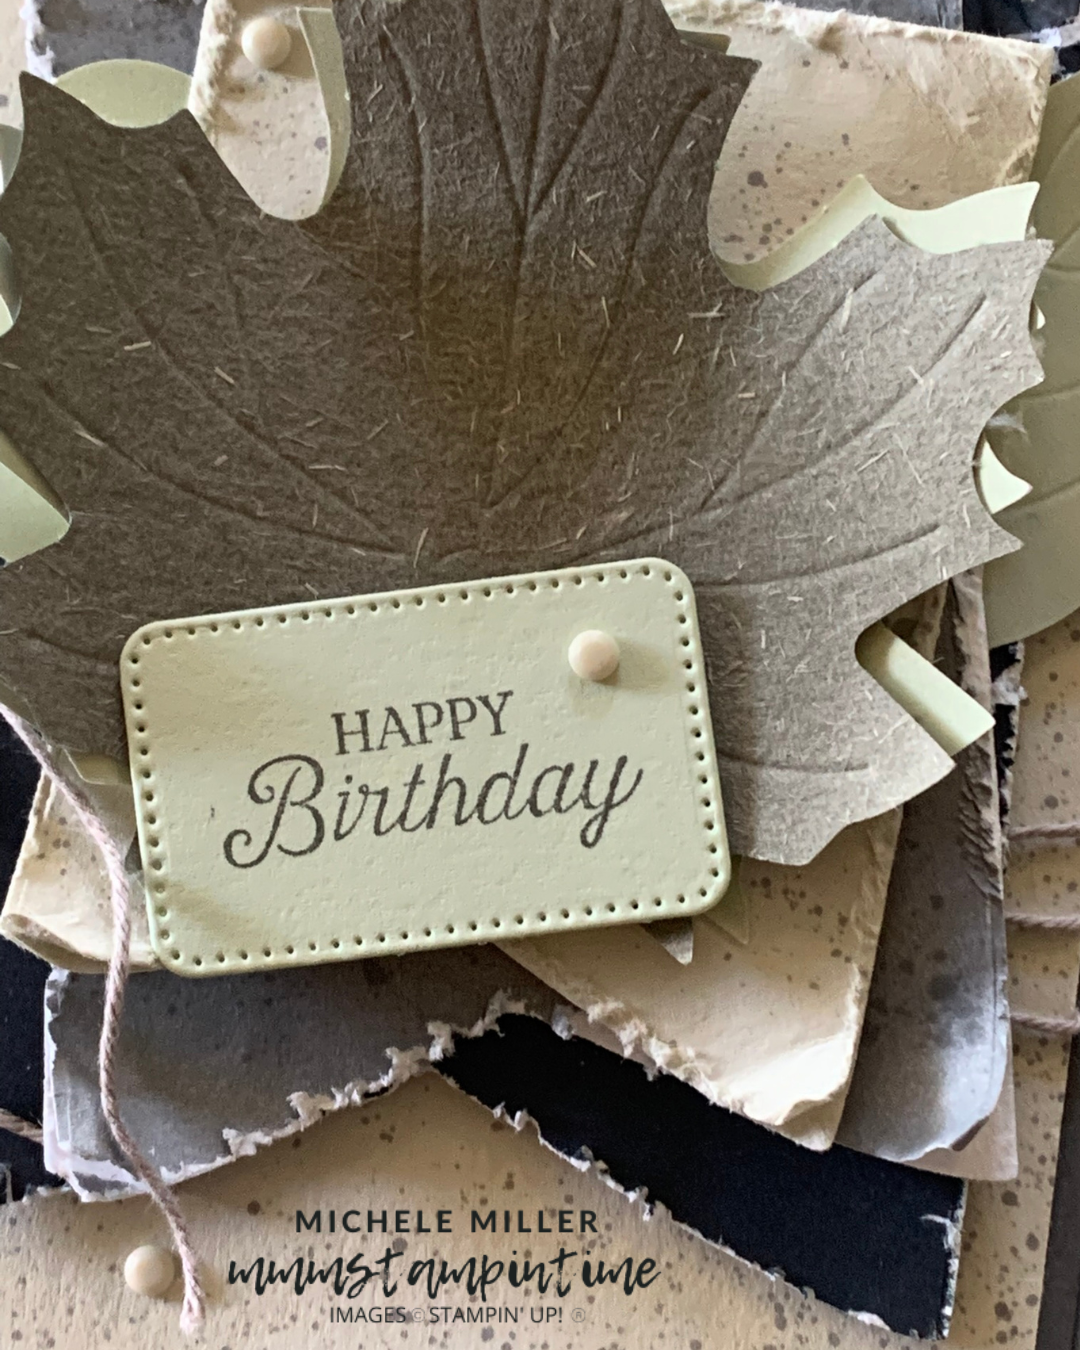
Today’s project is a card using the leaves from the Harvest Home Garland Kit.

I used the Dark Smoky Slate Stampin’ Blends marker to flick specks of gray across the Very Vanilla panel. Then I wrapped Gray Granite Twine around it, tied a bow and then adhered it to a Basic Gray cardbase.
The three banners, from the party Banners Dies, were cut from Two-tone cardstock. So when I frayed the edges of the banners, the white core was revealed.
The banners were layered with leaves inserted within each layer.
Then I added the Soft Sea Foam and textured gray leaves on the top layer.

The birthday greeting is from the Loveliest Tree Stamp Set. After stamping it, I used one of the Nested Essentials Dies to cut it.
The card insert and envelope also had gray flecks added to them.
Finally, I added some Very Vanilla Neutral Matte Dots to the card.

Tomorrow I have a 3D project to share with you.
Until then, happy staming and scrapbooking.

If you live in Australia, you can order any of the products I used to make this card by going to my online store. Just click on any of the images below.

![Harvest Home Garland Kit [ 166228 ]](https://i0.wp.com/assets1.tamsnetwork.com/images/EC042017NF/166228s.jpg?w=140&ssl=1 "Harvest Home Garland Kit [ 166228 ]") | ![Nested Essentials Dies [ 161597 ]](https://i0.wp.com/assets1.tamsnetwork.com/images/EC042017NF/161597s.jpg?w=140&ssl=1 "Nested Essentials Dies [ 161597 ]") | ![Neutral Matte Dots [ 165561 ]](https://i0.wp.com/assets1.tamsnetwork.com/images/EC042017NF/165561s.jpg?w=140&ssl=1 "Neutral Matte Dots [ 165561 ]") | ![Baker's Twine Essentials Pack [ 155475 ]](https://i0.wp.com/assets1.tamsnetwork.com/images/EC042017NF/155475s.jpg?w=140&ssl=1 "Baker's Twine Essentials Pack [ 155475 ]") | |
![Basic Gray Classic Stampin' Pad [ 149165 ]](https://i0.wp.com/assets1.tamsnetwork.com/images/EC042017NF/149165s.jpg?w=140&ssl=1 "Basic Gray Classic Stampin' Pad [ 149165 ]") | ![Basic Gray A4 Card Stock [ 121689 ]](https://i0.wp.com/assets1.tamsnetwork.com/images/EC042017NF/121689s.jpg?w=140&ssl=1 "Basic Gray A4 Card Stock [ 121689 ]") | ![Soft Sea Foam A4 Cardstock [ 147012 ]](https://i0.wp.com/assets1.tamsnetwork.com/images/EC042017NF/147012s.jpg?w=140&ssl=1 "Soft Sea Foam A4 Cardstock [ 147012 ]") | ![Very Vanilla A4 Cardstock [ 166785 ]](https://i0.wp.com/assets1.tamsnetwork.com/images/EC042017NF/166785s.jpg?w=140&ssl=1 "Very Vanilla A4 Cardstock [ 166785 ]") | |
![Multipurpose Liquid Glue [ 110755 ]](https://i0.wp.com/assets1.tamsnetwork.com/images/EC042017NF/110755s.jpg?w=140&ssl=1 "Multipurpose Liquid Glue [ 110755 ]") | ![Mini Glue Dots [ 103683 ]](https://i0.wp.com/assets1.tamsnetwork.com/images/EC042017NF/103683s.jpg?w=140&ssl=1 "Mini Glue Dots [ 103683 ]") | |||
![Paper Snips [ 103579 ]](https://i0.wp.com/assets1.tamsnetwork.com/images/EC042017NF/103579s.jpg?w=140&ssl=1 "Paper Snips [ 103579 ]") | ![Paper Trimmer [ 152392 ]](https://i0.wp.com/assets1.tamsnetwork.com/images/EC042017NF/152392s.jpg?w=140&ssl=1 "Paper Trimmer [ 152392 ]") | ![Very Vanilla C6 Envelopes [ 106589 ]](https://i0.wp.com/assets1.tamsnetwork.com/images/EC042017NF/106589s.jpg?w=140&ssl=1 "Very Vanilla C6 Envelopes [ 106589 ]") |
![Smoky Slate Stampin' Blends Combo Pack [ 154904 ]](https://i0.wp.com/assets1.tamsnetwork.com/images/EC042017NF/154904s.jpg?w=140&ssl=1 "Smoky Slate Stampin' Blends Combo Pack [ 154904 ]")
![Secret Sea 12" X 12" (30.5 X 30.5 Cm) Two Tone Cardstock [ 166709 ]](https://i0.wp.com/assets1.tamsnetwork.com/images/EC042017NF/166709s.jpg?w=140&ssl=1 "Secret Sea 12\" X 12\" (30.5 X 30.5 Cm) Two Tone Cardstock [ 166709 ]")
![Smoky Slate 12" X 12" (30.5 X 30.5 Cm) Two Tone Cardstock [ 166699 ]](https://i0.wp.com/assets1.tamsnetwork.com/images/EC042017NF/166699s.jpg?w=140&ssl=1 "Smoky Slate 12\" X 12\" (30.5 X 30.5 Cm) Two Tone Cardstock [ 166699 ]")
![Very Vanilla 12" X 12" (30.5 X 30.5 Cm) Two Tone Cardstock [ 166702 ]](https://i0.wp.com/assets1.tamsnetwork.com/images/EC042017NF/166702s.jpg?w=140&ssl=1 "Very Vanilla 12\" X 12\" (30.5 X 30.5 Cm) Two Tone Cardstock [ 166702 ]")
![Black Stampin' Dimensionals Combo Pack [ 150893 ]](https://i0.wp.com/assets1.tamsnetwork.com/images/EC042017NF/150893s.jpg?w=140&ssl=1 "Black Stampin' Dimensionals Combo Pack [ 150893 ]")



![Exposed Brick 3 D Embossing Folder [ 161600 ]](https://i0.wp.com/assets1.tamsnetwork.com/images/EC042017NF/161600s.jpg?w=140&ssl=1 "Exposed Brick 3 D Embossing Folder [ 161600 ]")
![Soft Waves 3 D Embossing Folder [ 164695 ]](https://i0.wp.com/assets1.tamsnetwork.com/images/EC042017NF/164695s.jpg?w=140&ssl=1 "Soft Waves 3 D Embossing Folder [ 164695 ]")
![Basic Black A4 Card Stock [ 121688 ]](https://i0.wp.com/assets1.tamsnetwork.com/images/EC042017NF/121688s.jpg?w=140&ssl=1 "Basic Black A4 Card Stock [ 121688 ]")
![Basic White A4 Cardstock [ 166781 ]](https://i0.wp.com/assets1.tamsnetwork.com/images/EC042017NF/166781s.jpg?w=140&ssl=1 "Basic White A4 Cardstock [ 166781 ]")
![Jet Black Stāzon Ink Pad [ 101406 ]](https://i0.wp.com/assets1.tamsnetwork.com/images/EC042017NF/101406s.jpg?w=140&ssl=1 "Jet Black Stāzon Ink Pad [ 101406 ]")
![Jet Black Stazon Ink Refill [ 102566 ]](https://i0.wp.com/assets1.tamsnetwork.com/images/EC042017NF/102566s.jpg?w=140&ssl=1 "Jet Black Stazon Ink Refill [ 102566 ]")
![Stampin' Cut & Emboss Machine [ 149653 ]](https://i0.wp.com/assets1.tamsnetwork.com/images/EC042017NF/149653s.jpg?w=140&ssl=1 "Stampin' Cut & Emboss Machine [ 149653 ]")
![Basic White C6 Envelopes [ 159235 ]](https://i0.wp.com/assets1.tamsnetwork.com/images/EC042017NF/159235s.jpg?w=140&ssl=1 "Basic White C6 Envelopes [ 159235 ]")


![Linen Thread [ 104199 ]](https://i0.wp.com/assets1.tamsnetwork.com/images/EC042017NF/104199s.jpg?w=140&ssl=1 "Linen Thread [ 104199 ]")
![Cajun Craze 12" X 12" (30.5 X 30.5 Cm) Two Tone Cardstock [ 166675 ]](https://i0.wp.com/assets1.tamsnetwork.com/images/EC042017NF/166675s.jpg?w=140&ssl=1 "Cajun Craze 12\" X 12\" (30.5 X 30.5 Cm) Two Tone Cardstock [ 166675 ]")
![Soft Sea Foam 12" X 12" (30.5 X 30.5 Cm) Two Tone Cardstock [ 166700 ]](https://i0.wp.com/assets1.tamsnetwork.com/images/EC042017NF/166700s.jpg?w=140&ssl=1 "Soft Sea Foam 12\" X 12\" (30.5 X 30.5 Cm) Two Tone Cardstock [ 166700 ]")
![Adhesive Sheets [ 152334 ]](https://i0.wp.com/assets1.tamsnetwork.com/images/EC042017NF/152334s.jpg?w=140&ssl=1 "Adhesive Sheets [ 152334 ]")




