Yesterday was September 3rd and that means that the new September – December 2025 Mini Catalogue has gone live for customers.
I am posting this a day late – oops!

Along with the new catalogue, there are also two new kits for you to choose from.
This is the Road to Christmas Kit (166227 $25AU).

This is the Handmade & Heartfelt Kit (166213 $45AU)

Today I have another card to share with you.
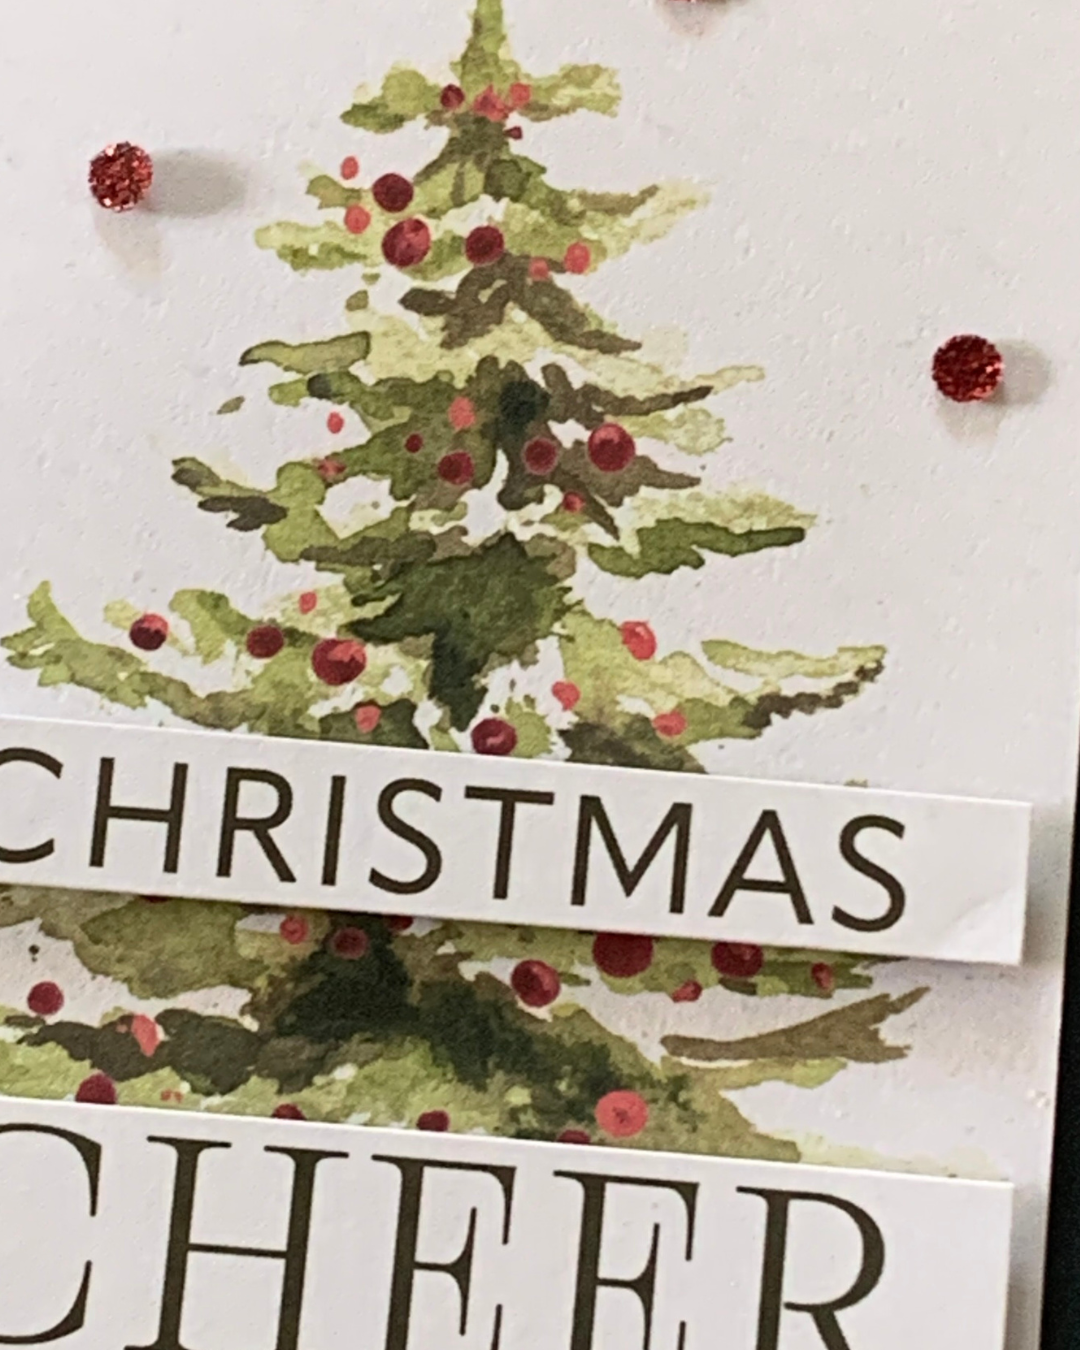
After starting with a Mossy Meadow cardbase, I took six strips of card – two each in Misty Moonlight, Mossy Meadow and Real Red, and attached them to the cardbase using dimensionals. I trimmed the ends at various angles.

Then I cut a Misty Moonlight panel and added one of the Memories & More Cards to it, using dimensionals and positioning it at an agnle.

I took another Memories & More card and trimmed the Christmas greeting before adding the greeting strips to the card.
Some Traditional Sparkling Sequins were then added as embellishment.

I added a strip of one of the trimmed Memories & More cards to the card insert, as well as one of the Greetings for You sentiments.
What do you think of this Christmas card?
Tomorrow I have a Christmas gift box to share with you.
Until then, happy stamping and scrapbooking.

If you live in Australia, you can order any of the products I used to make this card by going to my online store. As you read through this post, you will see the products I used for this project. The new items are available from September 3rd.




![Harvest Home Garland Kit [ 166228 ]](https://i0.wp.com/assets1.tamsnetwork.com/images/EC042017NF/166228s.jpg?w=140&ssl=1 "Harvest Home Garland Kit [ 166228 ]")
![Woven Textures 12" X 12" (30.5 X 30.5 Cm) Designer Series Paper [ 165560 ]](https://i0.wp.com/assets1.tamsnetwork.com/images/EC042017NF/165560s.jpg?w=140&ssl=1 "Woven Textures 12\" X 12\" (30.5 X 30.5 Cm) Designer Series Paper [ 165560 ]")
![Exposed Brick 3 D Embossing Folder [ 161600 ]](https://i0.wp.com/assets1.tamsnetwork.com/images/EC042017NF/161600s.jpg?w=140&ssl=1 "Exposed Brick 3 D Embossing Folder [ 161600 ]")
![Everyday Arches Dies [ 164629 ]](https://i0.wp.com/assets1.tamsnetwork.com/images/EC042017NF/164629s.jpg?w=140&ssl=1 "Everyday Arches Dies [ 164629 ]")
![Linen Thread [ 104199 ]](https://i0.wp.com/assets1.tamsnetwork.com/images/EC042017NF/104199s.jpg?w=140&ssl=1 "Linen Thread [ 104199 ]")
![Cajun Craze A4 Card Stock [ 121683 ]](https://i0.wp.com/assets1.tamsnetwork.com/images/EC042017NF/121683s.jpg?w=140&ssl=1 "Cajun Craze A4 Card Stock [ 121683 ]")
![Very Vanilla A4 Cardstock [ 166785 ]](https://i0.wp.com/assets1.tamsnetwork.com/images/EC042017NF/166785s.jpg?w=140&ssl=1 "Very Vanilla A4 Cardstock [ 166785 ]")
![Multipurpose Liquid Glue [ 110755 ]](https://i0.wp.com/assets1.tamsnetwork.com/images/EC042017NF/110755s.jpg?w=140&ssl=1 "Multipurpose Liquid Glue [ 110755 ]")
![Mini Glue Dots [ 103683 ]](https://i0.wp.com/assets1.tamsnetwork.com/images/EC042017NF/103683s.jpg?w=140&ssl=1 "Mini Glue Dots [ 103683 ]")
![Stampin' Dimensionals [ 104430 ]](https://i0.wp.com/assets1.tamsnetwork.com/images/EC042017NF/104430s.jpg?w=140&ssl=1 "Stampin' Dimensionals [ 104430 ]")
![Bone Folder [ 102300 ]](https://i0.wp.com/assets1.tamsnetwork.com/images/EC042017NF/102300s.jpg?w=140&ssl=1 "Bone Folder [ 102300 ]")
![Paper Snips [ 103579 ]](https://i0.wp.com/assets1.tamsnetwork.com/images/EC042017NF/103579s.jpg?w=140&ssl=1 "Paper Snips [ 103579 ]")
![Paper Trimmer [ 152392 ]](https://i0.wp.com/assets1.tamsnetwork.com/images/EC042017NF/152392s.jpg?w=140&ssl=1 "Paper Trimmer [ 152392 ]")
![Stampin' Cut & Emboss Machine [ 149653 ]](https://i0.wp.com/assets1.tamsnetwork.com/images/EC042017NF/149653s.jpg?w=140&ssl=1 "Stampin' Cut & Emboss Machine [ 149653 ]")
![Very Vanilla C6 Envelopes [ 106589 ]](https://i0.wp.com/assets1.tamsnetwork.com/images/EC042017NF/106589s.jpg?w=140&ssl=1 "Very Vanilla C6 Envelopes [ 106589 ]")



![Nested Essentials Dies [ 161597 ]](https://i0.wp.com/assets1.tamsnetwork.com/images/EC042017NF/161597s.jpg?w=140&ssl=1 "Nested Essentials Dies [ 161597 ]")
![Secret Sea 3/8" (1 Cm) Faux Linen Ribbon [ 165273 ]](https://i0.wp.com/assets1.tamsnetwork.com/images/EC042017NF/165273s.jpg?w=140&ssl=1 "Secret Sea 3/8\" (1 Cm) Faux Linen Ribbon [ 165273 ]")
![Neutral Matte Dots [ 165561 ]](https://i0.wp.com/assets1.tamsnetwork.com/images/EC042017NF/165561s.jpg?w=140&ssl=1 "Neutral Matte Dots [ 165561 ]")
![Clear Wink Of Stella Glitter Brush [ 141897 ]](https://i0.wp.com/assets1.tamsnetwork.com/images/EC042017NF/141897s.jpg?w=140&ssl=1 "Clear Wink Of Stella Glitter Brush [ 141897 ]")
![Basic White A4 Cardstock [ 166781 ]](https://i0.wp.com/assets1.tamsnetwork.com/images/EC042017NF/166781s.jpg?w=140&ssl=1 "Basic White A4 Cardstock [ 166781 ]")
![Secret Sea A4 Cardstock [ 165296 ]](https://i0.wp.com/assets1.tamsnetwork.com/images/EC042017NF/165296s.jpg?w=140&ssl=1 "Secret Sea A4 Cardstock [ 165296 ]")
![Black Stampin' Dimensionals Combo Pack [ 150893 ]](https://i0.wp.com/assets1.tamsnetwork.com/images/EC042017NF/150893s.jpg?w=140&ssl=1 "Black Stampin' Dimensionals Combo Pack [ 150893 ]")




