This week I am featuring the Painterly Pears Suite Collection (166159). It is a soon-to-be released Online Exclusive.

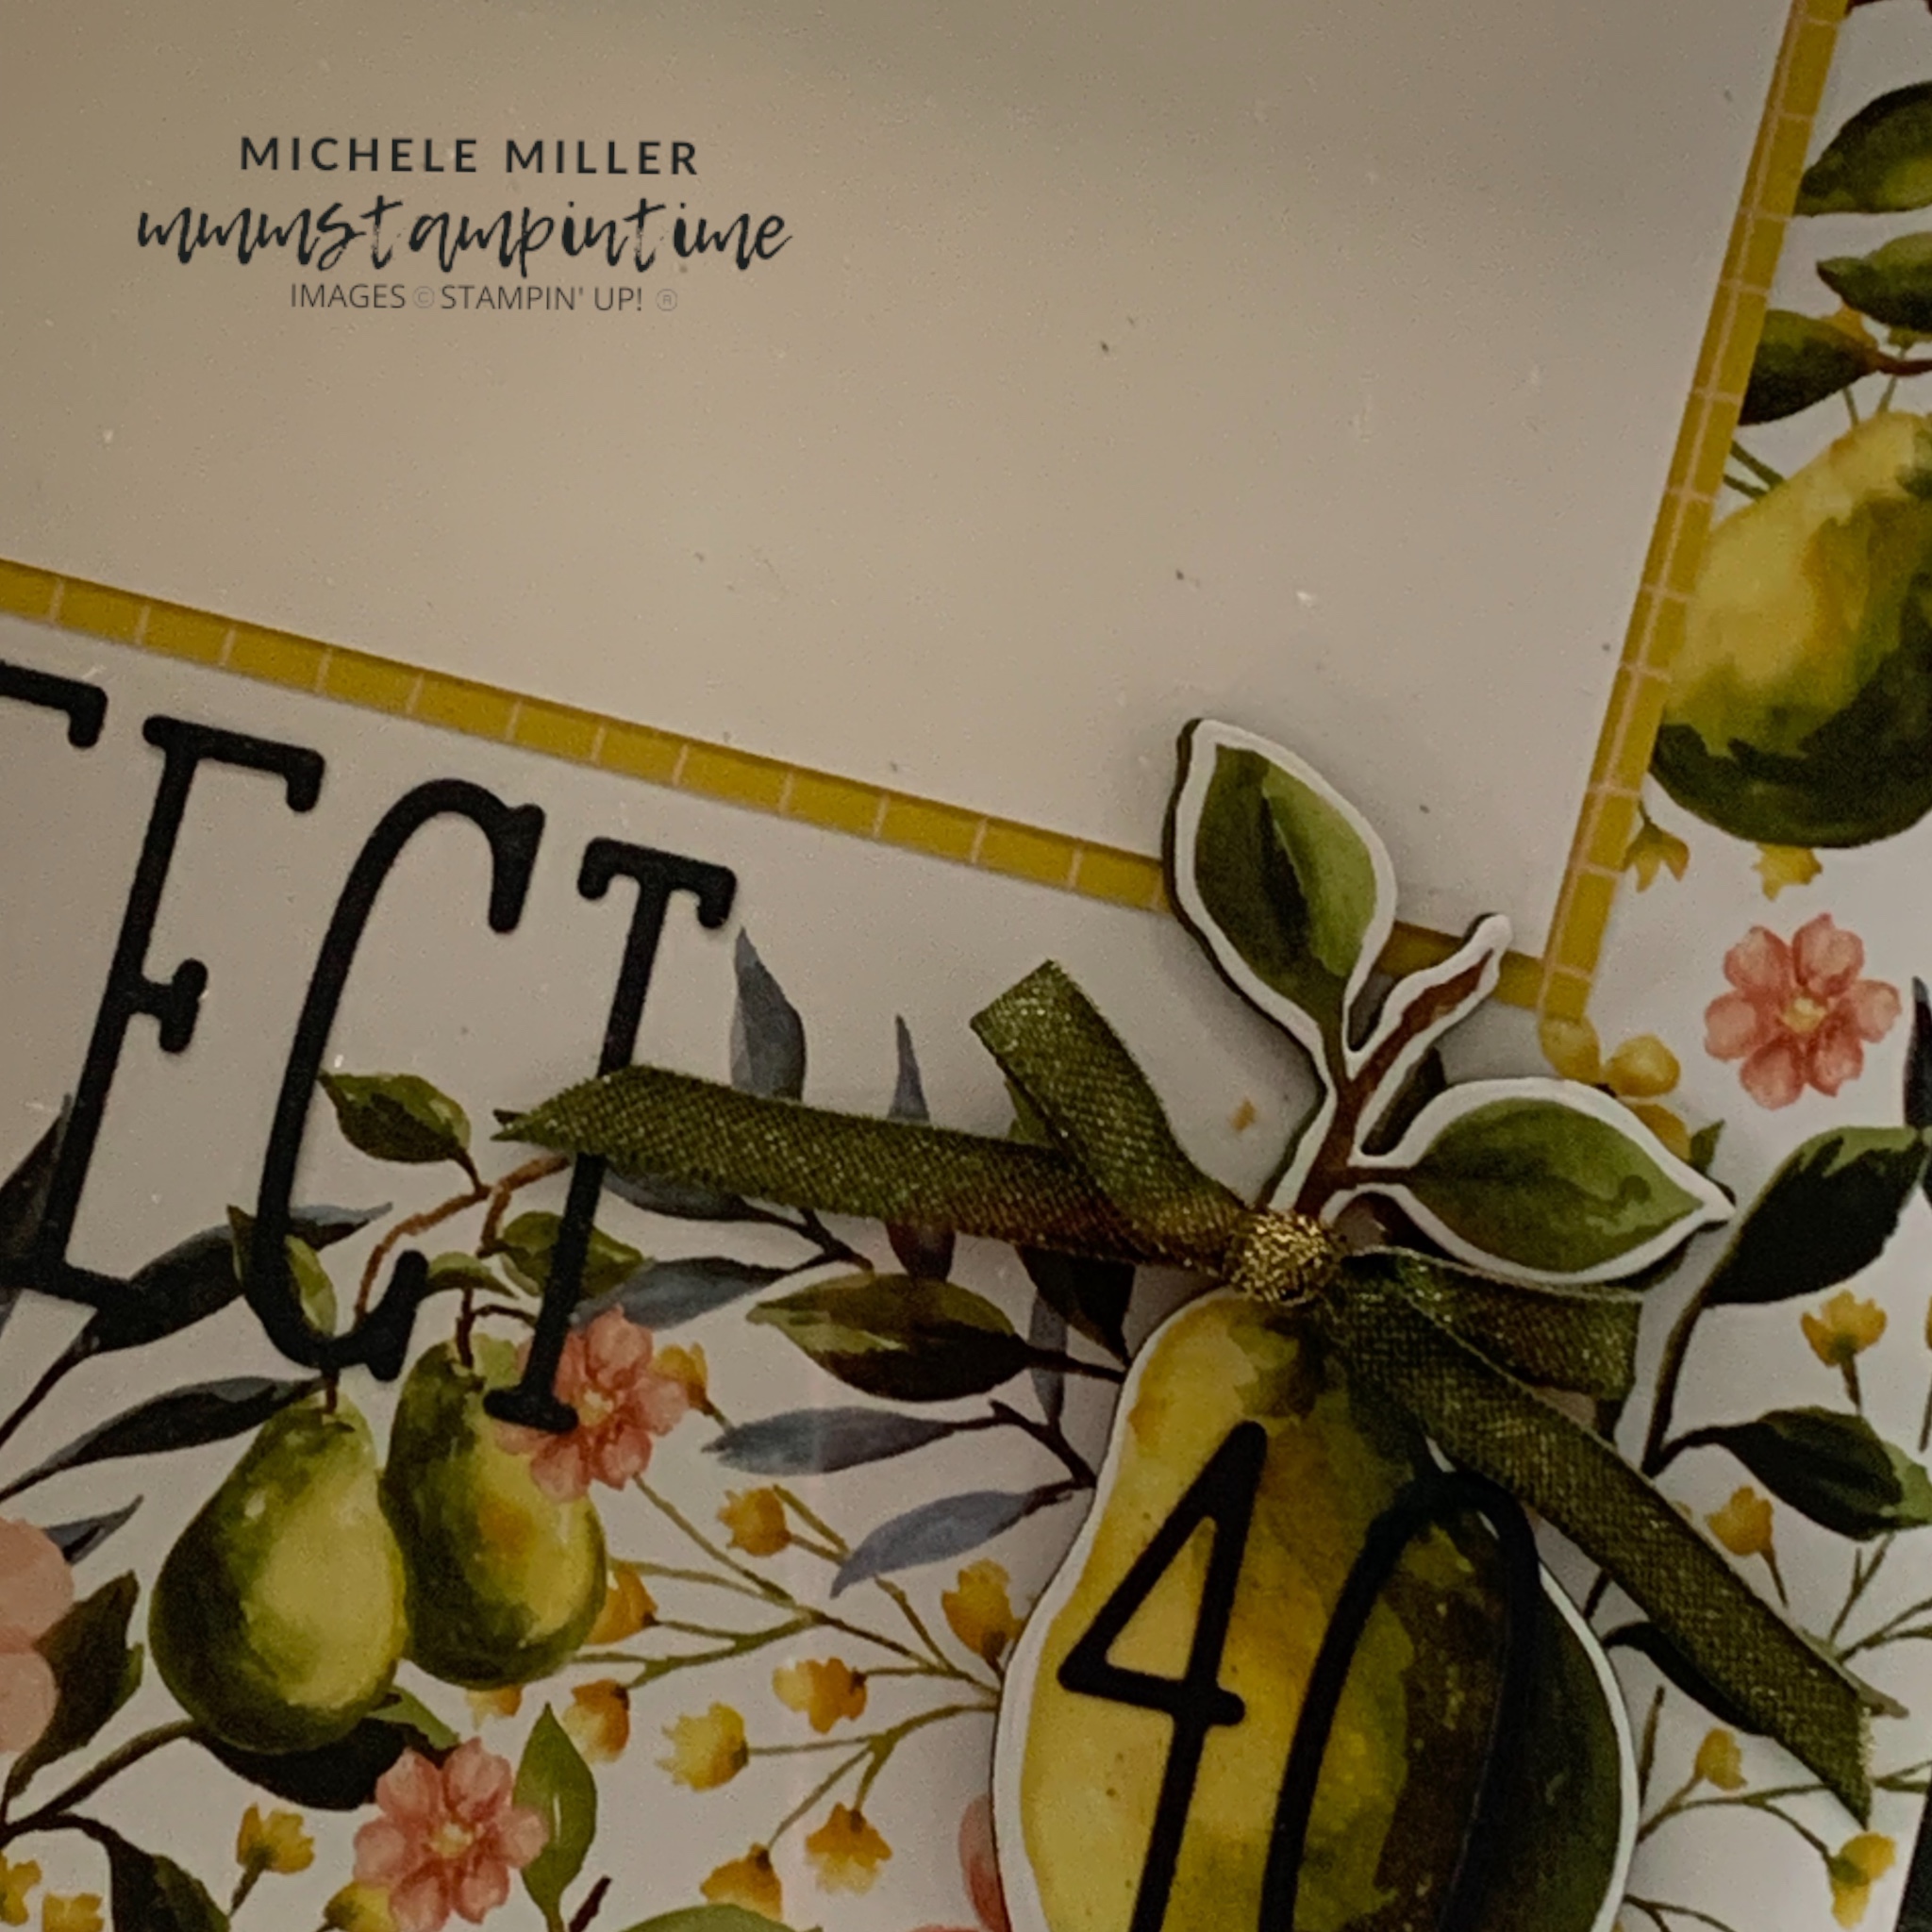
Yesterday, MDB (my darling boy) and I celebrated our 40th wedding anniversary.
I decided to make a memory decor item that I could add a photo of our day and place on our sideboard.

Ikea has two different sizes in their shadow frames … in both black and white. I always have some on hand just in case I have a decor project in mind.
I started with a 9 3/4″x 9 3/4″ piece of the Secret Sea checked DSP that I adhered to a piece of thick cardboard to ensure stability. Then I cut one of the designs from the Designer Series Paper to 8″x 8″ and glued it to the Secret Sea layer.
A 6 1/4″x 4 1/4″ Daffodil Delight panel, with a 6″x 4″ Basic White panel, was adhered to the DSP layer. This is the place that I will add a photo from our anniversary celebration.
I used the Alphabet A La Mode Dies and Secret Sea card to cut the title. The card stock had Adhesive Sheet on the back making it so much easier to position and secure the title.
Using the Perfectly Pears Dies, I cut one of the larger and pair of pears from one of the DSP sheets. Then I cut 8 of each of these shapes from Secret Sea card and layered them on top of each other to create the higher pear images. These were then adhered to the decor design.
Finally, I tied a bow using a length of Mossy Meadow and Gold Trim and secured it with a Mini Glue Dot.

For our anniversary we have two trips planned – one in October and another in February next year. So we decided not to exchange gifts on the day. I hope this decor memory project will ensure we remember the day.
Tomorrow I have a card showcasing a great colouring technique.
Until then, happy stamping and scrapbooking.

If you live in Australia, you can order any of the products I used to make this card by going to my online store. As you read through this post, you will see the products I used for this project. The new Online Exclusive items are available from July 2025.

![Alphabet à La Mode Dies [ 160750 ]](https://i0.wp.com/assets1.tamsnetwork.com/images/EC042017NF/160750s.jpg?w=140&ssl=1 "Alphabet à La Mode Dies [ 160750 ]") | ![Basic White A4 Cardstock [ 166781 ]](https://i0.wp.com/assets1.tamsnetwork.com/images/EC042017NF/166781s.jpg?w=140&ssl=1 "Basic White A4 Cardstock [ 166781 ]") | ![Daffodil Delight A4 Card Stock [ 121680 ]](https://i0.wp.com/assets1.tamsnetwork.com/images/EC042017NF/121680s.jpg?w=140&ssl=1 "Daffodil Delight A4 Card Stock [ 121680 ]") | ![Multipurpose Liquid Glue [ 110755 ]](https://i0.wp.com/assets1.tamsnetwork.com/images/EC042017NF/110755s.jpg?w=140&ssl=1 "Multipurpose Liquid Glue [ 110755 ]") |
![Mini Glue Dots [ 103683 ]](https://i0.wp.com/assets1.tamsnetwork.com/images/EC042017NF/103683s.jpg?w=140&ssl=1 "Mini Glue Dots [ 103683 ]") | ![Paper Snips [ 103579 ]](https://i0.wp.com/assets1.tamsnetwork.com/images/EC042017NF/103579s.jpg?w=140&ssl=1 "Paper Snips [ 103579 ]") | ![Paper Trimmer [ 152392 ]](https://i0.wp.com/assets1.tamsnetwork.com/images/EC042017NF/152392s.jpg?w=140&ssl=1 "Paper Trimmer [ 152392 ]") |


![Boho Vibes Suite Collection (English) [ 165156 ]](https://i0.wp.com/assets1.tamsnetwork.com/images/EC042017NF/165156s.jpg?w=140&ssl=1 "Boho Vibes Suite Collection (English) [ 165156 ]")
![Sunshine Vibes Photopolymer Stamp Set (English) [ 165146 ]](https://i0.wp.com/assets1.tamsnetwork.com/images/EC042017NF/165146s.jpg?w=140&ssl=1 "Sunshine Vibes Photopolymer Stamp Set (English) [ 165146 ]")
![Sunshine Vibes Dies [ 165151 ]](https://i0.wp.com/assets1.tamsnetwork.com/images/EC042017NF/165151s.jpg?w=140&ssl=1 "Sunshine Vibes Dies [ 165151 ]")
![Boho Vibes 6" X 6" (15.2 X 15.2 Cm) Designer Series Paper [ 165144 ]](https://i0.wp.com/assets1.tamsnetwork.com/images/EC042017NF/165144s.jpg?w=140&ssl=1 "Boho Vibes 6\" X 6\" (15.2 X 15.2 Cm) Designer Series Paper [ 165144 ]")
![Stylish Shapes Dies [ 159183 ]](https://i0.wp.com/assets1.tamsnetwork.com/images/EC042017NF/159183s.jpg?w=140&ssl=1 "Stylish Shapes Dies [ 159183 ]")
![Cajun Craze Classic Stampin' Pad [ 147085 ]](https://i0.wp.com/assets1.tamsnetwork.com/images/EC042017NF/147085s.jpg?w=140&ssl=1 "Cajun Craze Classic Stampin' Pad [ 147085 ]")
![Night Of Navy Classic Stampin' Pad [ 147110 ]](https://i0.wp.com/assets1.tamsnetwork.com/images/EC042017NF/147110s.jpg?w=140&ssl=1 "Night Of Navy Classic Stampin' Pad [ 147110 ]")
![Night Of Navy A4 Card Stock [ 106577 ]](https://i0.wp.com/assets1.tamsnetwork.com/images/EC042017NF/106577s.jpg?w=140&ssl=1 "Night Of Navy A4 Card Stock [ 106577 ]")
![Window Sheets [ 142314 ]](https://i0.wp.com/assets1.tamsnetwork.com/images/EC042017NF/142314s.jpg?w=140&ssl=1 "Window Sheets [ 142314 ]")
![Stampin' Dimensionals [ 104430 ]](https://i0.wp.com/assets1.tamsnetwork.com/images/EC042017NF/104430s.jpg?w=140&ssl=1 "Stampin' Dimensionals [ 104430 ]")
![Foam Adhesive Strips [ 141825 ]](https://i0.wp.com/assets1.tamsnetwork.com/images/EC042017NF/141825s.jpg?w=140&ssl=1 "Foam Adhesive Strips [ 141825 ]")
![Mini Stampin' Cut & Emboss Machine [ 150673 ]](https://i0.wp.com/assets1.tamsnetwork.com/images/EC042017NF/150673s.jpg?w=140&ssl=1 "Mini Stampin' Cut & Emboss Machine [ 150673 ]")
![Basic White C6 Envelopes [ 159235 ]](https://i0.wp.com/assets1.tamsnetwork.com/images/EC042017NF/159235s.jpg?w=140&ssl=1 "Basic White C6 Envelopes [ 159235 ]")


![Baker's Twine Essentials Pack [ 155475 ]](https://i0.wp.com/assets1.tamsnetwork.com/images/EC042017NF/155475s.jpg?w=140&ssl=1 "Baker's Twine Essentials Pack [ 155475 ]")
![2025–2027 In Color™ Flat Pearls [ 165192 ]](https://i0.wp.com/assets1.tamsnetwork.com/images/EC042017NF/165192s.jpg?w=140&ssl=1 "2025–2027 In Color™ Flat Pearls [ 165192 ]")
![Cajun Craze 12" X 12" (30.5 X 30.5 Cm) Two Tone Cardstock [ 166675 ]](https://i0.wp.com/assets1.tamsnetwork.com/images/EC042017NF/166675s.jpg?w=140&ssl=1 "Cajun Craze 12\" X 12\" (30.5 X 30.5 Cm) Two Tone Cardstock [ 166675 ]")


