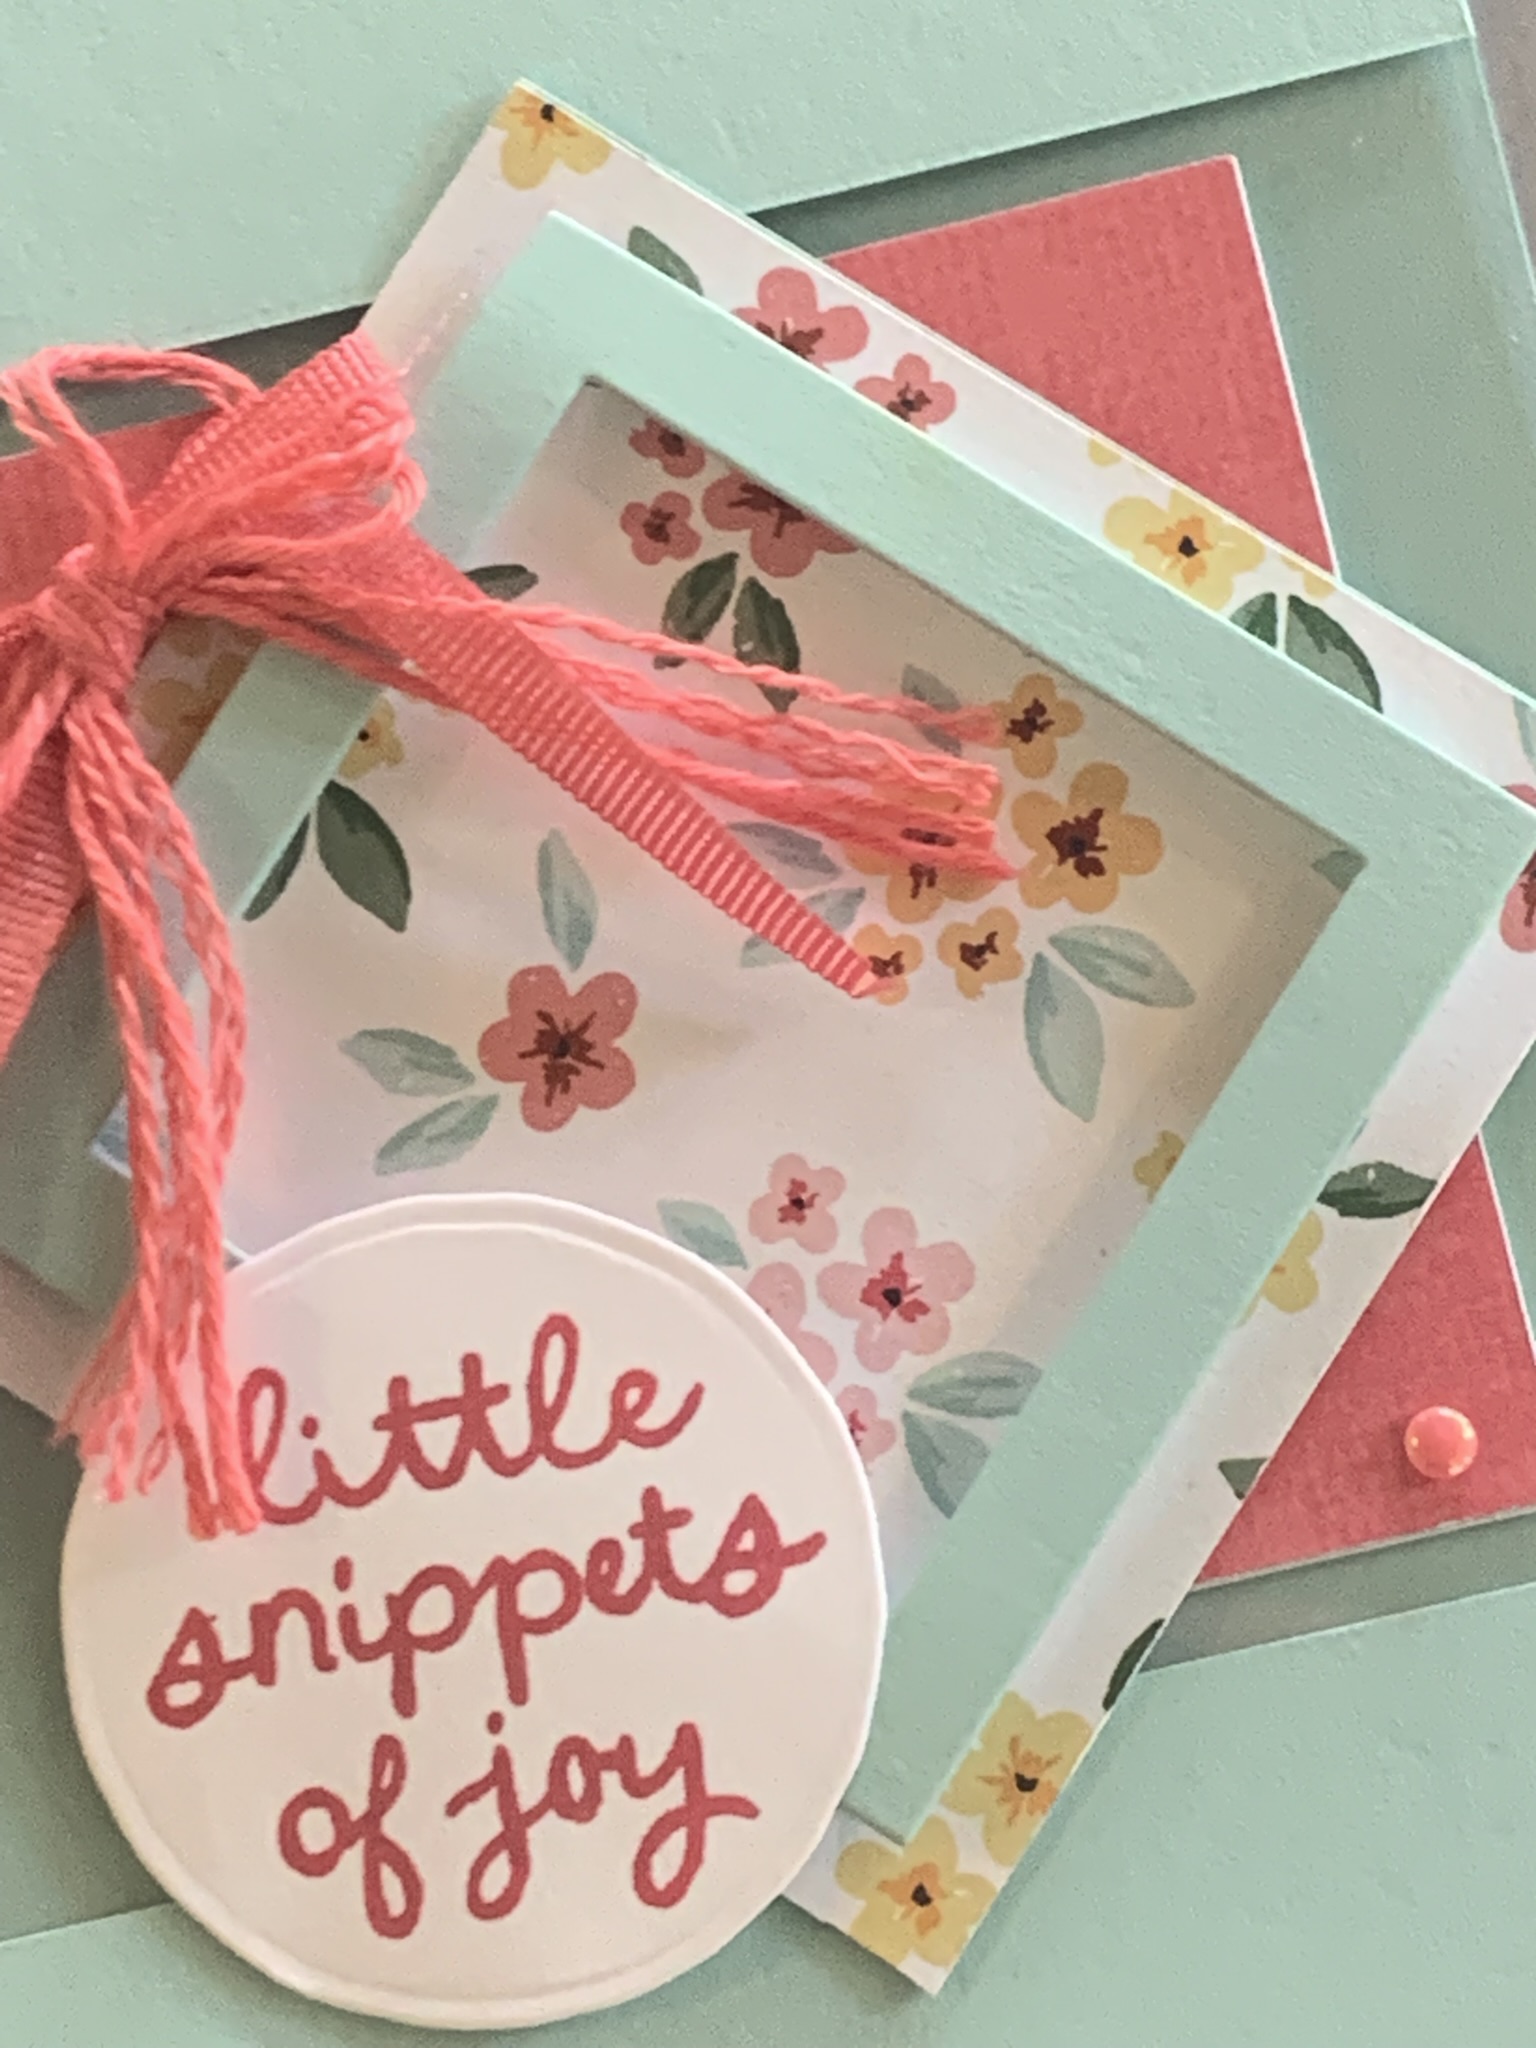
This week I am focusing on the Joyful Squares Bundle and the Square Snippets 12″x 12″ DSP.
Today’s project features a see through feature using a panel of Window Sheet.
Using A4 card, my cards measure 5 3/4″x 4 1/8″. For this card I cut a base measuring 7″x 4 1/8″ and scored it at 5 3/4″.
Then I cut a 1 1/4″x 4 1/8″ panel in the smae card ase colour – Pool Party. I also cut a window sheet panel measuring 4 1/2″x 4 1/8″.

TIP: Adhere the bottom Pool Party panel to one end of the window sheet. Then, add Stampin’ Seal+ to the back of the card base 1 1/4″ scored section. Hold the window sheet panel firmly at the bottom of the card base and then press the top 1 1/4″ flap to the window sheet panel.
I used the square and frame dies to cut the two DSP shapes and the Pool Party frame for the card front.
The two DSP squares were layered and adhered together. I added a Pool Party square to the back of each DSP square. The Pool Party frame was attached using Foam Adhesive Strips.
This layered DSP and frame piece was adhered to the window sheet using Stampin’ Seal+.
I stamped a Basic White square using Strawberry Slush ink.

TIP: Position the stamped white card insert over the Pool Party square on the window sheet. Use a strip of Post-it Tape to hold it in place. Add adhesive to the back of the white square and close the card to glue the card insert in place.
The back of the envelope was stamped with the same image.

I stamped the greeting on Basic White card and used the irregular circle die to cut it out. It was popped up on the card front using Stampin’ Dimensionals.
A length of Strawberry SLush Faux Linen Ribbon was cut in half and tied into a bow with three lengths of white Baker’s Twine that was coloured with the Dark Strawberry Slush Stampin’ Blend. It took one of the amazing Mini Glue Dots to secure the bow in place.
Finally, I added three of the Strawberry Slush Flat Pearls to embellish the card.
Tomorrow I have another card to share with you, as well as some extras to share with you.
Until then, happy stamping and scrapbooking.

If you live in Australia, you can order any of the products I used to make this card by going to my online store. Just click on any of the images below.

![Joyful Squares Bundle (English) [ 166850 ]](https://i0.wp.com/assets1.tamsnetwork.com/images/EC042017NF/166850s.jpg?w=140&ssl=1 "Joyful Squares Bundle (English) [ 166850 ]") | ![Joyful Squares Dies [ 166849 ]](https://i0.wp.com/assets1.tamsnetwork.com/images/EC042017NF/166849s.jpg?w=140&ssl=1 "Joyful Squares Dies [ 166849 ]") | ||
![Baker's Twine Essentials Pack [ 155475 ]](https://i0.wp.com/assets1.tamsnetwork.com/images/EC042017NF/155475s.jpg?w=140&ssl=1 "Baker's Twine Essentials Pack [ 155475 ]") | ![2025–2027 In Color™ Flat Pearls [ 165192 ]](https://i0.wp.com/assets1.tamsnetwork.com/images/EC042017NF/165192s.jpg?w=140&ssl=1 "2025–2027 In Color™ Flat Pearls [ 165192 ]") | ||
![Basic White A4 Cardstock [ 166781 ]](https://i0.wp.com/assets1.tamsnetwork.com/images/EC042017NF/166781s.jpg?w=140&ssl=1 "Basic White A4 Cardstock [ 166781 ]") | ![Pool Party A4 Card Stock [ 124391 ]](https://i0.wp.com/assets1.tamsnetwork.com/images/EC042017NF/124391s.jpg?w=140&ssl=1 "Pool Party A4 Card Stock [ 124391 ]") | ![Window Sheets [ 142314 ]](https://i0.wp.com/assets1.tamsnetwork.com/images/EC042017NF/142314s.jpg?w=140&ssl=1 "Window Sheets [ 142314 ]") | |
![Multipurpose Liquid Glue [ 110755 ]](https://i0.wp.com/assets1.tamsnetwork.com/images/EC042017NF/110755s.jpg?w=140&ssl=1 "Multipurpose Liquid Glue [ 110755 ]") | ![Foam Adhesive Strips [ 141825 ]](https://i0.wp.com/assets1.tamsnetwork.com/images/EC042017NF/141825s.jpg?w=140&ssl=1 "Foam Adhesive Strips [ 141825 ]") | ![Stampin' Seal+ [ 149699 ]](https://i0.wp.com/assets1.tamsnetwork.com/images/EC042017NF/149699s.jpg?w=140&ssl=1 "Stampin' Seal+ [ 149699 ]") |
![Joyful Squares Photopolymer Stamp Set (English) [ 166847 ]](https://i0.wp.com/assets1.tamsnetwork.com/images/EC042017NF/166847s.jpg?w=140&ssl=1 "Joyful Squares Photopolymer Stamp Set (English) [ 166847 ]")
![Square Snippets 12" X 12" (30.5 X 30.5 Cm) Designer Series Paper [ 166993 ]](https://i0.wp.com/assets1.tamsnetwork.com/images/EC042017NF/166993s.jpg?w=140&ssl=1 "Square Snippets 12\" X 12\" (30.5 X 30.5 Cm) Designer Series Paper [ 166993 ]")
![Strawberry Slush 3/8" (1 Cm) Faux Linen Ribbon [ 165274 ]](https://i0.wp.com/assets1.tamsnetwork.com/images/EC042017NF/165274s.jpg?w=140&ssl=1 "Strawberry Slush 3/8\" (1 Cm) Faux Linen Ribbon [ 165274 ]")
![Strawberry Slush Stampin’ Blends Combo Pack [ 165290 ]](https://i0.wp.com/assets1.tamsnetwork.com/images/EC042017NF/165290s.jpg?w=140&ssl=1 "Strawberry Slush Stampin’ Blends Combo Pack [ 165290 ]")
![Strawberry Slush Classic Stampin' Pad [ 165286 ]](https://i0.wp.com/assets1.tamsnetwork.com/images/EC042017NF/165286s.jpg?w=140&ssl=1 "Strawberry Slush Classic Stampin' Pad [ 165286 ]")




