Posted on Leave a comment

GLOBAL DESIGN PROJECT CHALLENGE #316

Another week and another GDP Challenge. I look forward to these each week.

I think the GDP team has shared a great explanation for CASEing – Remember that when you CASE (Copy And Selectively Edit) a project you can take what you like from the design and make it your own. It might be the stamp set – the colors, the layout, the theme, the images – whatever you like that has inspired you to make a card of your own.

For my card I chose the layout and Christmas greeting theme as inspiration.

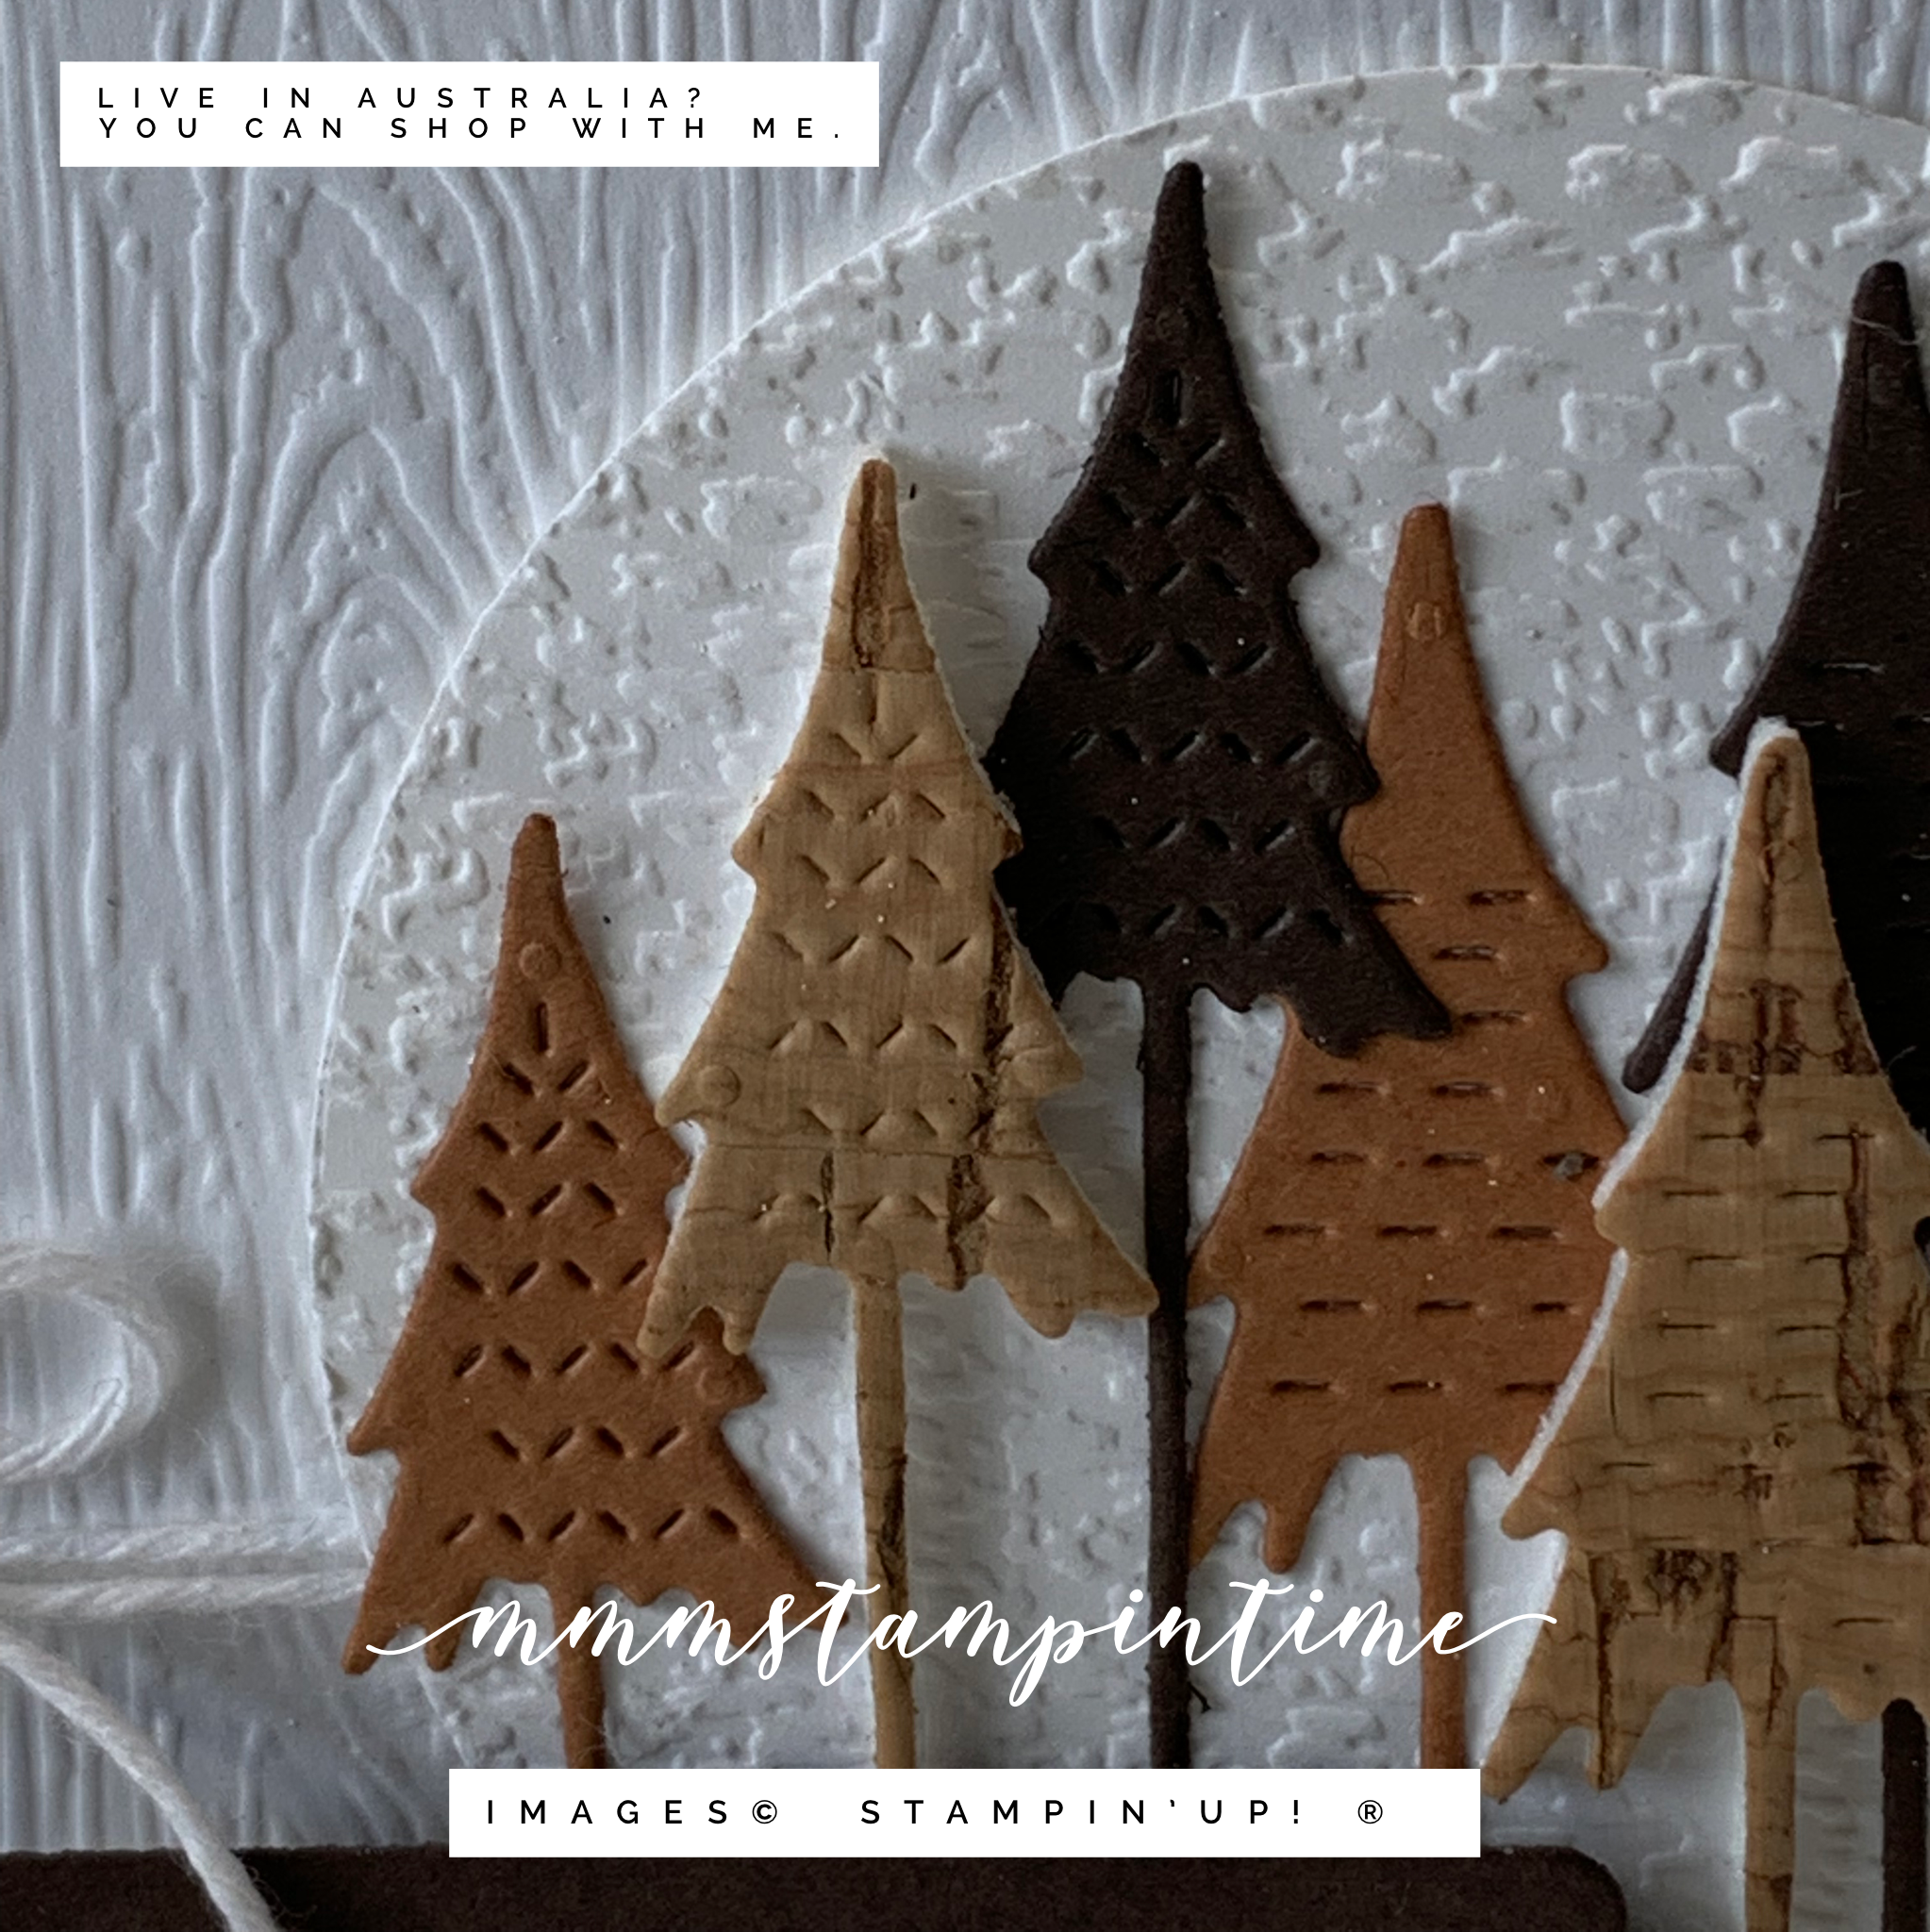
Using a Basic White card base, I then added an Early Espresso layer with the distressed and embossed Basic White feature panel. I used the Timber 3D Embossing Folder for this layer.

After wrapping and tying some white Baker’s Twine, from the Essentials Pack, I added a Basic White embossed circle. I used the Tasteful Textile 3D Embossing Folder and then one of the Layering Circles Dies to cut this layer.

The trees, from the Christmas Trees Dies, have been cut from Cinnamon Cider, Early Espresso and Cork Specialty Paper. The cork has Foam Adhesive Sheet attached and the other trees have Adhesive Sheet. This certainly makes securing the trees so easy.

The tree trunks were trimmed back to the edge of the circle to keep them within that focal point.

The greeting is from the Heartfelt Wishes Stamp Set and was heat embossed in white from the Basics Stampin’ Emboss Powders. It was cut using one of the Seasonal Labels Dies (I forgot to add this in my product photo).

I think that I have been a bit late to the lots of white trend but I do like the way this card looks.

Until next time, happy stamping.

If you live in Australia, you can order any of the products I used to make this card by going to my online store. Just click on any of the images below.

Product List
Heat Tool
[129056]
$50.00
Paper Snips
[103579]
$17.00
Posted on Leave a comment

IT’S TIME FOR SOME CHRISTMAS GIFT TAGS

Well, I was so caught up in my Coffee & Card class and making Christmas gift tags, I totally forgot to share a post with you yesterday.

I wanted to use the Sweet Stockings Suite to make Christmas gift tags and a coordinating gift box.

The gift box was inspired by Julie DiMatteo’s design for a reinforced gift box. I will be making this Thursday during my Facebook Live if you want to see how to make it.

The box base was made with a piece of Bumblebee card stock and the lid uses one of the designs from the Sweet Stockings 12″x 12″ Designer Series Paper.

The tag, which I also used for all the gift tags in the box, was cut using the tag from the Stockings Dies.

I used the Sweet Little Stockings Stamp Set for the Christmas greeting and the gift boxes. The boxes were stamped onto the tag as well as some scrap card stock. These extra boxes were fussy cut and popped up using Stampin’ Dimensionals.

The diamond shaled silver Epoxy Essentials were coloured using the dark Evening Evergreen Stampin’ Blend and added to each of the boxes.

The star die, from the Stocking Dies, was used to cut three Evenng Evergreen stars. I added some of the black Cute Star Sequins to the centre of each star. Using half a Mini Stampin’ Dimensional, I added the stars to the top of the box.

I punched a small hole at the top of the tag before threading some Bumblebee 2020 – 2022 In Colour Ribbon through the tag. The tag was then popped up with dimensionals and the ribbon wrapped and tied into a bow.

When the bow is untied the gift tags are revealed.

There are eight gift tags in total and they all have a Basic White backing with ‘to’ and ‘from’ stamped in coordinating colours.

I fussy cut each of the stockings that I chose from the DSP. The Whisper White Crinkled Seam Binding Ribbon was threaded through the top of each tag.

I used the Clear & Silver Epoxy Essentials to add some coloured shimmer to the tags.

I really like the colour combination in this suite and the playful images and ‘pawfect’ sentiments.

What is your favourite Christmas product in the July – December 2021 Mini Catalogue?

Until next time, happy stamping.

If you live in Australia, you can order any of the products I used to make this card by going to my online store. Just click on any of the images below.

Product List
Paper Snips
[103579]
$17.00
Posted on Leave a comment

COLOUR INKspiration INSPIRATION

Today’s post is a little late – thank you for your patience!

I was delighted to be chosen as the ‘winner’ of the #109 Colour INKspiration Challenge and invited to be a guest designer with the team very soon.

While very satisfying, this is not the destination but still part of my journey. I will continue to participate in blog hops and challenges because these offer me an opportunity to create in a more creative way.

These are the colours for the #110 Colour INKspiration Challenge.

I started by pulling out the card stock, ink pads and Stampin’ Blends in these colours. Then I took some time glancing across the stamp sets and dies sitting on the shelves in front of me. After a couple of minutes I chose the Hand-Penned Petals Stamp set and Penned Flowers Dies.

The large floral image was stamped in Versamark on Fluid 100 Watercolor Paper and heat embossed in black. Then I used one of my Water Painters to water colour the images in Cajun Craze, Pale Papaya and Shaded Spruce.

Before I die cut these water coloured images, I thought about how I might ‘frame’ them on a Basic White card base.

I decided to cut a number of frames using the Stitched Rectangles Frames. The frames were cut in all four of the challenge colours and in two different sizes. Then they were overlapped, interwoven and glued in place. After the frames were adhered to the front of the card, the overhanging pieces were trimmed off.

As soon as the frames were adhered in place, I gently bent each of the water coloured floral bouquet die cut. Then I adhered each one in place, carefully positioning and layering them. Some of the bouquets were cut down so they could be popped in behind a higher layer.

The rectangular frames act as a trellis for the water coloured floral images.

I also fussy cut a few of the larger flowers and placed them, over the top of a base flower, using Stampin’ Dimensionals.

When all the flowers were securely in place, I took my Clear Wink of Stella and painted some gorgeous bling on all the leaves and the three highlighted flowers.

The greeting, also from the Hand-Penned Petals Stamp Set, was stamped in Shaded Spruce and cut using the Stitched Rectangles Dies. Then it was positioned in the top left-hand corner using Stampin’ Dimensionals.

I trimmed down one of the water coloured floral images to use inside the card and on the front of the envelope.

My final touch was to colour some of the silver Epoxy Essentials, using the Dark Shaded Spruce Stampin’ Blend, and pop them on the front of the card.

For the water colouring I added a few drops, from each of the chosen colours, in to the lid of the ink pad.

I am so happy with the depth created by all the coloured flowers and leaves on the front of this card.

I also like the effect I achieved with the multiple frames that are sitting under the flowers – at different angles. What do you think? I would love your comments about this card.

Until next time, happy stamping.

If you live in Australia, you can order any of the products I used to make this card by going to my online store. Just click on any of the images below.

Product List
Paper Snips
[103579]
$17.00