Posted on Leave a comment

A PERFECT PURPLE PACKET OF PANSY SEEDS

After my trio of pansy card yesterday, I made a 3D double slider gift card to hold a packet of pansy seeds.

Double slider cards are so much fun to make. In the past, I have made them to hold goodies as small as gift cards and as large as a block of Lindt chocolate.

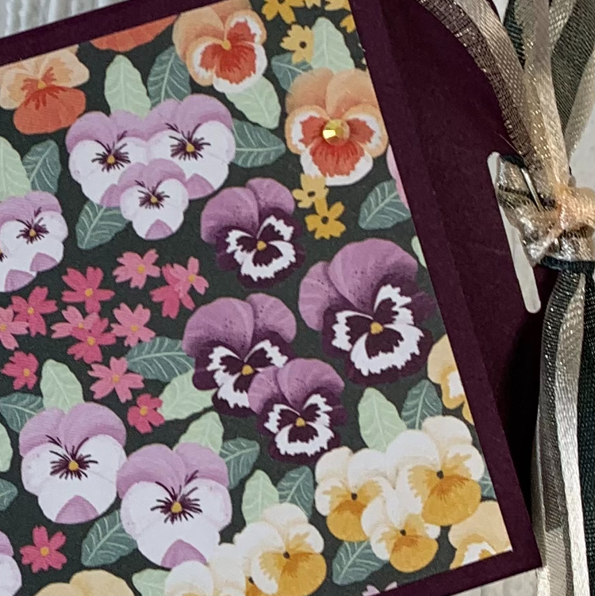
The base for the double slider card was made from Blackberry Bliss card stock and was decorated with the small pansies design from the Pansy Petals 12″x 12″ Designer Series Paper.

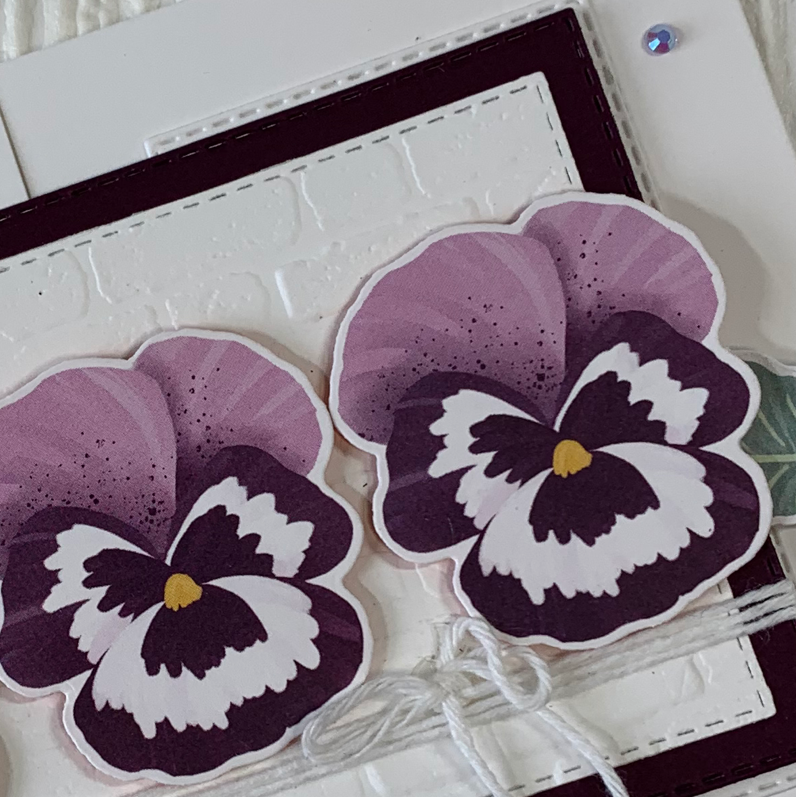
The Basic White and Blackberry Bliss internal layers had each of their corners rounded using the Detailed Trio Punch.

When you pull on the ribbon trimmed end of the card, both sides of the double slider card open out revealing the treat and greeting.

For the ribbons, I used some of the Pale Papaya Open Weave Ribbon and the white faux linen ribbon from the Flowers for Every Season Ribbon Combo Pack. The white faux linen was coloured using the dark Evening Evergreen Stampin’ Blend pen. The ribbons were threaded through the punched hole and tied in a knot. Some extra lengths of the Pale Papaya Ribbon were cut in half lengthways and also tied through the punched hole.

The greeting is the same as the one I used in yesterday’s card.

I added some of the 2021 – 2023 In Colour Jewels to the front of this 3D project.

This is such a pretty pansy paper design. The flowers are so sweet, small and colourful.

Who would you send a packet of pansy seeds to?

Until next time, happy stamping.

If you live in Australia, you can order any of the products I used to make this card by going to my online store. Just click on any of the images below.

Product List
Paper Snips
[103579]
$17.00
Posted on Leave a comment

A TRIO OF PURPLE PANSIES

It seems so long ago that I last used the Pansy Petals Suite. I am pleased that I pulled the Pansy Patch Stamp Set and Pansy Dies from my shelf to use for this project. And, I still had more than enough of the Pansy Petals 12’x 12″ Designer Series Paper for a few projects.

I also made a card that is predominantly white. just like yesterday’s GDP Challenge card.

I chose a gate fold card for this project with Basic White as the base. Then I used the Stitched Rectangle Dies to cut a piece of Blackberry Bliss card stock and a slightly smaller die for a Basic White rectangle.

This Basic White rectangle was then embossed using the Brick & Mortar 3D Embossing Folder. The two die cut rectangles were then glued together and a length of white Baker’s Twine, from the Essentials Pack, was wrapped around these layers and tied in a bow. I often pop a Mini Glue Dot behind a bow to ensure it stays in place.

Multipurpose Glue was added to one half of the back of the Blackberry Bliss and then positioned on the front left card flap.

I used the Pansy Dies to cut several purple pansies from the DSP. Three of them were placed over the brick embossed white panel using Stampin’ Dimensionals. Then I tucked two die cut leaves under two of the flowers.

I stamped the sentiment, using Fresh Freesia ink, onto a piece of Basic White card before cutting it with one of the Stitched Rectangle Dies. Then it was adhered inside the card.

Another purple pansy was adhered to the inside of the card and the front of the envelope.

Then I added some 2021 – 2023 In Colour Jewels to the front of the card and one inside the card.

Who would have thought that pansies and bricks would work so well together? What do you think?

Until next time, happy stamping.

If you live in Australia, you can order any of the products I used to make this card by going to my online store. Just click on any of the images below.

Product List
Pansy Dies
[155680]
$56.00
Paper Snips
[103579]
$17.00
Posted on Leave a comment

FRESHLY BREWED PROJECTS CUTE CHRISTMAS

This week we look forward to sharing some cute Christmas projects with you.

I decided to use Penguin Place and Holly Jolly Stamp Sets with the Whimsy & Wonder 12″x 12″ Specialty Designer Series Paper.

I started with a Misty Moonlight card base and added the trees and stars DSP for my midnight sky. Then I cut the sloping layered hills using a die from the Inspiring Canopy Dies. Each of these layers were popped up using Stampin’ Dimensionals.

For the tree, I added Adhesive Sheet to the back of the pink DSP before cutting this tree from the Christmas Tree Dies. I peeled away the backing paper and postioned the tree on the left hand side.

The penguin was stamped and punched using the Penguin Builder Punch. Then I stamped his scarf and beanie using the Polished Pink Stampin’ Write Marker ™ to colour the images. I used the pen end of the marker to draw around the outline of the scarf.

The greeting was stamped using Misty Moonlight ink and trimmed down before it was tucked in under the front sloping layer.

The same greeting was stamped inside the card and on the envelope. I used some of the pink and white twine that was left over from my Love, Santa Tag Kit to wrap around the top of the card and then tied a bow.

Finally, I added some of the 2021 – 2023 In Colour Jewels.

Make sure you pop across and see the other cute Christmas projects from the Freshly Brewed team.

I hope that these projects have inspired you to create something cute and, perhaps, non-traditional Christmas cards this year.

Until next time, happy stamping.

If you live in Australia, you can order any of the products I used to make this card by going to my online store. Just click on any of the images below.

Product List
Paper Snips
[103579]
$17.00