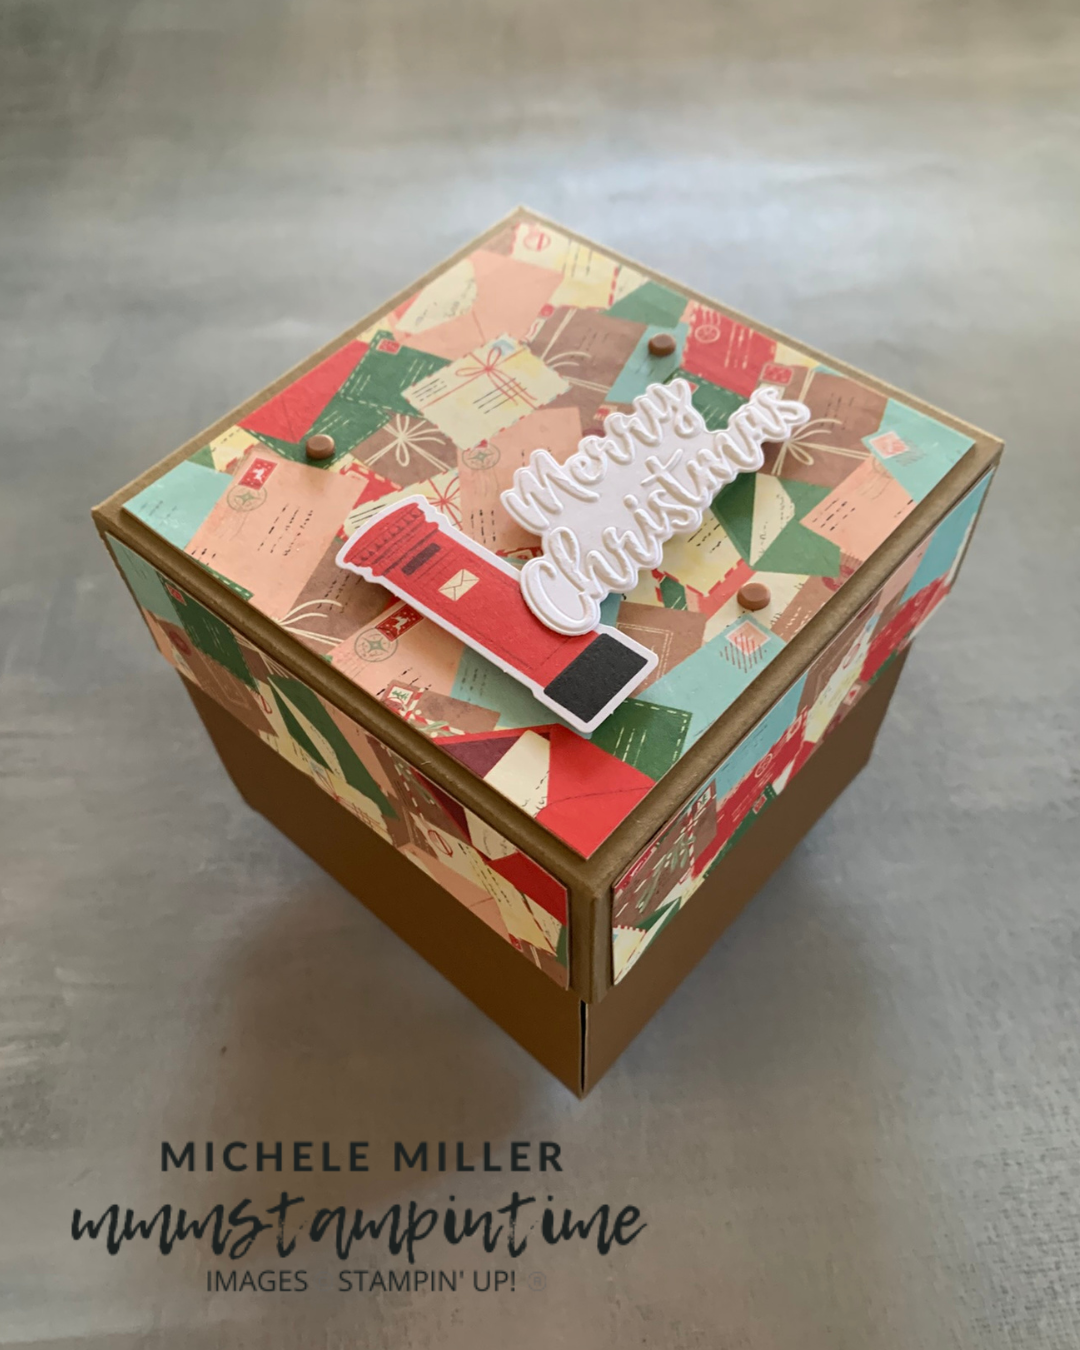
Today I have a Christmas Explosion Box to share with you.
The box base measrues 4″x 4″x 4″ and the lid is 4 3/16″x 4 3/16″x 1 1/2″ and was made using Pecan Pie Two Tone card and A4 card.

I enjoy taking the time to carefully cut the DSP to ensure each of the 1 1/2″ sides match to the paper on top of the lid.

When the lid is removed the sides fall away to reveal an inner box holding Lindt chocolates wrapped in Christmas red foil.
Each of the outer sides have white panels, for Christmas messages, and are decorated with some of the pre-cut designs.

The inner box also had DSP panels added.

The box lid was topped off with a letter box, a Christmas greeting and some of the soon to be available Earthy Matte Dots.
Tomorrow I have a great fun fold card to sahre with you.
Until then, happy stamping and scrapbooking.

If you live in Australia, you can order any of the products I used to make this card by going to my online store. Just click on any of the images below.

![Basic White A4 Thick Cardstock [ 159230 ]](https://i0.wp.com/assets1.tamsnetwork.com/images/EC042017NF/159230s.jpg?w=140&ssl=1 "Basic White A4 Thick Cardstock [ 159230 ]") | ![Pecan Pie A4 Cardstock [ 161726 ]](https://i0.wp.com/assets1.tamsnetwork.com/images/EC042017NF/161726s.jpg?w=140&ssl=1 "Pecan Pie A4 Cardstock [ 161726 ]") | ![Multipurpose Liquid Glue [ 110755 ]](https://i0.wp.com/assets1.tamsnetwork.com/images/EC042017NF/110755s.jpg?w=140&ssl=1 "Multipurpose Liquid Glue [ 110755 ]") | ![Stampin' Dimensionals [ 104430 ]](https://i0.wp.com/assets1.tamsnetwork.com/images/EC042017NF/104430s.jpg?w=140&ssl=1 "Stampin' Dimensionals [ 104430 ]") |
![Mini Stampin' Dimensionals [ 144108 ]](https://i0.wp.com/assets1.tamsnetwork.com/images/EC042017NF/144108s.jpg?w=140&ssl=1 "Mini Stampin' Dimensionals [ 144108 ]") | ![Paper Snips [ 103579 ]](https://i0.wp.com/assets1.tamsnetwork.com/images/EC042017NF/103579s.jpg?w=140&ssl=1 "Paper Snips [ 103579 ]") | ![Paper Trimmer [ 152392 ]](https://i0.wp.com/assets1.tamsnetwork.com/images/EC042017NF/152392s.jpg?w=140&ssl=1 "Paper Trimmer [ 152392 ]") | ![Stampin' Cut & Emboss Machine [ 149653 ]](https://i0.wp.com/assets1.tamsnetwork.com/images/EC042017NF/149653s.jpg?w=140&ssl=1 "Stampin' Cut & Emboss Machine [ 149653 ]") |
![North Pole Delivery Suite Collection (English) [ 165850 ]](https://i0.wp.com/assets1.tamsnetwork.com/images/EC042017NF/165850s.jpg?w=140&ssl=1 "North Pole Delivery Suite Collection (English) [ 165850 ]")
![North Pole Delivery 12" X 12" (30.5 X 30.5 Cm) Specialty Designer Series Paper [ 165837 ]](https://i0.wp.com/assets1.tamsnetwork.com/images/EC042017NF/165837s.jpg?w=140&ssl=1 "North Pole Delivery 12\" X 12\" (30.5 X 30.5 Cm) Specialty Designer Series Paper [ 165837 ]")
![Christmas Words Collage Hybrid Embossing Folder (English) [ 165912 ]](https://i0.wp.com/assets1.tamsnetwork.com/images/EC042017NF/165912s.jpg?w=140&ssl=1 "Christmas Words Collage Hybrid Embossing Folder (English) [ 165912 ]")
![Pecan Pie 12" X 12" (30.5 X 30.5 Cm) Two Tone Cardstock [ 166688 ]](https://i0.wp.com/assets1.tamsnetwork.com/images/EC042017NF/166688s.jpg?w=140&ssl=1 "Pecan Pie 12\" X 12\" (30.5 X 30.5 Cm) Two Tone Cardstock [ 166688 ]")


![Love & Courage Cling Stamp Set (English) [ 165935 ]](https://i0.wp.com/assets1.tamsnetwork.com/images/EC042017NF/165935s.jpg?w=140&ssl=1 "Love & Courage Cling Stamp Set (English) [ 165935 ]")
![Perennial Postage Dies [ 162607 ]](https://i0.wp.com/assets1.tamsnetwork.com/images/EC042017NF/162607s.jpg?w=140&ssl=1 "Perennial Postage Dies [ 162607 ]")
![Strawberry Slush 3/8" (1 Cm) Faux Linen Ribbon [ 165274 ]](https://i0.wp.com/assets1.tamsnetwork.com/images/EC042017NF/165274s.jpg?w=140&ssl=1 "Strawberry Slush 3/8\" (1 Cm) Faux Linen Ribbon [ 165274 ]")
![Baker's Twine Essentials Pack [ 155475 ]](https://i0.wp.com/assets1.tamsnetwork.com/images/EC042017NF/155475s.jpg?w=140&ssl=1 "Baker's Twine Essentials Pack [ 155475 ]")
![2025–2027 In Color™ 6" X 6" (15.2 X 15.2 Cm) Designer Series Paper [ 165300 ]](https://i0.wp.com/assets1.tamsnetwork.com/images/EC042017NF/165300s.jpg?w=140&ssl=1 "2025–2027 In Color™ 6\" X 6\" (15.2 X 15.2 Cm) Designer Series Paper [ 165300 ]")
![Hole Punch Assortment [ 165409 ]](https://i0.wp.com/assets1.tamsnetwork.com/images/EC042017NF/165409s.jpg?w=140&ssl=1 "Hole Punch Assortment [ 165409 ]")
![Basic White A4 Cardstock [ 166781 ]](https://i0.wp.com/assets1.tamsnetwork.com/images/EC042017NF/166781s.jpg?w=140&ssl=1 "Basic White A4 Cardstock [ 166781 ]")
![Strawberry Slush A4 Cardstock [ 165297 ]](https://i0.wp.com/assets1.tamsnetwork.com/images/EC042017NF/165297s.jpg?w=140&ssl=1 "Strawberry Slush A4 Cardstock [ 165297 ]")
![Strawberry Slush Classic Stampin' Pad [ 165286 ]](https://i0.wp.com/assets1.tamsnetwork.com/images/EC042017NF/165286s.jpg?w=140&ssl=1 "Strawberry Slush Classic Stampin' Pad [ 165286 ]")
![Heat Tool [ 129056 ]](https://i0.wp.com/assets1.tamsnetwork.com/images/EC042017NF/129056s.jpg?w=140&ssl=1 "Heat Tool [ 129056 ]")
![Mini Stampin' Cut & Emboss Machine [ 150673 ]](https://i0.wp.com/assets1.tamsnetwork.com/images/EC042017NF/150673s.jpg?w=140&ssl=1 "Mini Stampin' Cut & Emboss Machine [ 150673 ]")


![Everyday You & Me Photopolymer Stamp Set (English) [ 166629 ]](https://i0.wp.com/assets1.tamsnetwork.com/images/EC042017NF/166629s.jpg?w=140&ssl=1 "Everyday You & Me Photopolymer Stamp Set (English) [ 166629 ]")
![Everyday Happiness 12" X 12" (30.5 X 30.5 Cm) Designer Series Paper [ 166632 ]](https://i0.wp.com/assets1.tamsnetwork.com/images/EC042017NF/166632s.jpg?w=140&ssl=1 "Everyday Happiness 12\" X 12\" (30.5 X 30.5 Cm) Designer Series Paper [ 166632 ]")
![Pretty Peacock Classic Stampin’ Pad [ 150083 ]](https://i0.wp.com/assets1.tamsnetwork.com/images/EC042017NF/150083s.jpg?w=140&ssl=1 "Pretty Peacock Classic Stampin’ Pad [ 150083 ]")
![Irregular Weave 3/8" (1 Cm) Trim [ 165903 ]](https://i0.wp.com/assets1.tamsnetwork.com/images/EC042017NF/165903s.jpg?w=140&ssl=1 "Irregular Weave 3/8\" (1 Cm) Trim [ 165903 ]")
![Tear & Tape Adhesive [ 154031 ]](https://i0.wp.com/assets1.tamsnetwork.com/images/EC042017NF/154031s.jpg?w=140&ssl=1 "Tear & Tape Adhesive [ 154031 ]")
![Bone Folder [ 102300 ]](https://i0.wp.com/assets1.tamsnetwork.com/images/EC042017NF/102300s.jpg?w=140&ssl=1 "Bone Folder [ 102300 ]")


