Posted on Leave a comment

TIME TO SHARE ANOTHER COLOURING TECHNIQUE TODAY

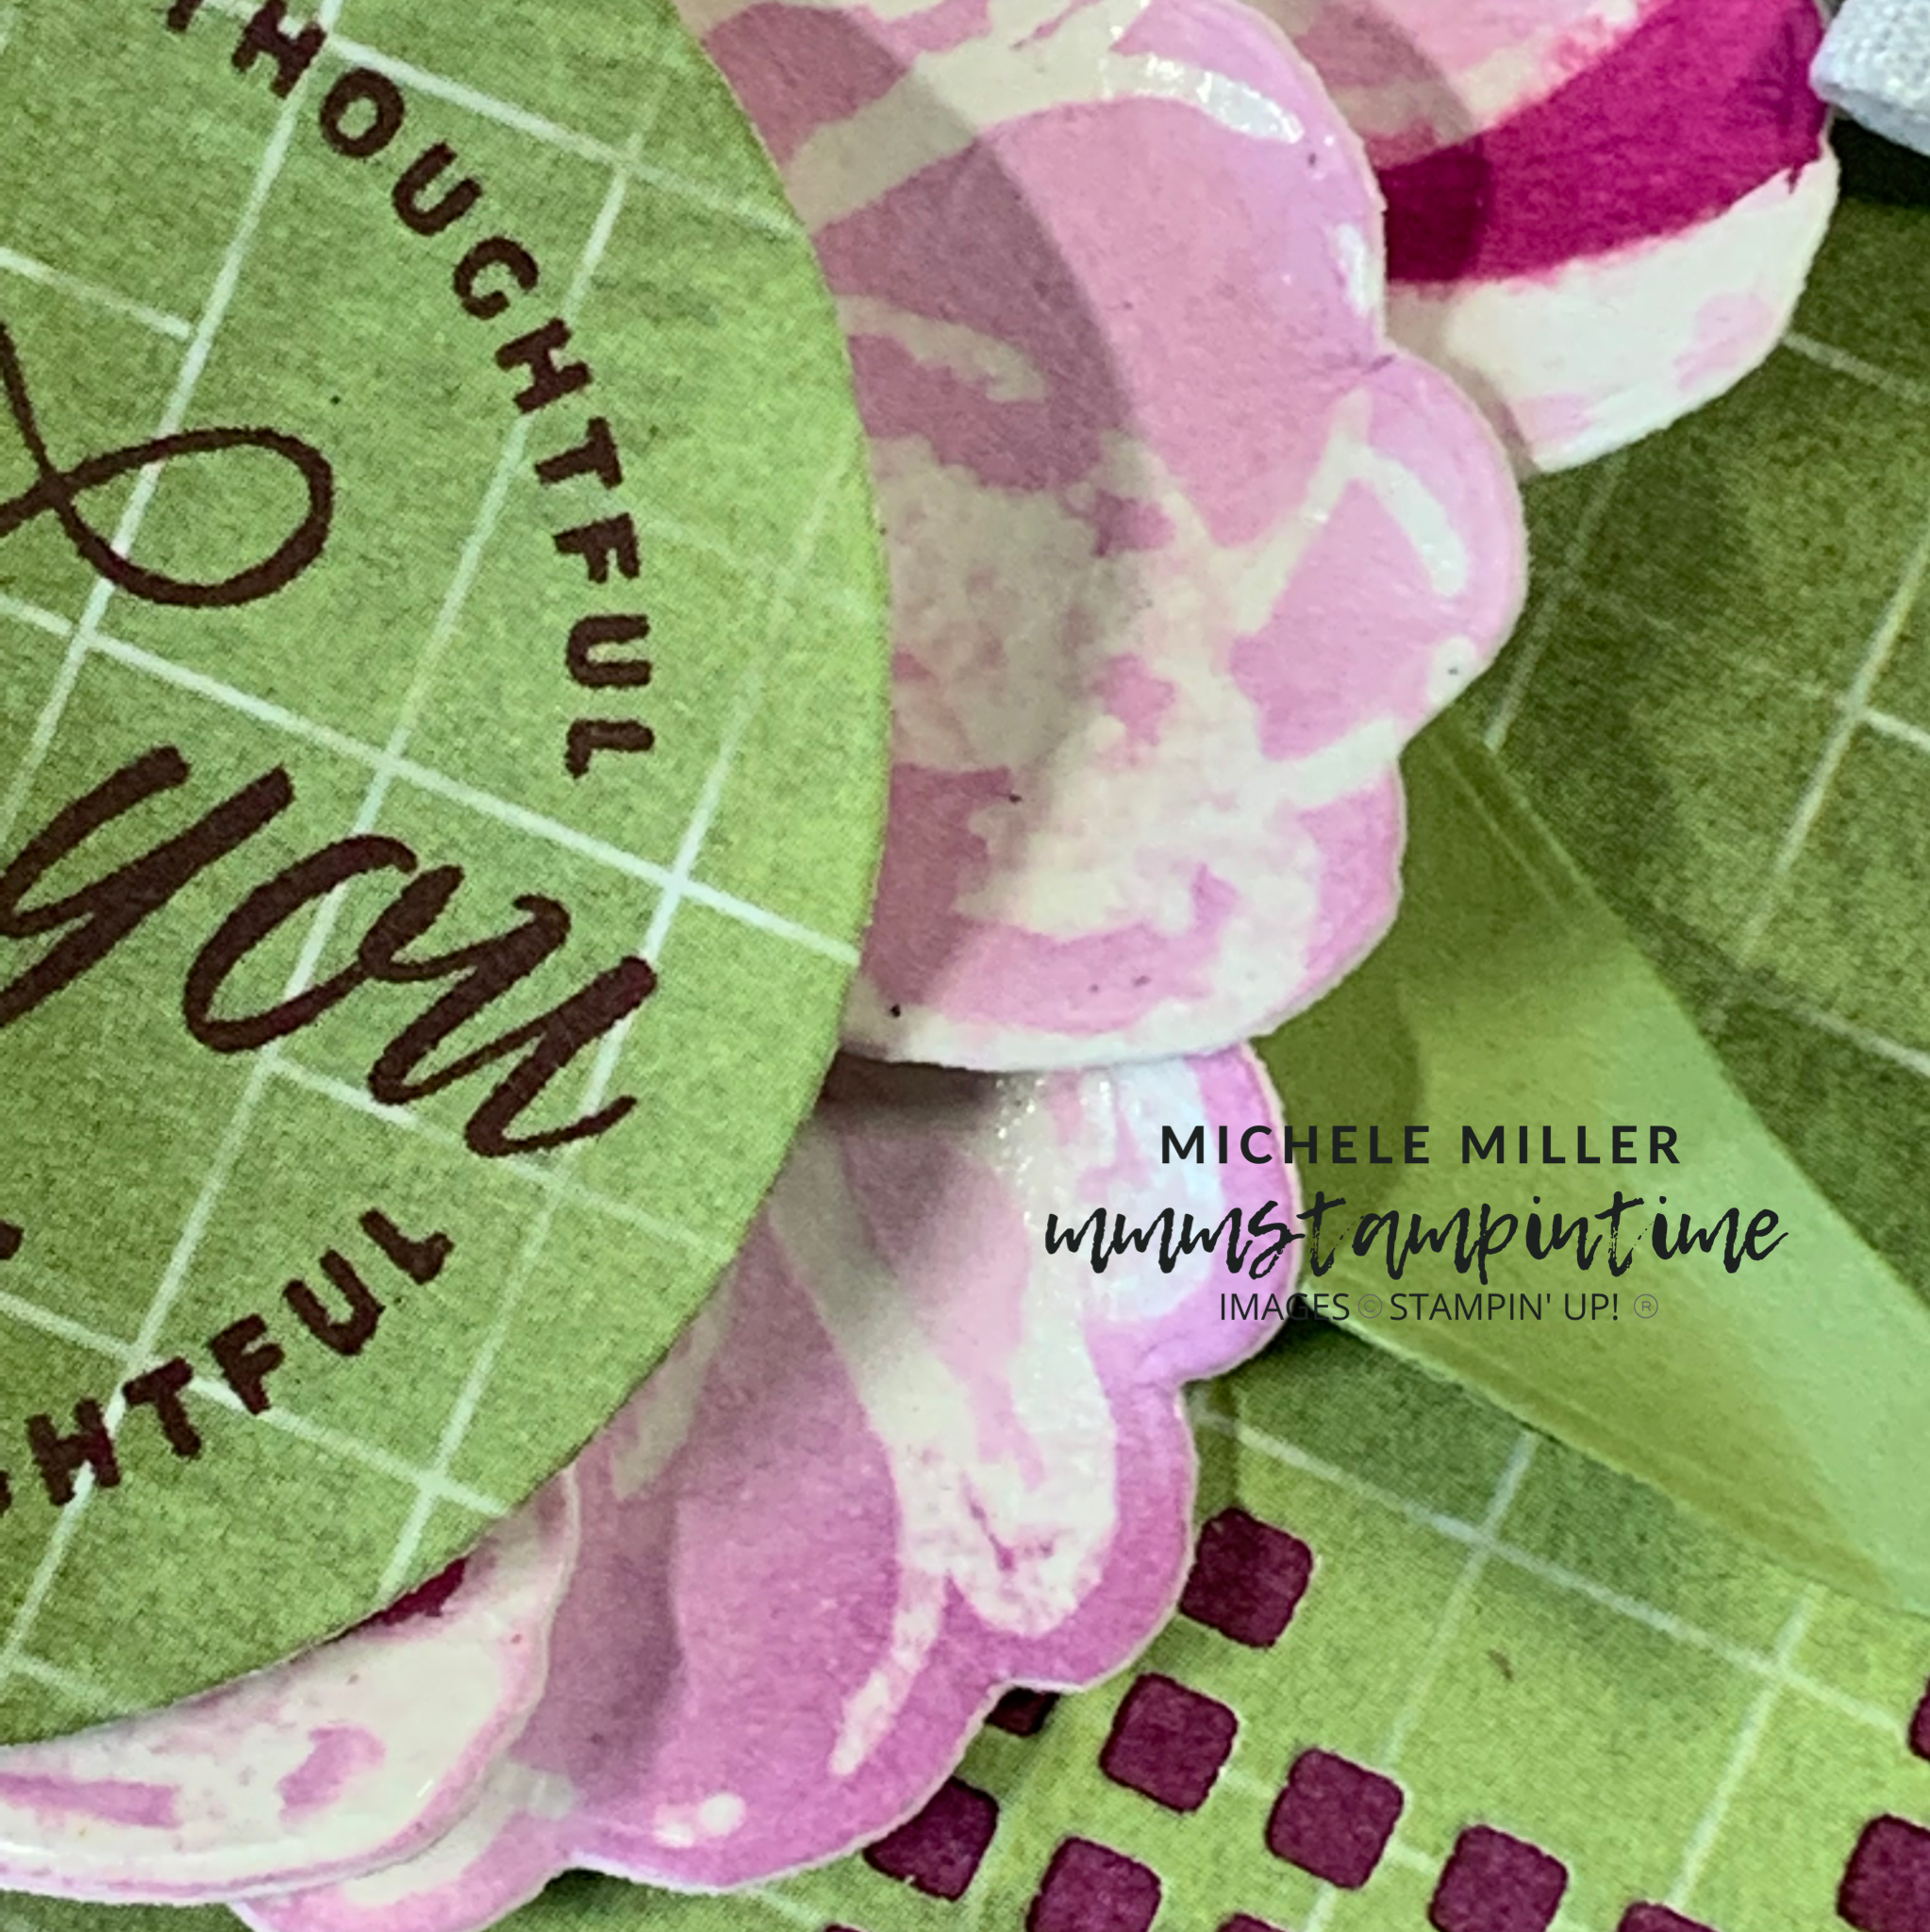
I wanted to experiment with some acrylic block water colouring. For the first experiment, I used Block F and added ink in 1″ strips directly onto the block. The colours were added in sequence – Cajun Craze, Cinnamon Cider, Evening Evergreen, Just Jade, Garden Green and Granny Apple Green. I used both Classic Stampin’ Pads and Stampin’ Write Markers™.

Then I spritzed water across the block.

I pressed a piece of Shimmery White cardstock onto the block.

The result was a little muddy looking in some areas so I tried a different approach.

This time I chose Block G and used the same cardstock and colours.

I taped the cardstock to stop it from curling up when it was spritzed with water. Then I inked up the small block and pressed it down on the cardstock.

Between each colour being stamped down, I gave the card an extra spritz.

When both samples were dry, I decided to use the second experiment for today’s project.

The layout for this card is symmetrical and quite simple. I used the Painted Texture 3D Embossing Folder to add texture to the Granny Apple Green layer. Then I adhered it to the Basic Black layer and then the Basic White card base.

The block water coloured panel was trimmed down. A length of black twine, from the Baker’s Twine Essentials Pack, was wrapped around this panel and then tied in a bow.

A scrap of Basic Black cardstock was used to punch out the cactus and pot. I used Stampin’ Dimensionals to attach the pieces to the card front.

The sentiment was partially inked so that it would only read ‘a note’. It was cut into a small strip and added to the card front with dimensionals.

Finally, I added some Matte Black Dots for decoration.

This technique is a bit messy but I do like the finished look.

Oops – I forgot to include the baker’s twine in the products photo.

Tomorrow I will have a project for the Global Design Project Challenge to share with you.

Until then, happy stamping.

If you live in Australia, you can order any of the products I used to make this card by going to my online store. Just click on any of the images below.

Product List
Paper Snips
[103579]
$17.00
Posted on Leave a comment

IT’S TECHNIQUE TUESDAY & WHO CAN RESIST EMBOSSING?

I have always loved the ways we can use the English language in so many creative ways. It was so much fun teaching my high school English students different literary devices and techniques to achieve more expressive effects.

Two of my favourites are ALLITERATION and WORDPLAY. You can both of these in today’s title. The first it obvious but the second will reveal itself very quickly.

Today, I am sharing a card using RESIST EMBOSSING with some very simple water colouring.

If you have been following along, you will know that this week I am featuring the Flowering Fields Suite Collection.

FLOWERING FIELDS SUITE COLLECTION (ENGLISH)

For this card I have used the Flowering Tulips Bundle and Flowering Fields Designer Series Paper.

FLOWERING TULIPS BUNDLE (ENGLISH)

I used the Fluid 100 Watercolour Paper, Water Painters and the Fresh Freesia and Rich Razzleberry Classic Stampin’ Pads as the basis for water colouring flowers for the card.

I started by stamping the floral images onto the water colour paper using Versamark and then adding Clear Embossing Powder. This was then set using the Heat Tool.

Then I used my Water Painters to add water directly to the paper and then to add colour to the images.

The heat embossed clear embossing powder ‘stays’ white after the water colouring has been completed. When the paper is dry, each of the three different flowers were then cut using the outline dies from the Tulip Dies set.

Then I gently scrunched the flowers to give them some shape and texture.

The card base is Rich Razzleberry and I chose this piece of Designer Series Paper for the next layer of the card. Before this DSP layer was adhered to the card front, I added the checked Pear Pizzazz DSP piece . This piece features the geometric small squares die cut effect. Then I used a length of 1/2″ white Faux Linen Ribbon, from the Flowers for Every Season Ribbon Combo Pack, to tie a bow and wrap it around the DSP layers. The ribbon was secured behind this DSP using Tean & Tape.

The DSP and ribbon layers were then adhered to the card front.

Then I worked on creating these cascading flowers, using Multipurpose Glue and Stampin’ Dimensionals. I die cut three small leaves from a scrap of Pear Pizzazz cardstock and gently crunched them. With some Multipurpose Glue added to the base of each leaf, I tucked them in behind the flowers.

I used the ‘thank you’ sentiment, from the Flowering Tulips Stamp Set, to stamp on to the same piece of Pear Pizzazz DSP in Rich Razzleberry. This was then cut using one of the Layering Circles Dies. Stampin’ Dimensionals were placed on the back of the sentiment circle and then popped up on the card front. This is such a gorgeous sentiment – I love the way the two fonts work so well together, as well as the ‘logo style’ it has been styled.

The card insert and the back flap of the envelope both had some of the Pear Pizzazz DSP attached to create a coordinated and complete look to this card.

NOTE TO SELF – when I look back at the card, I think I should have lightened the colour in the centre of the flowers. What do you think? I would love your feedback!

Tomorrow is Welcome to Wednesay and this is the day that I will share projects that I have created for blog hops and challenges. I make a project each week for the Global Design Project challenge and will soon start sharing a project for the Freshly Brewed Projects Blog Hop.

Until the, happy stamping.

If you live in Australia, you can order any of the products I used to make this card by going to my online store. Just click on any of the images below.

Product List
Heat Tool
[129056]
$50.00
Paper Snips
[103579]
$17.00
Posted on Leave a comment

AWESOME OTTERS

A new Stampin’ Up!® January – June Mini Catalogue will launch very, very soon. As a demonstrator I have been fortunate to see it already AND order some of the new products, in a special pre-release, because I attended the recent OnStage Online event.

If you have been around for a while, you will be aware that with a Mini Catalogue comes a Sale-a-bration Brochure and all of it’s FREE products that you can earn.

During this recent OnStage Online pre-order, I was able to order some of the great new products and earn one of the Sale-a-bration items. I was so delighted when I realised it was the Awesome Otters Stamp Set. My daughters are mesmerised by otters (and, to be honest, I think they are super cute as well).

After seeing the stamp set, this is the card I immediately imagined making – three otters floating around, just chilling in the water.

I started by taking a piece of Shimmery White cardstock and applying several layers of Pacific Point ink, water colouring it in a variety of ways. I was pleased to create a variety of colour hues and colour movement.

The next step was to stamp and colour the three floating otters. I knew that they would look totally adorable floating across the ‘water’, holding their fish tightly to their bodies. The Stampin’ Blends were perfect for this colouring. After they were coloured, I fussy cut the otters,

When the floating otter layer was completed I attached it to a piece of Pacific Point cardstock and then wrapped some white twine, from the Baker’s Twine Essentials Pack, and tied it in a bow.

Under the floating otters layer there is a piece of Basic White cardstock that has been randomly stamped with the same otter image using Pacific Point ink. This was then attached to the Pacific Point card base.

The terribly cute otter was also stamped on the card insert and the front of the envelope.

The only ‘bling’ that I added to this card was the Clear Wink of Stella I painted across the centre of the card front.

I am looking forward to making lots more fun projects using this super cute Awesome Otters Stamp Set.

Until next time, happy stamping.

If you live in Australia, you can order any of the products I used to make this card by going to my online store. If you read back through my post you will see the products I have used for this project.