Posted on Leave a comment

THURSDAY MEANS THAT IT’S TIME FOR A 3D PROJECT

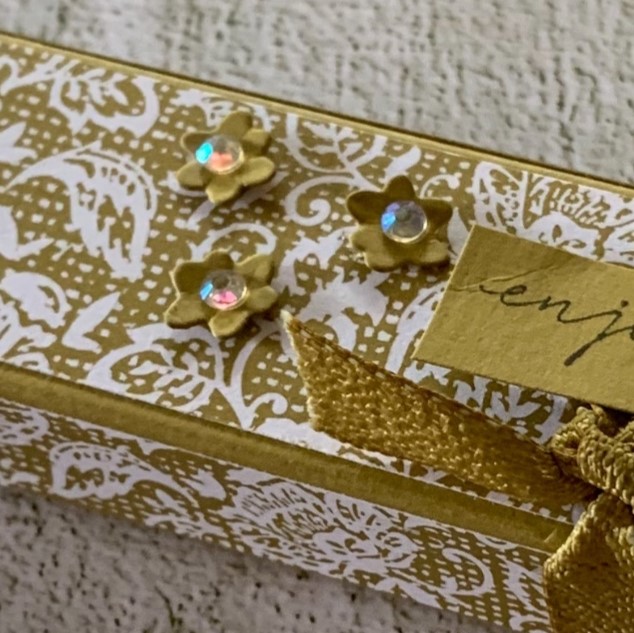
I recently found a bag of Reece Peanut Butter Cups Miniatures Milk Chocolate – I tried one and they are soooo yummy. Fortunately, I stopped at one to ensure I had enough for this matchbox style gift box.

The gift box fits 5 Reece Cups.

I thought that the Wild Wheat cardstock and DSP is quite close to a matte gold look.

The box measures 6 1/4″ x 1 3/8″ x 3/4″ and the outer casing is ever so slightly larger.

I cut the DSP so that it wraps in a continual pattern around the box.

I wrapped a length of Wild Wheat Textured Ribbon around the box and tied a knot. Then I trimmed the ends of the ribbon.

The greeting was stamped in Wild Wheat, on Wild Wheat card and trimmed down. I popped Stampin’ Dimensionals behind the greeting and added it to the top of the box.

Finally, I added some die cut small Wild Wheat flowers and Iridescent Rhinestones Basic Jewels for some extra embellsihment.

I popped a Mini Glue Dot under each of the Reece Cups to secure them in place.

This piece of DSP is really very lovely.

Tomorrow I will share my fifth and final card for the week.

Until then, happy stamping.

If you live in Australia, you can order any of the products I used to make this card by going to my online store. Just click on any of the images below.

Product List
Paper Snips
[103579]
$19.25
Posted on Leave a comment

AN EXTRA WEDNESDAY POST FOR THE LATEST COLOUR INKSPIRATION CHALLENGE

I have a project to share with you for the #159 Colour IKNspiration Challenge. I hope you are inspired by all the creativity the team has contributed and that you will join us for this challenge.

Today’s picture which has inspired our colour palette was chosen by Colour INKspiration Crew Member, Nicole Wilson.

As well as the chosen colour combination for #CI159, Smoky Slate, Berry Burst and Pretty Peacock, you may also add Basic White, Very Vanilla, Crumb Cake, Basic Black and metallics to your project. We also allow ‘Ivory’, ‘Bronze’ and ‘Natural Tones’ in the Stampin’ Blends. If you don’t have the colours in our palette, feel free to use the closest Stampin’ Up! substitute – Coastal Cabana instead of Pool Partyfor example.

To get your creative ideas flowing, make sure you check out the Crew’s Project in the CI#159 Album.

Picture credit – https://en.idei.club/57270-pink-sofa-in-living-room.html

For my project U decided to combine the Heartfelt Hexagons Bundle with some baby wipes colouring.

I started with some Fluid 100 Watercolour Paper and did a light watercolour wash across a few pieces. When the wash was dry, I then crumpled baby wipes and ‘stamped’ more colour onto the paper.

When the paper was dry, I punched out several pieces using the Heartfelt Hexagon Punch.

Then I arranged the punched shapes across a panel of the water colour paper. Some shapes were adhered directly on this paper and others were popped up using Stampin’ Dimensionals.

I stamped the spotted border and the greeting on a scrap of Fluid 100 and punched it out. The punched shaped was trimmed down so that I could slightly offset iton the card front. Stampin’ Dimensionals were used to pop it up for some height.

The greetingwas also added to the card insert and envelope.

I tied a triple gold bow (Simply Elegant Trim) and a single bow using a length of Pretty Peacock/Gold Metallic Ribbon. They were secured in place using Mini Glue Dots.

Beginning next week, I will be featuring the Heartfelt Hexagon Bundle and share the Sale-a-bration Heartfelt Hellos Stamp Set.

Until then, happy stamping.

If you live in Australia, you can order any of the products I used to make this card by going to my online store. Just click on any of the images below.

Product List
Paper Snips
[103579]
$19.25
Posted on Leave a comment

WELL, WHAT’S HAPPENING THIS WEDNESDAY

For the rest of Februry you still have the opportunity to earn FREE Sale-a-bration products with every qualifying $90 order.

This week 10 additional items were added to the collection of SAB products.

Today I have another great Poetic Expressions project.

I chose this piece of Moody Mauve DSP as the basisi for this card. A piece of the DSP was adhered to a slightly larger Moody Mauve panel.

Then I tied a length of Moody Mauve Textured Ribbon with a knot and secured it to the back of the card with Tear & Tape.

I used a Basic White card base to attach the Moody Mauve layers.

Five floral and leaf images were stamped, coloured and die cut. I overlaid them,creating a wreath-like arrangement.

The flowers were then given some shimmer witha little Clear Wink of Stella.

The greeting was stamped, in Mossy Meadow, and cut using one of the Autumn Leaves Dies. I placed it on the card front using Stampin’ Dimensionals.

I added Iridescent Rhinestones Basic Jewels to the card front.

A floral image was stamped inside the card and on the envelope.

It is amazing how you can create so many different looking projects using the same collection of products.

Tomorrow I have a 3D gift box to share with you.

Until then, happy stamping.

If you live in Australia, you can order any of the products I used to make this card by going to my online store. Just click on any of the images below

Product List
Paper Snips
[103579]
$19.25