Posted on Leave a comment

GINGERBREAD CHRISTMAS CRACKER

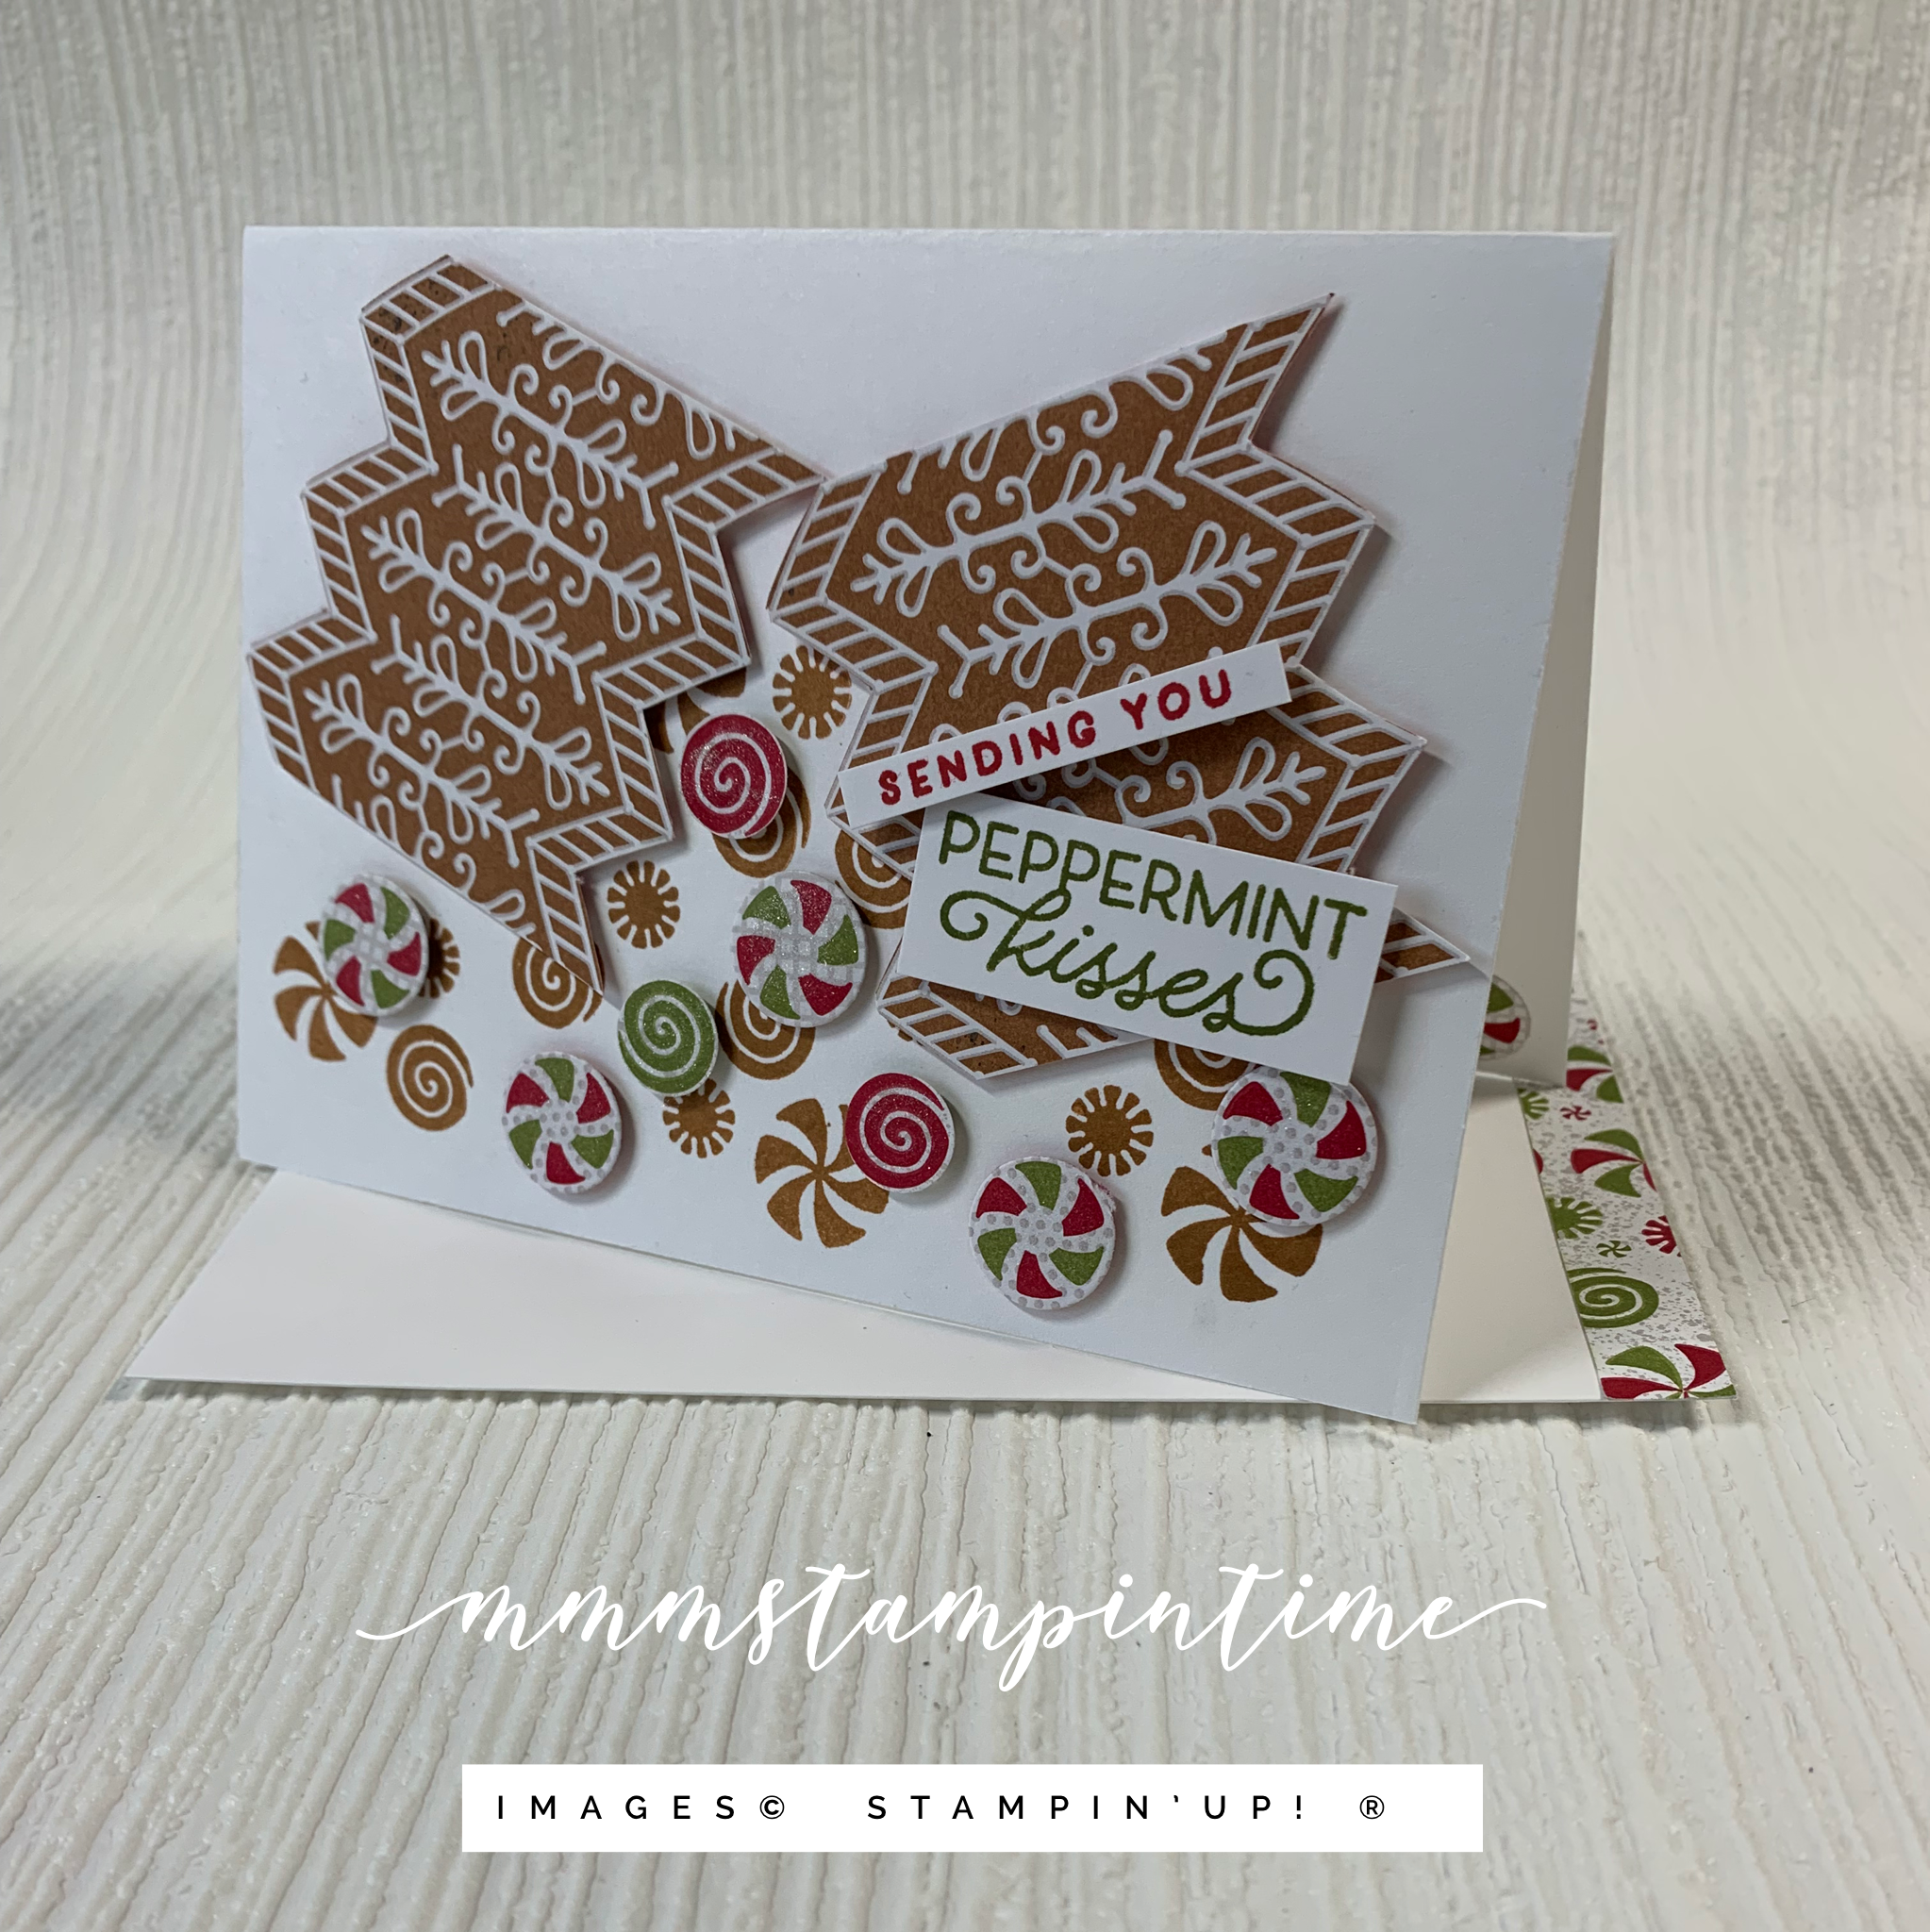
The Gingerbread & Peppermint 6″x 6″ Designer Series Paper is so much fun to play with.

Thank you for popping by to see my latest project using this gorgeous ‘iced gingerbread’ paper. I trimmed and fussy cut it to make it look like a Christmas cracker.

Before I placed the two ends of the cracker on the card front I stamped some of the peppermint kisses, from the Frosted Gingerbread Stamp Set, using Cinnamon Cider ink. With the ‘cracker’ split open the ‘candy’ looks like it is spilling out.

I cut some of the peppermint kisses from the DSP using the Gingerbread Dies. These were popped up on the card front using Stampin’ Dimensionals. I added one of the cut kisses to the inside of the card and a strip of the DPS to the envelope.

The greeting, from the same stamp set, was stamped twice – once in Real Red and once in Old Olive. I trimmed the greetings down so they could be positioned with the red “sending you” above the green “pepperment kisses”.

Make sure you leave me a comment and let me know what you think of this card!

Until next time, happy stamping.

If you live in Australia, you can order any of the products I used to make this card by going to my online store. Just click on any of the images below.

Product List
Paper Snips
[103579]
$17.00
Posted on Leave a comment

GINGERBREAD & PEPPERMINT

Hello to each of my crafting friends who are popping by to see my latest project.

Thank you for your patience today. I have had a few computer and internet connection issues that I think are now resolved – woohoo!

I spent yesterday and today playing with the Gingerbread & Peppermint Suite from the July – December Mini Catalogue. And, today I added a reel to my Instagram account showing the aftermath of my Sunday stamping session. This is only my second reel in a week – thank you Patty Bennett for inspiring me to learn how to add this to my social media presence. Check it out below!

For my first card, using the Frosted Gingerbread Stamp Set, I wanted to use thelong scalloped image and my Stamparatus to create my own background design.

After I finished stamping this background paper design I trimmed it down to a 1-1/2″ strip for the card front,a 1″ strip for the front of the envelope and a 1/2″ strip for the card insert.

I used stamped and hinge-stepped the image down a piece of Basic White card – using Early Espresso, Real Red, Old Olive, Cinnamon Cider and Real Red again. The image was then repositioned in reverse to create the ‘lace-like’ images.

I created a bow, using the Early Espresso Faux Suede Trim, and then wrapped and secured the extra trim to the back of the stamped strip.

From here, I prepared the Cinnamon Cider card base and used the Merry Melody 3D Embossing Folder to add musical texture to a piece of Cinnamon Cider card. I also cut a piece of Old Olive card to the same dimensions – 5-1/2″x 3-1/2″. These layers were adhered to the card front at the angles you can see.

From here, I popped the stamped strip of card up using Stampin’ Dimensionals.

The stamped sentiment, from the Frosted Gingerbread Stamp Set, was trimmed down to match the size of the stamped strip it was placed on.

The next step was to add three Christmas baubles. These were die cut from the coordinating Gingerbread & Peppermint 6″x 6″ Designer Series Paper, using the coordinting die from the Gingerbread Dies.

This image shows many of the products I have used to make the projects I will share with you over the next few days – I have not used ALL of them for any one projecr.

I hope that you like this first Gingerbread & Peppermint card.

Until next time, happy stamping.

If you live in Australia, you can order any of the products I used to make this card by going to my online store. Just click on any of the images below.

Product List
Paper Snips
[103579]
$17.00
Posted on Leave a comment

CHRISTMAS GIFT BAG

Hello friends! Thanks for popping by to see my latest project.

I decided to make a gift bag to coordinate with a card I shared a couple of days ago.

I used one of the Ombre Gift Bags, some of the Whimsy & Wonder Designer Series Paper and a few of the Wonderful Snowflakes.

I secured a length of the Soft Succulent Open Weave Ribbon to the back of the DSP layer and then adhered it to the front of the ombre bag.

Three snowflakes were added to the bag using Stampin’ Dimensionals.

I cut four tags using the Tailor Made Tags Dies – two in Basic White and one each in Sift Succulent and DSP. One of the white tags was glued to the back of the DSP tag.

Using the Delivering Cheer Stamp Set, I stamped the greeting and trees to the Basic White tag. Then I stamped the ‘to’ and ‘from’ on the Soft Succulent tag.

I stamped, coloured and fussy cut the gift boxes. After I photographed the gift bag I carefully removed the gift boxes and repositioned them so they are now parallel with the bottom of the bag (and it looks much better).

The tags were overlapped and glued in place. Then I cut a length of White Faux Linen Ribbon in half, from the Flowers for Every Season Ribbon Combo Pack, and frayed it before combining it with White Baker’s Twine and Soft Succulent Open Weave Ribbon to finish the tags.

I added some CLear Wink of Stella to the Soft Succulent ‘ribbon’ on the gift boxes before popping some coordinating 2021-2023 In Colur Jewels.

What do you think of this little gift bag? I think that I will make a gift card holder to pop inside the bag.

Until next time, happy stamping.

If you live in Australia, you can order any of the products I used to make this card by going to my online store. Just click on any of the images below.

Product List
Paper Snips
[103579]
$17.00