Posted on Leave a comment

Colour INKspiration Challenge #155 – TIMELESS ARRANGEMENTS

Welcome to another Colour INKspiration Challenge.

This inspiration picture which has inspired our colour palette was chosen by Crew Member, Monica Formosa. 

Picture credit – https://musefraisedesbois.tumblr.com/post/90783247152

As well as the chosen colour combination for #CI155, Fresh Freesia, Highland Heather, Gorgeous Grape and Cherry Cobbler, you may also add Basic White, Very Vanilla, Crumb Cake and metallics to your project. We also allow Ivory, Bronze and Natural Tones in Stampin’ Blends. If you don’t have the colours in our palette, feel free to use the closest Stampin’ Up! substitute.

To get your creative ideas flowing make sure you check out the Crew’s Projects in the CI#155 album. 

While I love this photograph – it’s colours and textural features, it was a tough one to decide what to create.

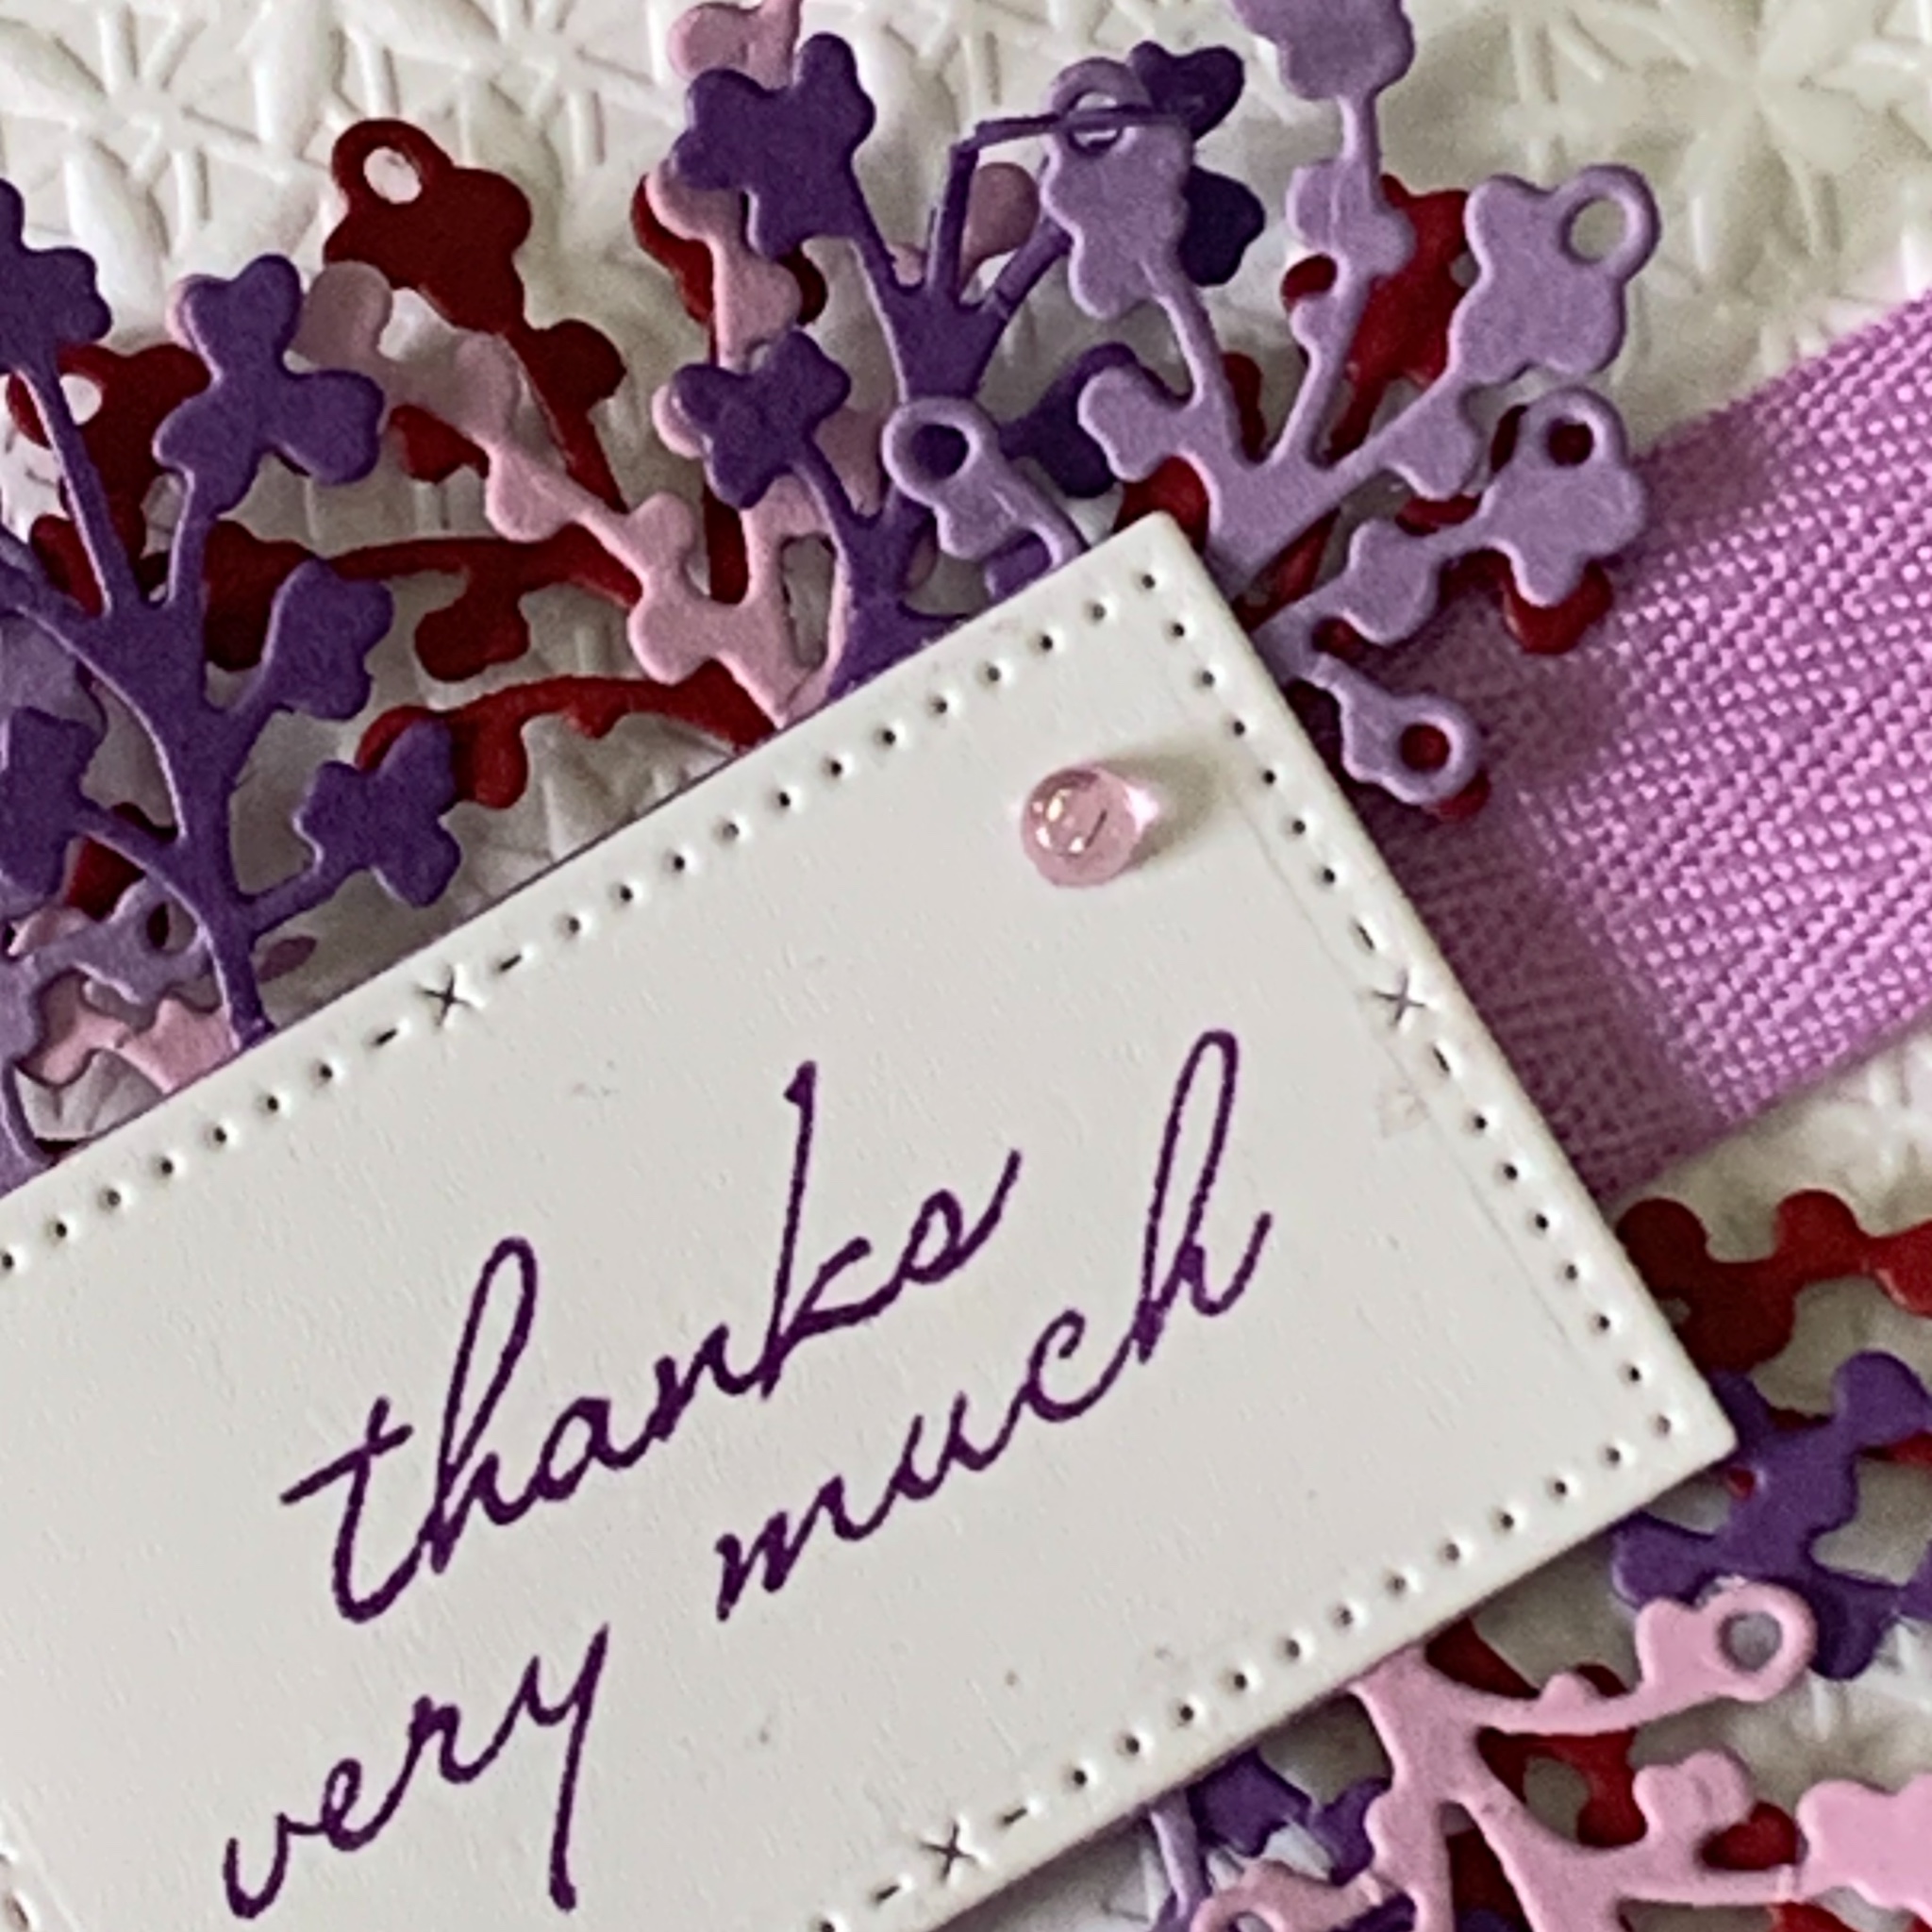
After spending time scanning my stamp sets, dies and embossing folders, I decided on the Timeles Arrangements Bundle and Basics 3D Emossing Folder – Flowers.

I started with a Fresh Freesia card base and then took a Basic White panel to emboss with the Flowers 3D Basics Embossing Folder.Using the Dark Fresh Freesia Stampin’ Blend pen, I coloured a length of White Herringbone Ribbon. This ribbon was wrapped around the embossed panel and secured with Tear and Tape.

I used the dies you can see above to cut several floral panels and individual flowers, in each of the challenge colours.

They were layered and glued together.

The greeting was stamped in Gorgeous Grape before cutting it using one of the rectangular dies from the Timeless Arrangements Dies.

The layered flowers were then adhered behind the greeting panel. Stampin’ Dimensionals were placed behind the greeting so that it would sit up above the ribbon.

I stamped the trio of small flowers on the card insert and envelope.

Finally, I added several Fresh Freesia embellishments, from the Tinsel Gems 3 Pack, to the card front.

I’m so happy with this card! What do you think?

Until next time, happy stamping.

If you live in Australia, you can order any of the products I used to make this card by going to my online store. Just click on any of the images below.

Product List
Paper Snips
[103579]
$19.25
Posted on Leave a comment

Colour INKspiration Challenge #154 – IT’S A SCIENCE

Welcome to another Colour INKspiration Challenge.

This inspiration picture which has inspired our colour palette was chosen by Crew Member, Rose Packer. 

Picture credit – https://www.instagram.com/p/CQxyZ-QB5CQ/

As well as the chosen colour combination for #CI154, Berry Burst, Poppy Parade, Pool Party and Crumb Cake, you may also add Basic White, Very Vanilla and metallics to your project. We also allow Ivory, Bronze and Natural Tones in Stampin’ Blends. If you don’t have the colours in our palette, feel free to use the closest Stampin’ Up! substitute.

To get your creative ideas flowing make sure you check out the Crew’s Projects in the CI#154 album. 

It took me a while to find a stamp set that I thought would work with this colour palette. Eventually I decided that I could use these colours with the It’s a Science Stamp Set.

I started by stamping the atomic structure image and chemical structure image across the Pool Party card front.

Then I wrapped a length of Black & White Gingham Ribbon around a panel of Pool Party card.

I used StazOn Jet Black ink to stamp the microscope image on to a piece of Holographic Trio Specialty Paper. Then I fussy cut the microscope and placed it on the card using Stampin’ Dimensionals.

I stamped the quartet of beakers and test tubes twice before fussy cutting each of them separately. The bubbles were stamped inside the round bottom flask.

Berry Burst, Crumb Cake, Poppy Parade and Pool Party Stampin’ Blends were used to ‘fill’ each of the vessels with colourful ‘liquids’. The black Stampin’ Write Marker was used for one of the test tubes. Wink of Stella was used to give the ‘liquids’ a little shimmer.

I stamped the clipboard twice, fussy cut them and coloured them.

The greeting was stamped with Poppy Parade. Then I pierced a hole in the top of both clipboards and used a black Square Brad to hold them together. I popped a Mini Glue Dot between them to keep them staggered.

Can you see the effect the holographic paper has? A piece of this specialty paper is in the bottom right hand corner of this photo – it was originally a silvery colour but appears blue and green in the corner. Yet, the microscope appears purple. How amazing is that!

One of the beakers was stamped on the card insert and envelope. Finally, I added several black Classic Matte Dots to the card.

I’m not sure what I’ll be sharing tomorrow. But until then, happy stamping.

If you live in Australia, you can order any of the products I used to make this card by going to my online store. Just click on any of the images below.

Product List
Paper Snips
[103579]
$19.25
Posted on Leave a comment

CAN YOU EVER GET TOO MUCH MERRY, BOLD & BRIGHT?

Hello and welcome back to another pair of Merry, Bold & Bright projects. I am so pleased to be able to share them with you.

Let’s start with a 3D project.

Have you ever been at a Christmas lunch or dinner and don’t know which glass is yours? I have a solution for you!

I made a set of wine glass charms.

When I saw the lightbulb dies in the Merry & Bright Dies set, I knew that I wanted to make some charms. Fortunately I already had some Sizzix shrink plastic in my craft drawer.

I cut six of the oval shaped bulbs using the Mini Stampin’ Cut & Emboss Machine.

Then I punched a small hole in the top of each bulb.

I used a coordinating variety of Stampin’ Blends to colour each of the die cut pieces.

After each of the bulbs were coloured, I used my heat tool to shrink them down. Isn’t it amazing – the difference in size – before and after! The colour actually intensifies.

I found these looped shapes in the jewellery making area of my local craft store. It took me a while to find coordinating glass beads to use in this project.

Then I created a gift box to hold six wine charms. I used Gold Foil 12″ x 12″ Specialty Paper and Gold Celebrations 12″ x 12″ Specialty Designer Series Paper to make the box and acetate slide on cover.

Now, I need to make a few more for my daughter – she has placed her order for Christmas stocking fillers.

Now for a card inspired by Mary Knabe! It is a SQUARE TRI-FOLD FUN FOLD CARD. Here is a link to her creative process – https://www.stampinpeace.com/2023/08/square-tri-fold-fun-fold-card-meets-the-zoo-crew.html

The finished card measures 4″ x 4″ and has a specially folded envelope for it to go in.

This shows the card fully folded out, with all of the panels. I love the way each of the designs in this collection of Designer Series Paper coordinate so well.

After I stamped the Christmas greeting on the Granny Apple Green card, I used the Banners Pick a Punch to finish each end.

There is lift up panel so that you can write your Christmas message.

A special card needs a special envelope.

And, there is more writing space on the back of the card.

What do you think of these two projects?

More to come tomorrow. So until then, happy stamping.

If you live in Australia, you can order any of the products I used to make this card by going to my online store. Just click on any of the images below.

Product List
Heat Tool
[129056]
$54.00
Paper Snips
[103579]
$19.25