Today I have two cards that a made a week or so ago for one of the GLobal Design Project challenges. The theme was flowers.
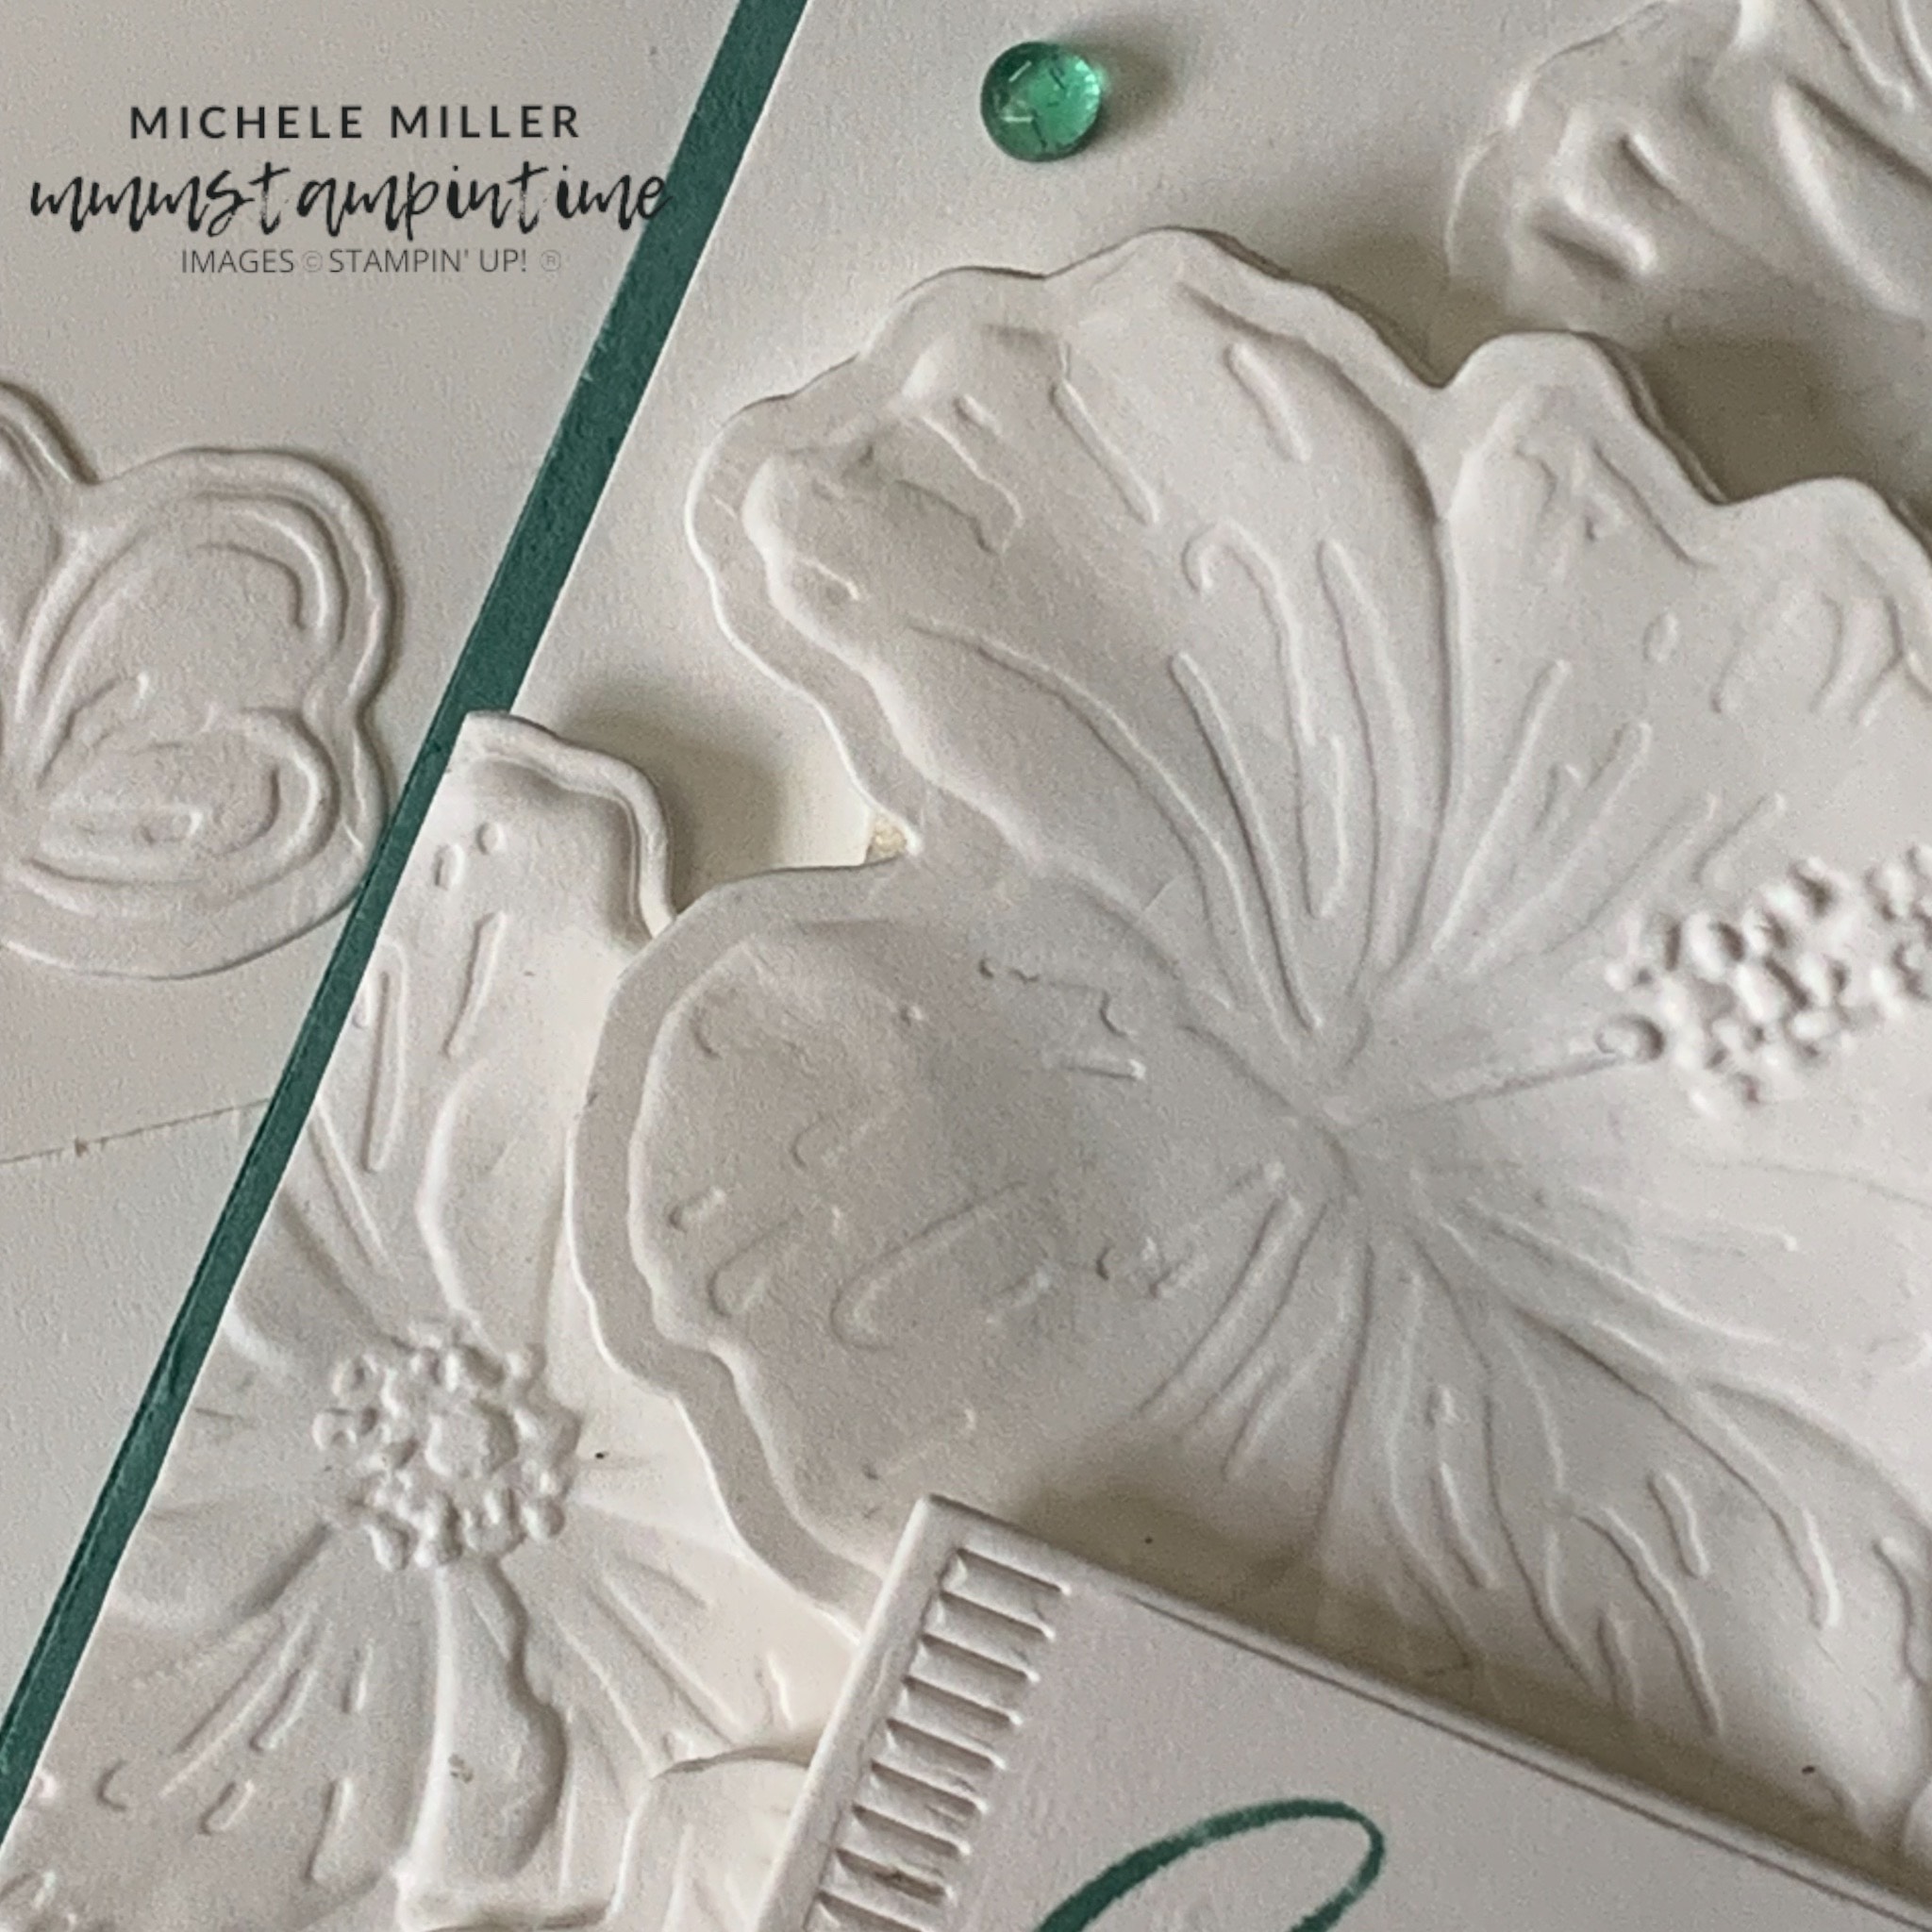
I used the Happy Hibiscus Bundle and Mini Corrugated 3D Embossing Folder for both of them.

After preparing the card base and embossing the Basic White panel, I used the 1 7/8″ Circle Punch to cut out the space where I placed the greeting circle.
I embossed more white card to cut out two more circles, using the 1 3/4″ Circle Punch.
Then I used the Happy Hibiscus floral dies to cut all of these flowers.
I I secured the embossed circles to the corrugated panel and then attached all the flowers to it.
The dark Flirty Flamingo Stampin’ Blends pen was used to splatter the card front and colour some of the Drusy Embellishments that I placed in some of the flowers.

The greeting was also stamped on inside the card and the back of the evelope.

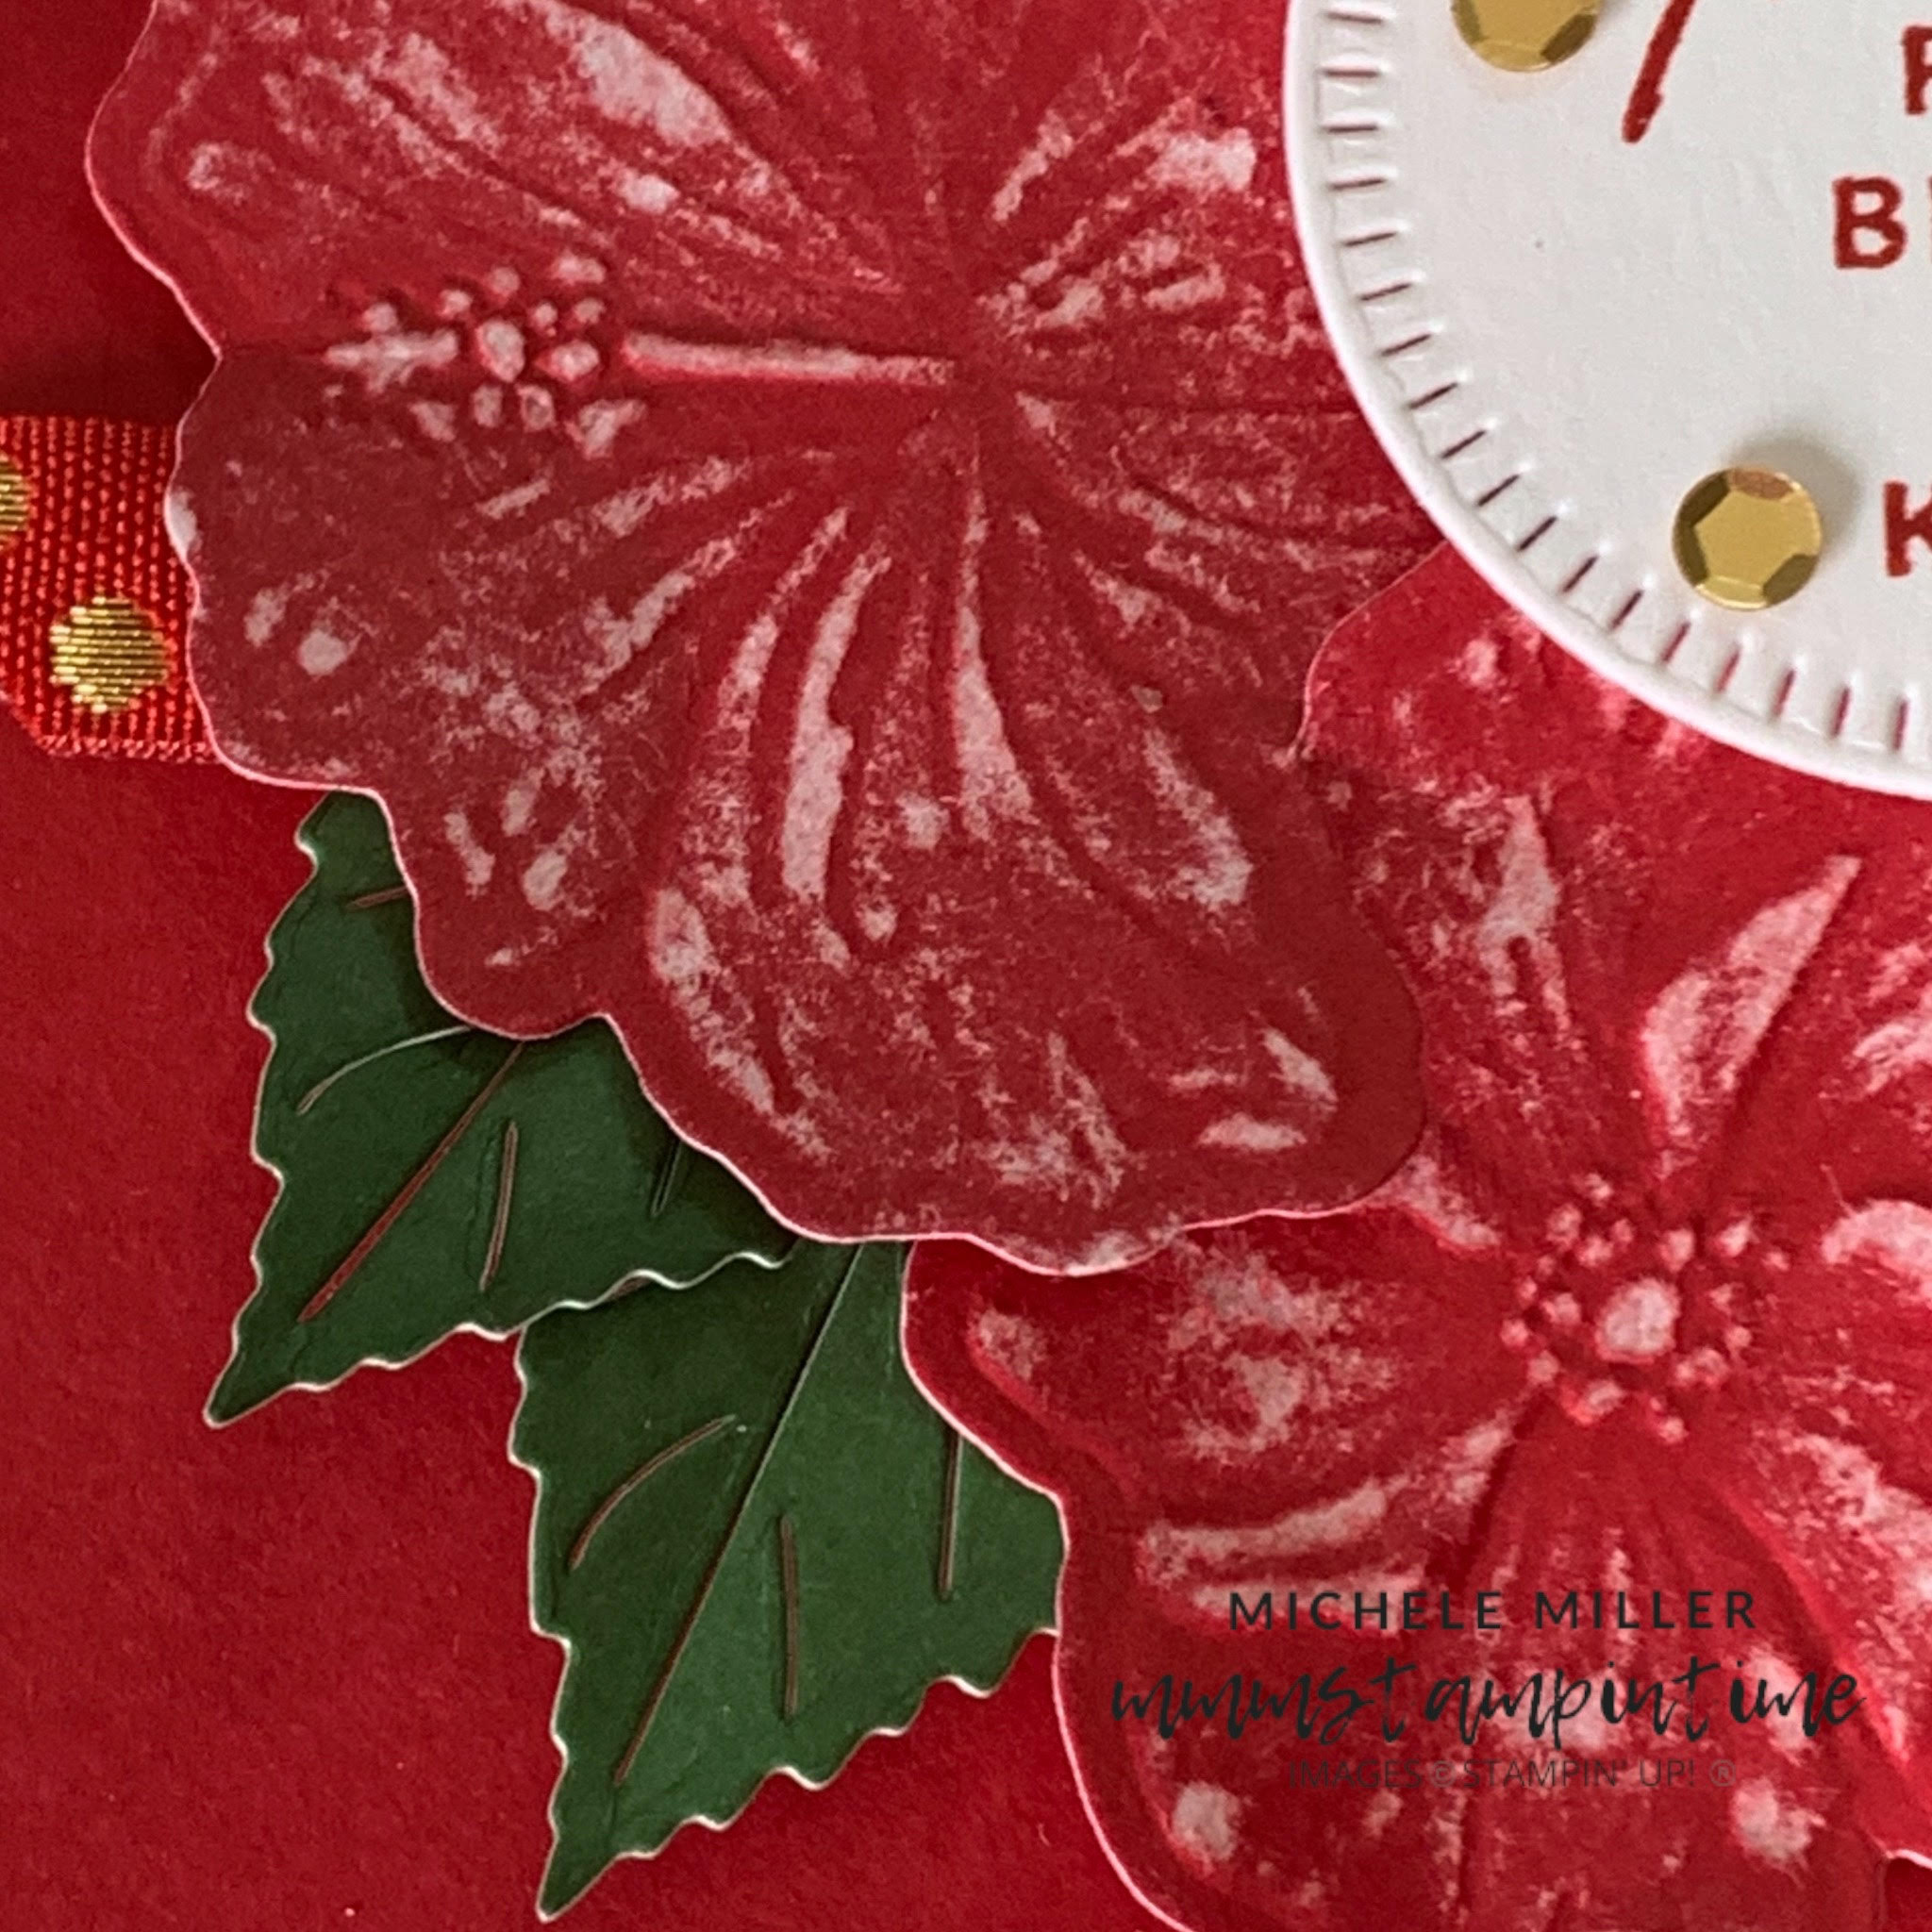
The second card was created in a similar way to the first.

To create the flowers I applied multiple layers of the Extraordinary Flora Washi Tape to a piece of Basic White card. Then I die cut the flowers.

I used the dark Mossy Meadow Stampin’ Blends pen to colour the Drusy Embellishments and leave flecks of colour across the corrugated panel.
Some Petal Pink strands from the Braided Trim were used to create the bow that was added to the card front.

I am so happy with how well these washi tape flowers turned out.

This is a weekend when I will be sharing another card tomorrow.
Until then, happy stamping and scrapbooking.

If you live in Australia, you can order any of the products I used to make this card by going to my online store. Just click on any of the images below.

![Happy Hibiscus Bundle (English) [ 164880 ]](https://i0.wp.com/assets1.tamsnetwork.com/images/EC042017NF/164880s.jpg?w=140&ssl=1 "Happy Hibiscus Bundle (English) [ 164880 ]") | ![Extraordinary Flora Washi Tape [ 165269 ]](https://i0.wp.com/assets1.tamsnetwork.com/images/EC042017NF/165269s.jpg?w=140&ssl=1 "Extraordinary Flora Washi Tape [ 165269 ]") | |||
![1 7/8" (4.8 Cm) Circle Punch [ 165259 ]](https://i0.wp.com/assets1.tamsnetwork.com/images/EC042017NF/165259s.jpg?w=140&ssl=1 "1 7/8\" (4.8 Cm) Circle Punch [ 165259 ]") | ![1-3/4" (4.4 Cm) Circle Punch [ 119850 ]](https://i0.wp.com/assets1.tamsnetwork.com/images/EC042017NF/119850s.jpg?w=140&ssl=1 "1-3/4\" (4.4 Cm) Circle Punch [ 119850 ]") | ![Basic White A4 Cardstock [ 166781 ]](https://i0.wp.com/assets1.tamsnetwork.com/images/EC042017NF/166781s.jpg?w=140&ssl=1 "Basic White A4 Cardstock [ 166781 ]") | ||
![Mossy Meadow Classic Stampin' Pad [ 147111 ]](https://i0.wp.com/assets1.tamsnetwork.com/images/EC042017NF/147111s.jpg?w=140&ssl=1 "Mossy Meadow Classic Stampin' Pad [ 147111 ]") | ![Mossy Meadow Stampin' Blends Combo Pack [ 148547 ] (Retired)](https://i0.wp.com/assets1.tamsnetwork.com/images/EC042017NF/148547s.jpg?w=140&ssl=1 "Mossy Meadow Stampin' Blends Combo Pack [ 148547 ] (Retired)") Mossy Meadow Stampin’ Blends Combo Pack [148547] $15.50 | ![Multipurpose Liquid Glue [ 110755 ]](https://i0.wp.com/assets1.tamsnetwork.com/images/EC042017NF/110755s.jpg?w=140&ssl=1 "Multipurpose Liquid Glue [ 110755 ]") | ||
![Mini Glue Dots [ 103683 ]](https://i0.wp.com/assets1.tamsnetwork.com/images/EC042017NF/103683s.jpg?w=140&ssl=1 "Mini Glue Dots [ 103683 ]") | ![Stampin' Dimensionals [ 104430 ]](https://i0.wp.com/assets1.tamsnetwork.com/images/EC042017NF/104430s.jpg?w=140&ssl=1 "Stampin' Dimensionals [ 104430 ]") | ![Paper Snips [ 103579 ]](https://i0.wp.com/assets1.tamsnetwork.com/images/EC042017NF/103579s.jpg?w=140&ssl=1 "Paper Snips [ 103579 ]") | ![Paper Trimmer [ 152392 ]](https://i0.wp.com/assets1.tamsnetwork.com/images/EC042017NF/152392s.jpg?w=140&ssl=1 "Paper Trimmer [ 152392 ]") | ![Mini Stampin' Cut & Emboss Machine [ 150673 ]](https://i0.wp.com/assets1.tamsnetwork.com/images/EC042017NF/150673s.jpg?w=140&ssl=1 "Mini Stampin' Cut & Emboss Machine [ 150673 ]") |
![Basic White C6 Envelopes [ 159235 ]](https://i0.wp.com/assets1.tamsnetwork.com/images/EC042017NF/159235s.jpg?w=140&ssl=1 "Basic White C6 Envelopes [ 159235 ]") |
![Happy Hibiscus Photopolymer Stamp Set (English) [ 164877 ]](https://i0.wp.com/assets1.tamsnetwork.com/images/EC042017NF/164877s.jpg?w=140&ssl=1 "Happy Hibiscus Photopolymer Stamp Set (English) [ 164877 ]")
![Happy Hibiscus Hybrid Embossing Folder [ 164879 ]](https://i0.wp.com/assets1.tamsnetwork.com/images/EC042017NF/164879s.jpg?w=140&ssl=1 "Happy Hibiscus Hybrid Embossing Folder [ 164879 ]")
![Mini Corrugated 3 D Embossing Folder [ 165559 ]](https://i0.wp.com/assets1.tamsnetwork.com/images/EC042017NF/165559s.jpg?w=140&ssl=1 "Mini Corrugated 3 D Embossing Folder [ 165559 ]")
![Drusy Adhesive Backed Embellishments [ 164223 ]](https://i0.wp.com/assets1.tamsnetwork.com/images/EC042017NF/164223s.jpg?w=140&ssl=1 "Drusy Adhesive Backed Embellishments [ 164223 ]")
![Petal Pink 5/16" (8 Mm) Braided Trim [ 166140 ]](https://i0.wp.com/assets1.tamsnetwork.com/images/EC042017NF/166140s.jpg?w=140&ssl=1 "Petal Pink 5/16\" (8 Mm) Braided Trim [ 166140 ]")
![Flirty Flamingo Classic Stampin' Pad [ 147052 ]](https://i0.wp.com/assets1.tamsnetwork.com/images/EC042017NF/147052s.jpg?w=140&ssl=1 "Flirty Flamingo Classic Stampin' Pad [ 147052 ]")
![Flirty Flamingo Stampin' Blends Combo Pack [ 154884 ]](https://i0.wp.com/assets1.tamsnetwork.com/images/EC042017NF/154884s.jpg?w=140&ssl=1 "Flirty Flamingo Stampin' Blends Combo Pack [ 154884 ]")


 Two Tone Cardstock")
 Two Tone Cardstock")