I have been ‘doing life’ for the past two weeks but have returned to my crafting at last!
This week I am featuring the Pop Up Petals Bundle (168010 $81.75AUD)

One of the key features of this bundle is the ability to die cut a pop up panel inside the card.

My first card this week is my own version of a floral pop up card.

I used a Secret Sea card base and prepared a Basic White insert.
The smaller of the two pop up dies was used to cut two panels in the centre of the card insert.
These panels had pieces of Darling Duckling DSP, from the 2025 – 2027 In Color DSP, adhered to the panels.
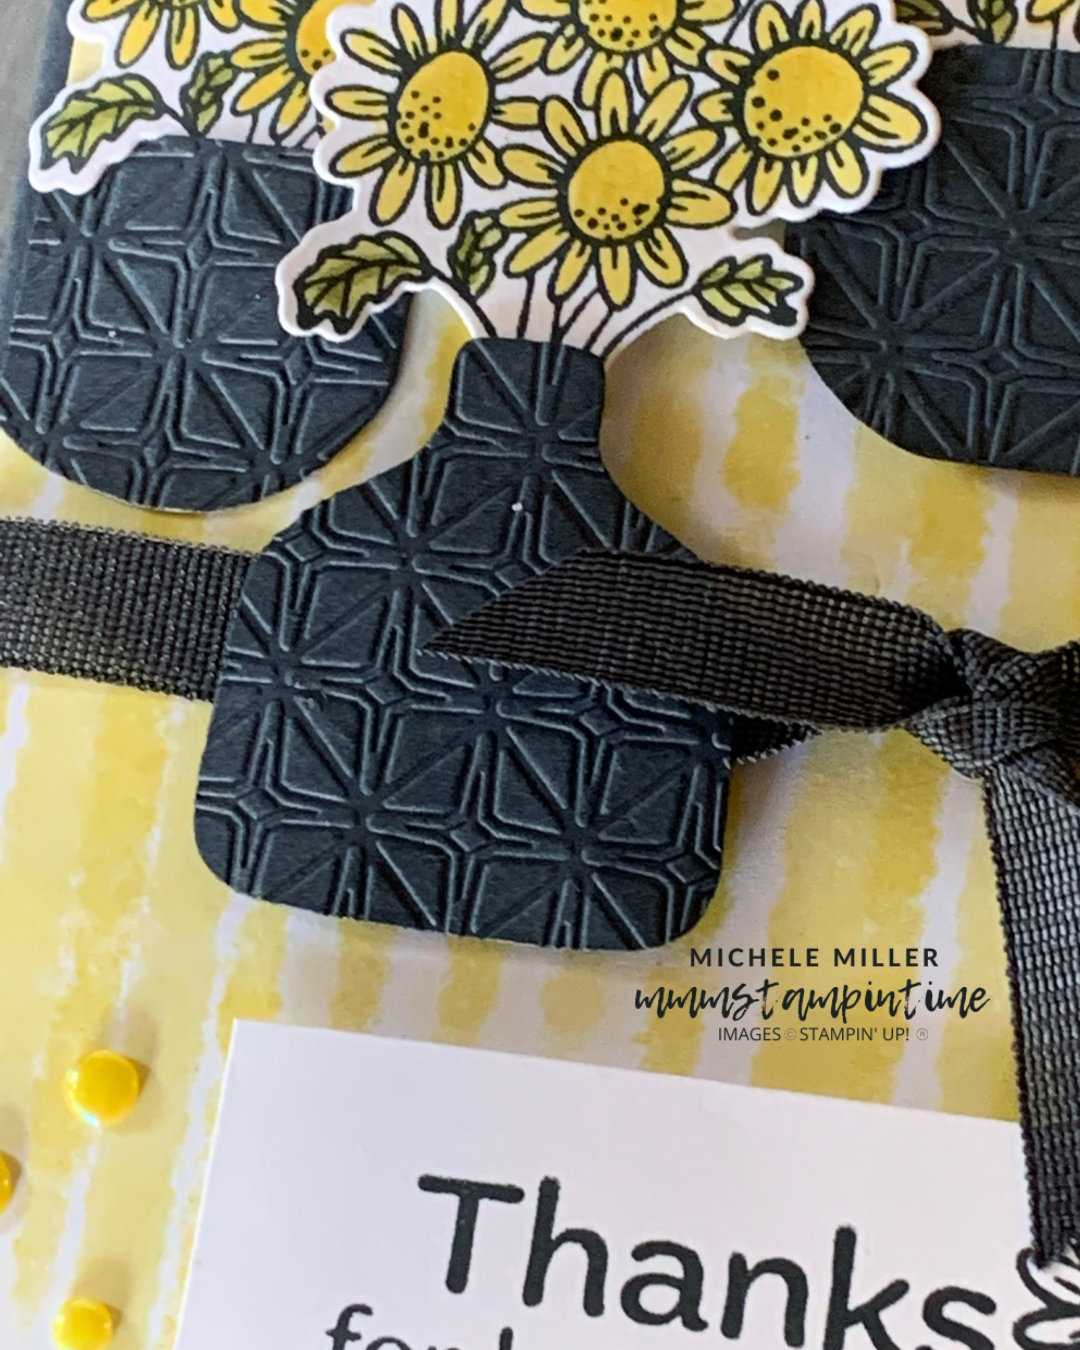
I stamped, coloured and die cut 5 floral bouquets for the card.

Then I die cut and embossed four vases. I used the Glass and Gardens Embossing Folder.
After attaching a vase and two floral bouquets to the card insert, I also added two panels of the Darling Duckling DSP and a Basic White panel.

The card front had another panel of Darling Duckling DSP design used. Before attaching it to the card front, I wrapped a length of Secret Sea Faux Linen Ribbon around the DSP and tied it off.
Three embossed vases, with floral bouquets, were added to the card front.
The greeting was stamped and a single flower was also stamped The card insert and back of the envelope also had the single flower stamped.
Finally, I added three of the Darling Duckling Flat PEarls added for embellishment.
Tomorrow, and for the rest of the week, I have some Christmas inspired projects to share with you.
Until then, happy stamping.

If you live in Australia, you can order any of the products I used to make this card by going to my online store. Just click on any of the images below.

![Pop Up Petals Bundle (English) [ 168010 ]](https://i0.wp.com/assets1.tamsnetwork.com/images/EC042017NF/168010s.jpg?w=140&ssl=1 "Pop Up Petals Bundle (English) [ 168010 ]") | ![Pop Up Petals Dies [ 167043 ]](https://i0.wp.com/assets1.tamsnetwork.com/images/EC042017NF/167043s.jpg?w=140&ssl=1 "Pop Up Petals Dies [ 167043 ]") | ![Glass & Gardens Embossing Folders [ 165597 ]](https://i0.wp.com/assets1.tamsnetwork.com/images/EC042017NF/165597s.jpg?w=140&ssl=1 "Glass & Gardens Embossing Folders [ 165597 ]") | |
![2025–2027 In Color™ Flat Pearls [ 165192 ]](https://i0.wp.com/assets1.tamsnetwork.com/images/EC042017NF/165192s.jpg?w=140&ssl=1 "2025–2027 In Color™ Flat Pearls [ 165192 ]") | ![Basic White A4 Thick Cardstock [ 159230 ]](https://i0.wp.com/assets1.tamsnetwork.com/images/EC042017NF/159230s.jpg?w=140&ssl=1 "Basic White A4 Thick Cardstock [ 159230 ]") | ||
![Secret Sea A4 Cardstock [ 165296 ]](https://i0.wp.com/assets1.tamsnetwork.com/images/EC042017NF/165296s.jpg?w=140&ssl=1 "Secret Sea A4 Cardstock [ 165296 ]") | ![Secret Sea Classic Stampin' Pad [ 165285 ]](https://i0.wp.com/assets1.tamsnetwork.com/images/EC042017NF/165285s.jpg?w=140&ssl=1 "Secret Sea Classic Stampin' Pad [ 165285 ]") | ||
![Multipurpose Liquid Glue [ 110755 ]](https://i0.wp.com/assets1.tamsnetwork.com/images/EC042017NF/110755s.jpg?w=140&ssl=1 "Multipurpose Liquid Glue [ 110755 ]") | ![Stampin' Dimensionals [ 104430 ]](https://i0.wp.com/assets1.tamsnetwork.com/images/EC042017NF/104430s.jpg?w=140&ssl=1 "Stampin' Dimensionals [ 104430 ]") | ![Mini Glue Dots [ 103683 ]](https://i0.wp.com/assets1.tamsnetwork.com/images/EC042017NF/103683s.jpg?w=140&ssl=1 "Mini Glue Dots [ 103683 ]") | ![Paper Snips [ 103579 ]](https://i0.wp.com/assets1.tamsnetwork.com/images/EC042017NF/103579s.jpg?w=140&ssl=1 "Paper Snips [ 103579 ]") |
![Paper Trimmer [ 152392 ]](https://i0.wp.com/assets1.tamsnetwork.com/images/EC042017NF/152392s.jpg?w=140&ssl=1 "Paper Trimmer [ 152392 ]") | ![Mini Stampin' Cut & Emboss Machine [ 150673 ]](https://i0.wp.com/assets1.tamsnetwork.com/images/EC042017NF/150673s.jpg?w=140&ssl=1 "Mini Stampin' Cut & Emboss Machine [ 150673 ]") | ![Basic White C6 Envelopes [ 159235 ]](https://i0.wp.com/assets1.tamsnetwork.com/images/EC042017NF/159235s.jpg?w=140&ssl=1 "Basic White C6 Envelopes [ 159235 ]") |
![Pop Up Petals Photopolymer Stamp Set (English) [ 167041 ]](https://i0.wp.com/assets1.tamsnetwork.com/images/EC042017NF/167041s.jpg?w=140&ssl=1 "Pop Up Petals Photopolymer Stamp Set (English) [ 167041 ]")
![2025–2027 In Color™ 6" X 6" (15.2 X 15.2 Cm) Designer Series Paper [ 165300 ]](https://i0.wp.com/assets1.tamsnetwork.com/images/EC042017NF/165300s.jpg?w=140&ssl=1 "2025–2027 In Color™ 6\" X 6\" (15.2 X 15.2 Cm) Designer Series Paper [ 165300 ]")
![Secret Sea 3/8" (1 Cm) Faux Linen Ribbon [ 165273 ]](https://i0.wp.com/assets1.tamsnetwork.com/images/EC042017NF/165273s.jpg?w=140&ssl=1 "Secret Sea 3/8\" (1 Cm) Faux Linen Ribbon [ 165273 ]")
![Darling Duckling Stampin’ Blends Combo Pack [ 165288 ]](https://i0.wp.com/assets1.tamsnetwork.com/images/EC042017NF/165288s.jpg?w=140&ssl=1 "Darling Duckling Stampin’ Blends Combo Pack [ 165288 ]")
![Old Olive Stampin' Blends Combo Pack [ 154892 ]](https://i0.wp.com/assets1.tamsnetwork.com/images/EC042017NF/154892s.jpg?w=140&ssl=1 "Old Olive Stampin' Blends Combo Pack [ 154892 ]")


![Bauble Blooms Bundle (English) [ 166096 ]](https://i0.wp.com/assets1.tamsnetwork.com/images/EC042017NF/166096s.jpg?w=140&ssl=1 "Bauble Blooms Bundle (English) [ 166096 ]")
![Bauble Blooms Photopolymer Stamp Set (English) [ 166091 ]](https://i0.wp.com/assets1.tamsnetwork.com/images/EC042017NF/166091s.jpg?w=140&ssl=1 "Bauble Blooms Photopolymer Stamp Set (English) [ 166091 ]")
![Impressions Abloom Dies [ 165610 ]](https://i0.wp.com/assets1.tamsnetwork.com/images/EC042017NF/165610s.jpg?w=140&ssl=1 "Impressions Abloom Dies [ 165610 ]")
![Metallic Textures Rub Ons [ 165270 ]](https://i0.wp.com/assets1.tamsnetwork.com/images/EC042017NF/165270s.jpg?w=140&ssl=1 "Metallic Textures Rub Ons [ 165270 ]")
![Basic Black 12" X 12" (30.5 X 30.5 Cm) Two Tone Cardstock [ 166704 ]](https://i0.wp.com/assets1.tamsnetwork.com/images/EC042017NF/166704s.jpg?w=140&ssl=1 "Basic Black 12\" X 12\" (30.5 X 30.5 Cm) Two Tone Cardstock [ 166704 ]")
![Gold Foil Sheets [ 132622 ]](https://i0.wp.com/assets1.tamsnetwork.com/images/EC042017NF/132622s.jpg?w=140&ssl=1 "Gold Foil Sheets [ 132622 ]")
![Versamark Pad [ 102283 ]](https://i0.wp.com/assets1.tamsnetwork.com/images/EC042017NF/102283s.jpg?w=140&ssl=1 "Versamark Pad [ 102283 ]")
![Metallics Wow! Embossing Powder [ 165678 ]](https://i0.wp.com/assets1.tamsnetwork.com/images/EC042017NF/165678s.jpg?w=140&ssl=1 "Metallics Wow! Embossing Powder [ 165678 ]")
![Embossing Additions Tool Kit [ 159971 ]](https://i0.wp.com/assets1.tamsnetwork.com/images/EC042017NF/159971s.jpg?w=140&ssl=1 "Embossing Additions Tool Kit [ 159971 ]")
![Heat Tool [ 129056 ]](https://i0.wp.com/assets1.tamsnetwork.com/images/EC042017NF/129056s.jpg?w=140&ssl=1 "Heat Tool [ 129056 ]")
![Black Stampin' Dimensionals Combo Pack [ 150893 ]](https://i0.wp.com/assets1.tamsnetwork.com/images/EC042017NF/150893s.jpg?w=140&ssl=1 "Black Stampin' Dimensionals Combo Pack [ 150893 ]")
![Bone Folder [ 102300 ]](https://i0.wp.com/assets1.tamsnetwork.com/images/EC042017NF/102300s.jpg?w=140&ssl=1 "Bone Folder [ 102300 ]")
![Adhesive Sheets [ 152334 ]](https://i0.wp.com/assets1.tamsnetwork.com/images/EC042017NF/152334s.jpg?w=140&ssl=1 "Adhesive Sheets [ 152334 ]")
![Stampin' Cut & Emboss Machine [ 149653 ]](https://i0.wp.com/assets1.tamsnetwork.com/images/EC042017NF/149653s.jpg?w=140&ssl=1 "Stampin' Cut & Emboss Machine [ 149653 ]")


![Choose Happy Photopolymer Stamp Set (English) [ 163701 ]](https://i0.wp.com/assets1.tamsnetwork.com/images/EC042017NF/163701s.jpg?w=140&ssl=1 "Choose Happy Photopolymer Stamp Set (English) [ 163701 ]")
![Stylish Shapes Dies [ 159183 ]](https://i0.wp.com/assets1.tamsnetwork.com/images/EC042017NF/159183s.jpg?w=140&ssl=1 "Stylish Shapes Dies [ 159183 ]")
![Sunflower 3 D Embossing Folder [ 166145 ]](https://i0.wp.com/assets1.tamsnetwork.com/images/EC042017NF/166145s.jpg?w=140&ssl=1 "Sunflower 3 D Embossing Folder [ 166145 ]")
![Jet Black Stāzon Ink Pad [ 101406 ]](https://i0.wp.com/assets1.tamsnetwork.com/images/EC042017NF/101406s.jpg?w=140&ssl=1 "Jet Black Stāzon Ink Pad [ 101406 ]")


