I am hoping that you are all enjoying your time flicking through the new annual catalogue and OnLine exclusives. There are so many amazing new products for you to chose from.
There aren’t many updates from Stampin’ Up!® this week.
If you have found the new 1-7/8″ (4.8 CM) CIRCLE PUNCH, you will need to be patient because it is not yet available. I am very keen to order one, so as soon as I know this punch can be ordered I will let you know.
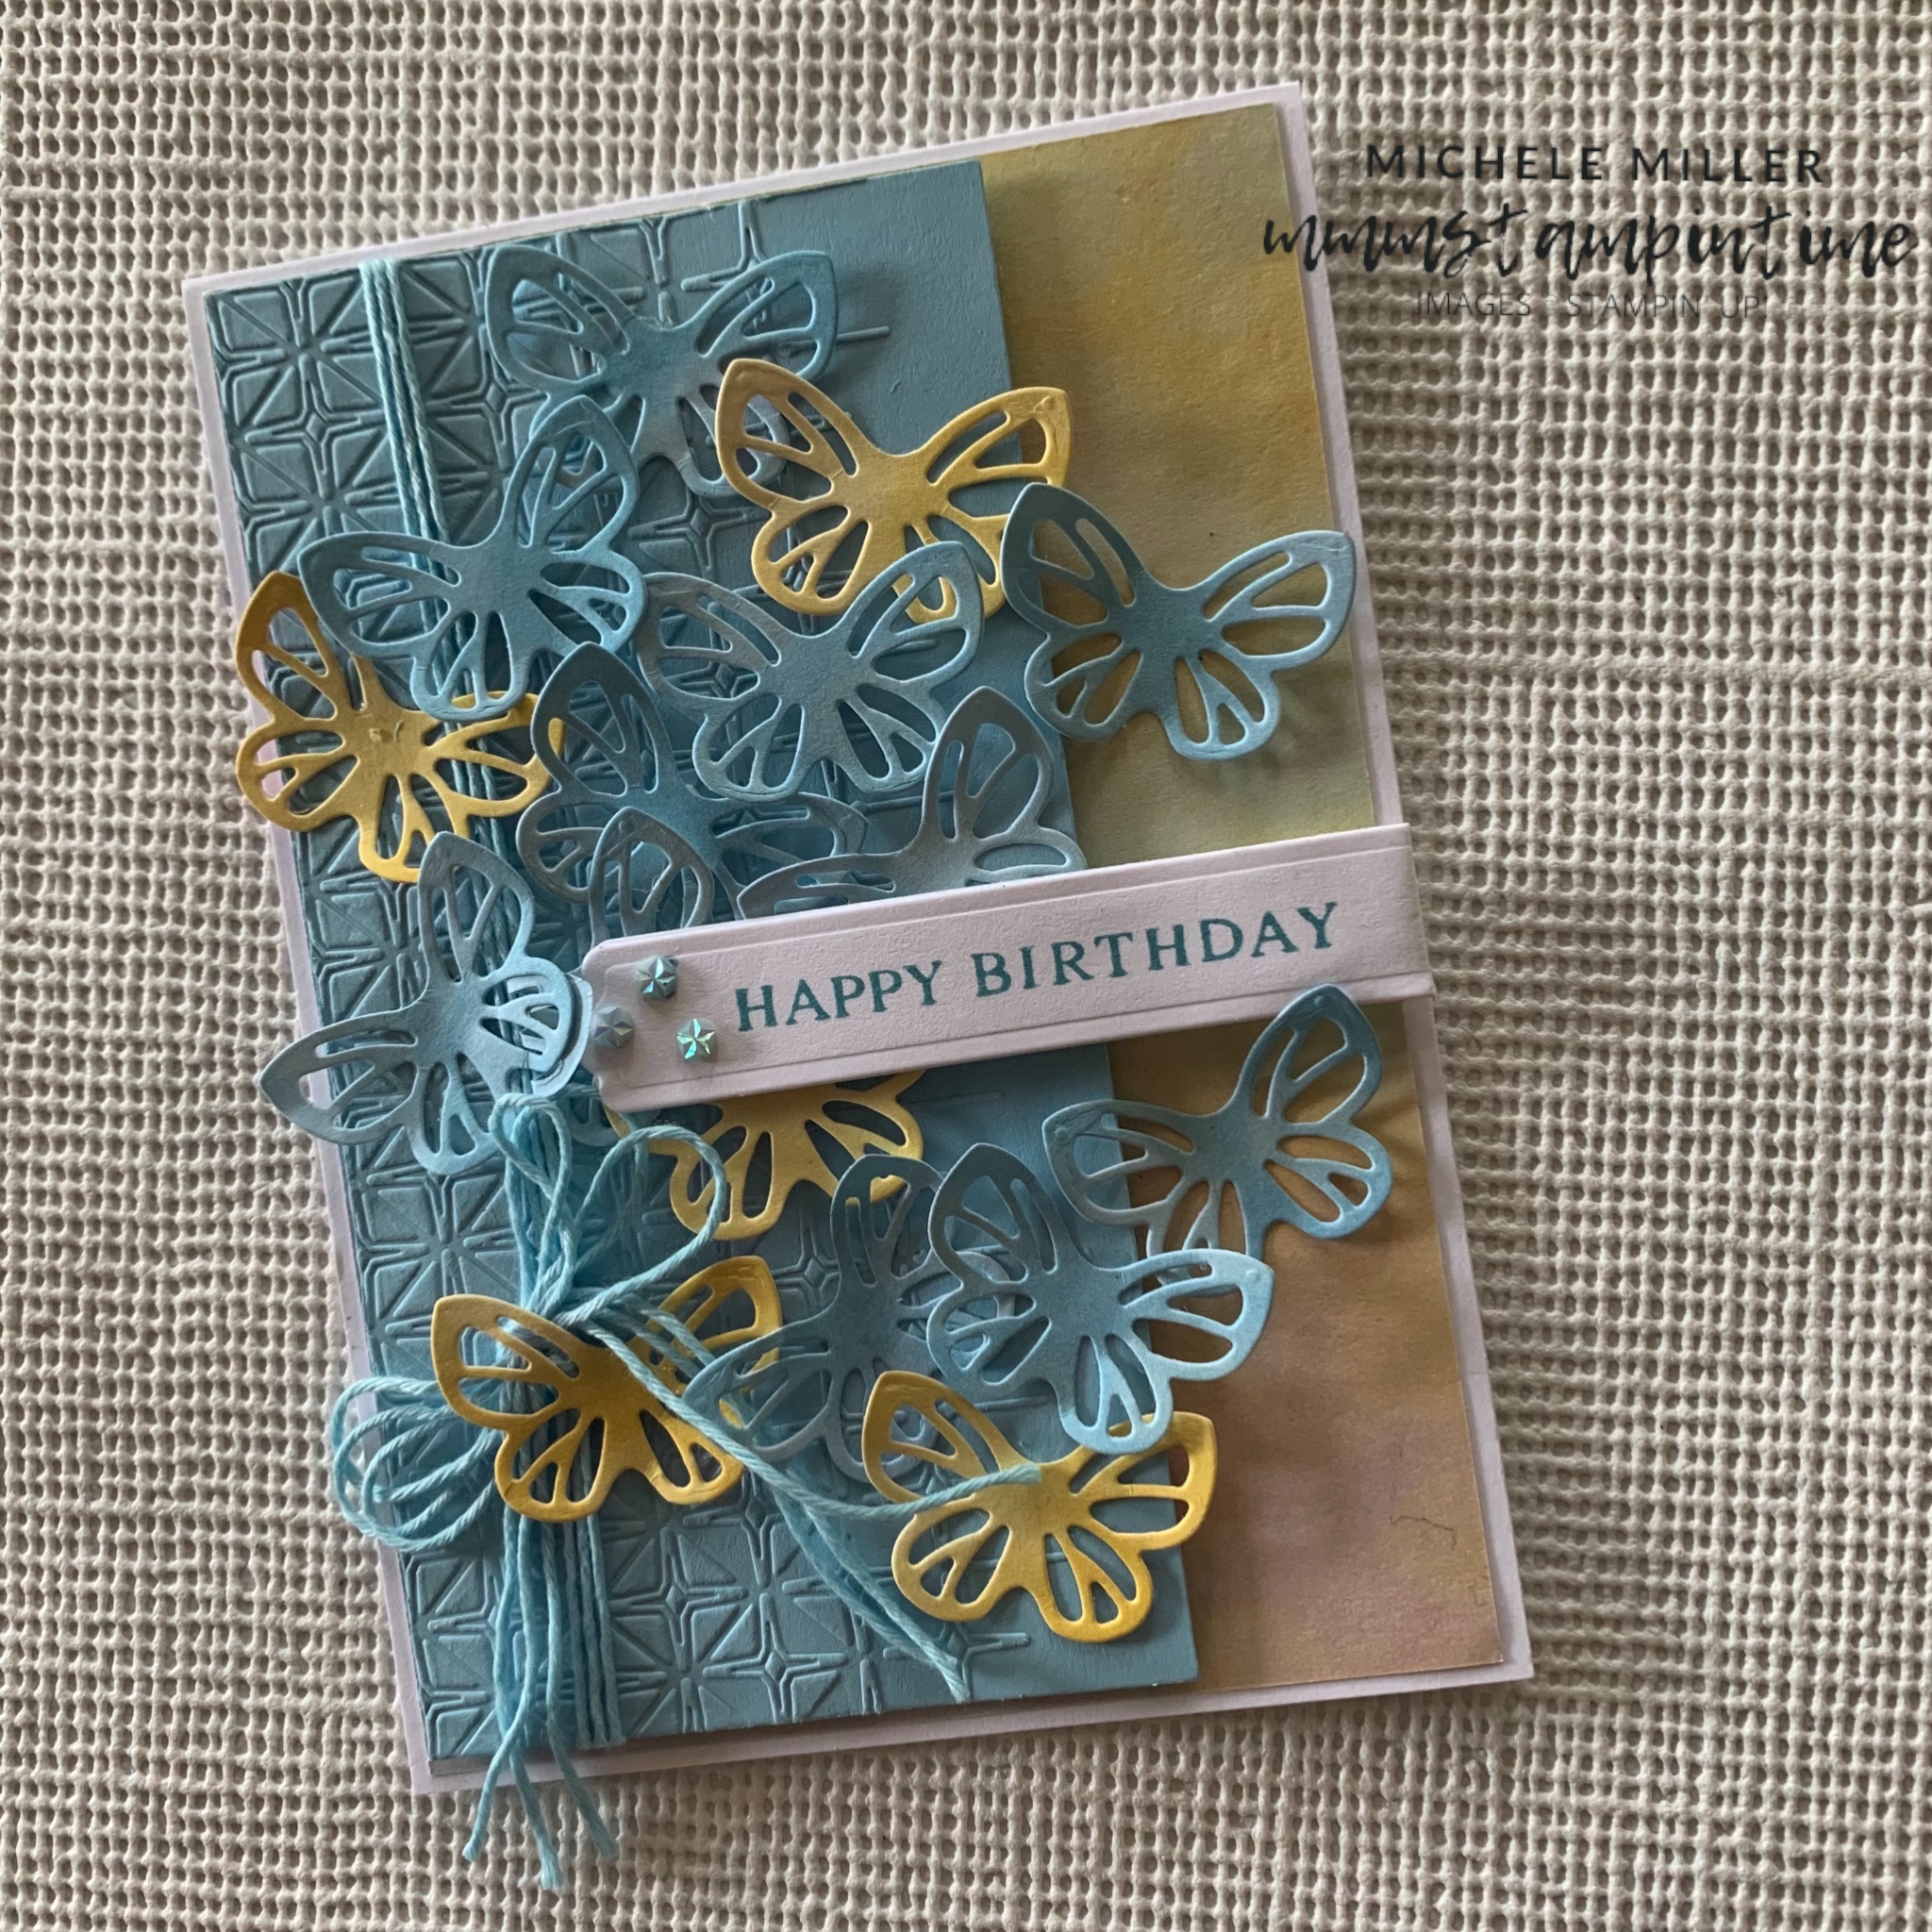
Today’s project is another butterfly and bokeh DSP inspired birthday card.

After preparing the Basic White card base, I cut a panel of the yellow-blue bokeh DSP and adhered to the vase.
Then I took a panel of Balmy Blue card and embossed it using one of the Glass & Gardens Embossing Folders – the embossing folder is the one on the left that looks like engraved glass.

After this panel was embossed, I wrapped a length of Balmy Blue Baker’s Twine from the Baker’s Twine Three Colour Pack. I added two more shorter lengths of the twine and then tied in a triple bow. The panel was lifted up using Stampin’ Dimensionals.
Then I used the two small detailed butterfly dies to cut many Baly Blue and Daffodil Delight bokeh butterflies.
I added them to the card front using Multipurpose Glue and Mini Dimensionals.

The greeting was stamped onto a piece of Basic White card and cut using one of the dies from the Beautiful Butterflies Dies.
I cut two more of these shapes and glued them behind the stamped panel to add some stability to the sentiment. Dimensionals were then placed behind sentiment panel and positioned on the card front.
A strip of the blue/yellow bokeh DSP was placed on the card insert. I
An extra die cut butterfly was added to the back of the envelope.
Finally, I coloured some of the Iridecent Faceted Gems using the dark Balmy Blue Stampin’ Blends pen.

Tomorrow I have a 3D butterfly gift box to share with you.
Until then, happy stamping and scrapbooking.

If you live in Australia, you can order any of the products I used to make this card by going to my online store. Just click on any of the images below.

![Beautiful Butterflies Bundle (English) [ 164615 ]](https://i0.wp.com/assets1.tamsnetwork.com/images/EC042017NF/164615s.jpg?w=140&ssl=1 "Beautiful Butterflies Bundle (English) [ 164615 ]") | ![Glass & Gardens Embossing Folders [ 165597 ]](https://i0.wp.com/assets1.tamsnetwork.com/images/EC042017NF/165597s.jpg?w=140&ssl=1 "Glass & Gardens Embossing Folders [ 165597 ]") | ![Baker's Twine Three Color Pack [ 162759 ]](https://i0.wp.com/assets1.tamsnetwork.com/images/EC042017NF/162759s.jpg?w=140&ssl=1 "Baker's Twine Three Color Pack [ 162759 ]") | ||
![Iridescent Faceted Gems [ 163368 ]](https://i0.wp.com/assets1.tamsnetwork.com/images/EC042017NF/163368s.jpg?w=140&ssl=1 "Iridescent Faceted Gems [ 163368 ]") | ![Balmy Blue A4 Cardstock [ 147007 ]](https://i0.wp.com/assets1.tamsnetwork.com/images/EC042017NF/147007s.jpg?w=140&ssl=1 "Balmy Blue A4 Cardstock [ 147007 ]") | ![Basic White A4 Thick Cardstock [ 159230 ]](https://i0.wp.com/assets1.tamsnetwork.com/images/EC042017NF/159230s.jpg?w=140&ssl=1 "Basic White A4 Thick Cardstock [ 159230 ]") | ![Balmy Blue Classic Stampin' Pad [ 147105 ]](https://i0.wp.com/assets1.tamsnetwork.com/images/EC042017NF/147105s.jpg?w=140&ssl=1 "Balmy Blue Classic Stampin' Pad [ 147105 ]") | |
![Multipurpose Liquid Glue [ 110755 ]](https://i0.wp.com/assets1.tamsnetwork.com/images/EC042017NF/110755s.jpg?w=140&ssl=1 "Multipurpose Liquid Glue [ 110755 ]") | ![Mini Stampin' Dimensionals [ 144108 ]](https://i0.wp.com/assets1.tamsnetwork.com/images/EC042017NF/144108s.jpg?w=140&ssl=1 "Mini Stampin' Dimensionals [ 144108 ]") | ![Mini Glue Dots [ 103683 ]](https://i0.wp.com/assets1.tamsnetwork.com/images/EC042017NF/103683s.jpg?w=140&ssl=1 "Mini Glue Dots [ 103683 ]") | ![Paper Trimmer [ 152392 ]](https://i0.wp.com/assets1.tamsnetwork.com/images/EC042017NF/152392s.jpg?w=140&ssl=1 "Paper Trimmer [ 152392 ]") | ![Mini Stampin' Cut & Emboss Machine [ 150673 ]](https://i0.wp.com/assets1.tamsnetwork.com/images/EC042017NF/150673s.jpg?w=140&ssl=1 "Mini Stampin' Cut & Emboss Machine [ 150673 ]") |
![Basic White C6 Envelopes [ 159235 ]](https://i0.wp.com/assets1.tamsnetwork.com/images/EC042017NF/159235s.jpg?w=140&ssl=1 "Basic White C6 Envelopes [ 159235 ]") |
![Beautiful Butterflies Photopolymer Stamp Set (English) [ 164608 ]](https://i0.wp.com/assets1.tamsnetwork.com/images/EC042017NF/164608s.jpg?w=140&ssl=1 "Beautiful Butterflies Photopolymer Stamp Set (English) [ 164608 ]")
![Beautiful Bokeh 6" X 6" (15.2 X 15.2 Cm) Designer Series Paper [ 164607 ]](https://i0.wp.com/assets1.tamsnetwork.com/images/EC042017NF/164607s.jpg?w=140&ssl=1 "Beautiful Bokeh 6\" X 6\" (15.2 X 15.2 Cm) Designer Series Paper [ 164607 ]")
![Balmy Blue Stampin' Blends Combo Pack [ 154830 ]](https://i0.wp.com/assets1.tamsnetwork.com/images/EC042017NF/154830s.jpg?w=140&ssl=1 "Balmy Blue Stampin' Blends Combo Pack [ 154830 ]")



![Stylish Shapes Dies [ 159183 ]](https://i0.wp.com/assets1.tamsnetwork.com/images/EC042017NF/159183s.jpg?w=140&ssl=1 "Stylish Shapes Dies [ 159183 ]")
![Mini Alphabet Dies [ 162934 ]](https://i0.wp.com/assets1.tamsnetwork.com/images/EC042017NF/162934s.jpg?w=140&ssl=1 "Mini Alphabet Dies [ 162934 ]")
![Stampin' Dimensionals [ 104430 ]](https://i0.wp.com/assets1.tamsnetwork.com/images/EC042017NF/104430s.jpg?w=140&ssl=1 "Stampin' Dimensionals [ 104430 ]")
![Bone Folder [ 102300 ]](https://i0.wp.com/assets1.tamsnetwork.com/images/EC042017NF/102300s.jpg?w=140&ssl=1 "Bone Folder [ 102300 ]")
![Paper Snips [ 103579 ]](https://i0.wp.com/assets1.tamsnetwork.com/images/EC042017NF/103579s.jpg?w=140&ssl=1 "Paper Snips [ 103579 ]")



![Country Flowers Dies [ 163410 ]](https://i0.wp.com/assets1.tamsnetwork.com/images/EC042017NF/163410s.jpg?w=140&ssl=1 "Country Flowers Dies [ 163410 ]")
![Basic White A4 Cardstock [ 166781 ]](https://i0.wp.com/assets1.tamsnetwork.com/images/EC042017NF/166781s.jpg?w=140&ssl=1 "Basic White A4 Cardstock [ 166781 ]")
![Card Stock A4 Crushed Curry [ 131288 ]](https://i0.wp.com/assets1.tamsnetwork.com/images/EC042017NF/131288s.jpg?w=140&ssl=1 "Card Stock A4 Crushed Curry [ 131288 ]")
![Stampin' Seal+ [ 149699 ]](https://i0.wp.com/assets1.tamsnetwork.com/images/EC042017NF/149699s.jpg?w=140&ssl=1 "Stampin' Seal+ [ 149699 ]")




