Posted on Leave a comment

TODAY IS TUESDAY & IT’S TIME FOR SOME TIPS AND TECHNIQUES

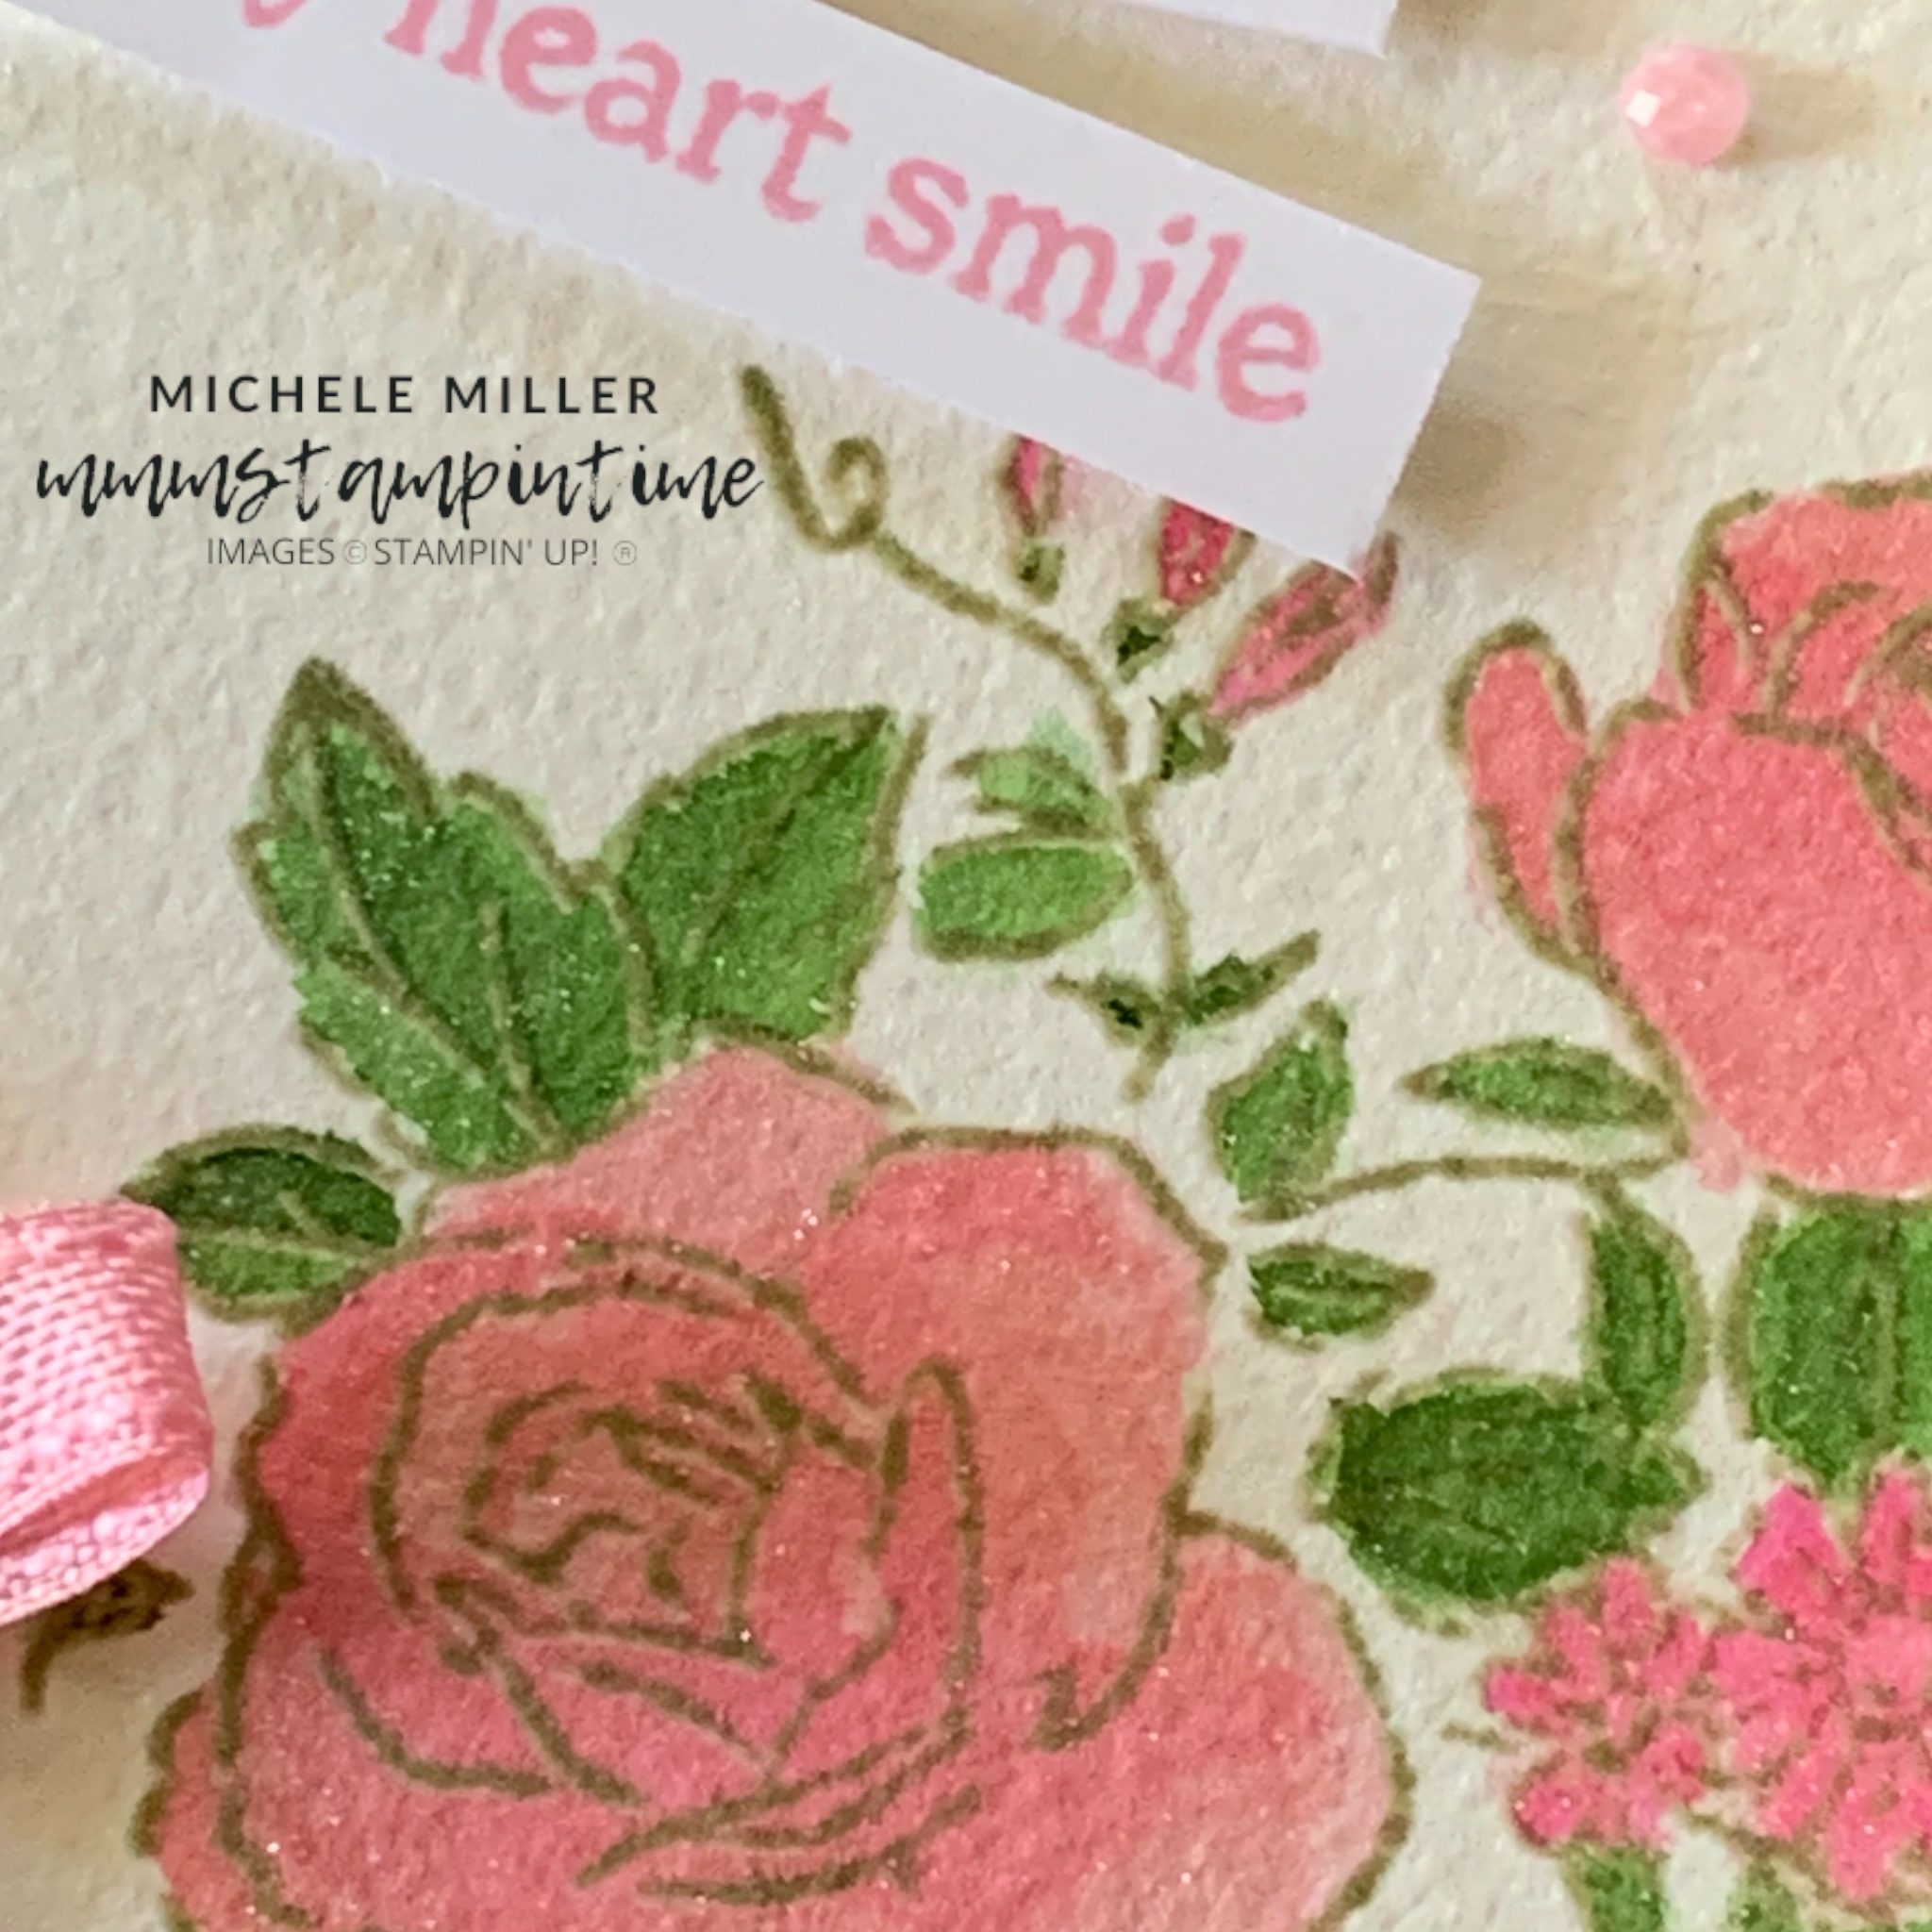
Today I want to share a ‘no line’ water colouring technique.

I am using the new Basic Beige Classic Stampin’ Pad to stamp the floral image, from the Layers of Beauty Stamp Set, onto a piece of Fluid 100 Watercolour Paper.

The Basic Beige was a little darker than I thought it would be – perhaps it would have been better on a piece of Basic Beige cardstock.

I used Pretty in Pink and Melon Mambo ink to water colour the flowers. The Water Painters are great colouring tools. The leaves are coloured using Garden Green.

After I finished water colouring the image, and letting it dry, I used Clear Wink of Stella to add some gorgeous shimmer.

I masked the greeting so that I could stamp the words in two seperate sections. After trimming down the greeitng, I attached it to the frot of the card with strips of Stampin’ Dimensionals.

A length of Pretty in Pink bordered Ribbon was tied into a bow and adhered to the card using a Mini Glue Dot.

I stamped three very small flowers on the card insert and on the back of the envelope.

Finally, I added three of the Pretty in Pink gems from the 2024-2025 In Colour Shimmer Gems pack.

Tomorrow I have a beautiful anniversary card to share with you.

Until then, happy stamping.

If you live in Australia, you can order any of the products I used to make this card by going to my online store. As you read through this post, you will see the products I used for this project. THe new items are available from May 1st.

Posted on Leave a comment

IT’S MONDAY & THAT MEANS IT IS TIME TO HIGHLIGHT SOME NEW STAMIN’ UP! PRODUCTS

This week I want to showcase one of the soon to be released new Stamp’ Up! products – Layers of Beauty Bundle and Decorative Masks.

There are five masks in the Decorative Masks bundle.

For my first card I chose Blackberry Bliss, Gorgeous Grape and Highland Heather for the flowers and Garden Green and Shaded Spruce for the leaves.

After using my Blending Brushes to colour the flowers and leaves, I cut the Basic White layer with the largest of the Rectangle Deckled Dies.

I added this panel to a Gorgeous Grape card base and Shaded Spruce layer.

The greeting was stamped with Versamark and then heat embossed with White Embossing Powder.

I coloured a length of Silver & White Sheer Ribbon with the Dark Shaded Spruce Stampin’ Blend. After cutting the narrow edge from the ribbon, I frayed the remaining length and adhered it to the embossed panel. Then I used Stampin’ Dimensionals to pop the greeting layer up from the card front.

The narrow ribbon edge was then tied into a bow and attached with a Mini Glue Dot.

I stamped a small flower image on the cardinsert and envelope.

Finally, I added some Glossy Dots to the card front.

Tomorrow I have a water coloured floral image to share.

Until then, happy stamping.

If you live in Australia, you can order any of the products I used to make this card by going to my online store.

fi

Posted on Leave a comment

IT’S FRIDAY & TIME FOR SOME FEATURES AND A FUN FOLD CARD

This week I have been showcasing the Beach Day Bundle.

The Photopolymer Stamp Set has 14 stamps – 4 different greetings and 10 awesome beach inspired images.

The greetings combine two different fonts and the images are outlined and perfect for colouring.

To coordinate with the stamps, there are 21 dies in the bundle.

Today’s card is a fun fold card that I made using a piece of 12″x 6″ that was scored at 4″ and 8″.

I also used the Bright & Beautiful 6″x 6″ DSP this week. Several of the designs were perfect for sky and ocean backgrounds.

I am so pleased with the extended beach scene I was able to create.

After cutting, scoring and folding the card base, I began creating each of the beach scenes throughout the card.

For the front I placed a panel of the DSP for the sky and then added the die cut beach element. I used my Dark Pecan Pie Blender Pen to create the sandy flecks across the beach.

I cut the wave piece using one of the Beach Day Dies and adhered it between the beach and the sky.

The next step was to add the palm tree and then the life guard’s hut. The hut was coloured in the same day as the hut from Monday.

After stamping and trimming the greeting, I tucked a loop of Lemon Lolly Sheer Ribbon, from the Combo Pack, behind the greeting. The greeting was popped up on the card front using Stampin’ Dimensionals.

Then I stamped and die cut some seagulls to add to the card.

When the card is fully opened there are three 4″ wide panels. I added two DSP panels and a Basic White panel to the card.

Then I added a 12″ wide panel of Crumb Cake card that had been die cut using the wavy die to create a beach waterline. This panel was scored at 4″, 6″, 8″ and 10″. The waves were added to the two outer panels.

I added palm trees, umbrellas, beach chairs, sandcastles, shells, a beachball, surfboards and shells to the beach panel.

To the skyline I added clouds, from the Hot Air Balloon Dies, and a few seagulls.

I am so happy with the beach scenes I created for this card.

I’m just deciding whether I need to go back and add another wave to the centre panel. What do you think? Should I?

So many fun products to play with!

Tomorrow I will have a challenge project to share with you.

Until then, happy stamping.

If you live in Australia, you can order any of the products I used to make this card by going to my online store. Just click on any of the images below.

Product List
Paper Snips
[103579]
$19.25