Posted on Leave a comment

THURSDAY MEANS THAT IT IS TIME FOR A 3D PROJECT

Today I have two projects to share with you. They both use a masking and blending colouring technique … one is a card and the second is a 3D project.

For these projects I wanted to use Masking Paper to create two sunset scenes by adding colour with my Blending Brushes.

When I started to colour these backgrounds, I punched a circle from a piece of Masking Paper. After positioning the masking paper on the Basic White panel, with a piece of grid paper as a guide, I began to add Daffodil Delight ink to colour the setting sun.

TIP: After you add ink to your Blending Brush, start using a circular brushing technique OFF the card stock. This way you will avoid adding a big splotch of colour . Continue using the circular brusging technique and slowly move the brush across the card, building up colour as you go.

I used other layers of Masking Paper to create the rest of my card background.

The Classic Stampin’ Pads that I used to colour the sunset image were (alphabetically) – Cajun Craze, Cherry Cobbler, Crushed Curry, Daffodil Delight, Gorgeous Grape, Pumpkin Pie and Real Red

After I finished blending the sunset background I die cut the ‘shadow’ elements using Basic Black cardstock.

The beach element was created using the wavy die. Then the life savers’ hut was cut from Basic Black card also.

Finally, I die cut the seagulls and palm tree elements in black card as well.

These pieces were then adhered to the front of the card using Multipurpose Adhesive and Stampin’ Dimensionals.

The 3D project I made for todayalso used a sunset brushed scene.

I found a white chocolate and orange sphere that is wrapped in an orange and yellow foil – it looks just like a gorgeous sun.

The gift box I made, for this chocolate, is a perfect fit.

The gift box is made from 12″x 12″ Pumpkin Pie cardstock. After cutting and scoring the box, I used one of the Deckled Circles Dies to cut out two ‘peepholes’.

For the top and the back of the box, I cut some pieces of Gorgeous Grape card and added texture with the circles Cheery Patterns Embossing Folder.

After adhering them in place, I stamped the greeting onto Basic White card and cut it with a smaller Deckled Circles Die. I added a die cut Pumpkin Pie circle under the greeting. Before adding this layered circles to the top of the box, I took some of the blended sunset scraps and created two banner cut strips.

I am so happy with the way my blended sunset scenes turned out.

Tomorrow I have a Fun Fold Card to share with you.

Until then, happy stamping.

If you live in Australia, you can order any of the products I used to make this card by going to my online store. Just click on any of the images below.

Product List
Paper Snips
[103579]
$19.25
Paper Snips
[103579]
$19.25
Posted on Leave a comment

THURSDAY MEANS THAT IT’S TIME FOR A 3D PROJECT

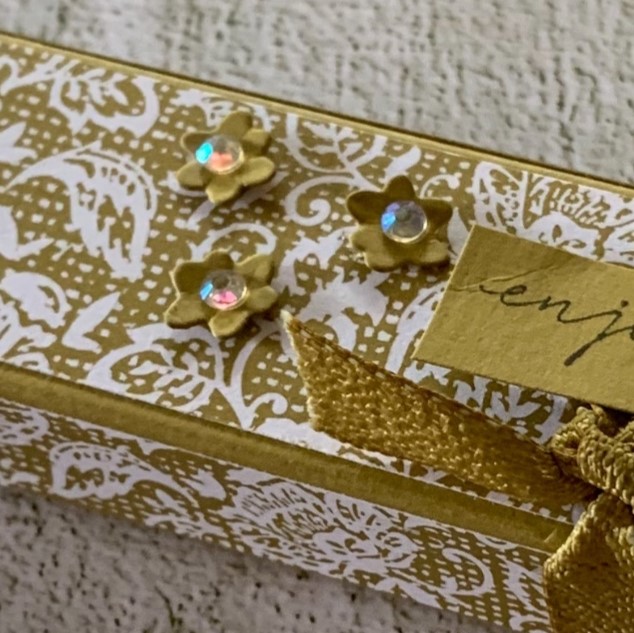
I recently found a bag of Reece Peanut Butter Cups Miniatures Milk Chocolate – I tried one and they are soooo yummy. Fortunately, I stopped at one to ensure I had enough for this matchbox style gift box.

The gift box fits 5 Reece Cups.

I thought that the Wild Wheat cardstock and DSP is quite close to a matte gold look.

The box measures 6 1/4″ x 1 3/8″ x 3/4″ and the outer casing is ever so slightly larger.

I cut the DSP so that it wraps in a continual pattern around the box.

I wrapped a length of Wild Wheat Textured Ribbon around the box and tied a knot. Then I trimmed the ends of the ribbon.

The greeting was stamped in Wild Wheat, on Wild Wheat card and trimmed down. I popped Stampin’ Dimensionals behind the greeting and added it to the top of the box.

Finally, I added some die cut small Wild Wheat flowers and Iridescent Rhinestones Basic Jewels for some extra embellsihment.

I popped a Mini Glue Dot under each of the Reece Cups to secure them in place.

This piece of DSP is really very lovely.

Tomorrow I will share my fifth and final card for the week.

Until then, happy stamping.

If you live in Australia, you can order any of the products I used to make this card by going to my online store. Just click on any of the images below.

Product List
Paper Snips
[103579]
$19.25
Posted on Leave a comment

THURSDAY MEANS THAT IT IS TIME FOR A 3D PROJECT

Today’s 3D project is not a gift box but a shadow box decor piece.

When I chose the Jungle Pals Stamp Set and Jungle Pals Dies, from the Sale-a-bration Brochure, I knew exactly what I wanted to make with it.

To earn these products, I needed a qualifying $270 order (before shipping). This bundle is well worth the order!

This is such a cute collection of jungle animals – lemur, toucan, sloth, alligator and tiger.

There are 15 dies in this set. Five of them coordinate with the Jungle Pals and the remaining dies provide elements to create their world.

I used an Ikea shadow box frame to create this decor piece.

(Oops – I am still working on photography skills – and how to reduce reflection in my images).

I stamped each of the animals before enjoying the time I spent colouring them with Stampin’ Blends.

Using the tree, leaves and vine dies, I cut so many pieces across a range of colours. I was able to create each panel of this decor item from these die cuts.

I used Copper Clay, Garden Green and Old Olive.

I used the new Mini Alphabet Dies, with Adhesive Sheet attached to the back of some Copper Clay cardstock, to cut out the decor title.

Each of the decor panels were adhered to a piece of paper from the Trusty Toolbox 12″ x 12″ Designer Series PAper.

I used so many Stampin’ Blends in this project and the end result is fantastic.

What do you think?

Tomorrow I have one more Sale-a-bration project to share with you.

Until then, happy stamping.

If you live in Australia, you can order any of the products I used to make this card by going to my online store. Just click on any of the images below.

Product List
Paper Snips
[103579]
$19.25